AUDIO AMPLIFIER REMOVAL/INSTALLATION
id092000801100
1. Disconnect the negative battery cable.
2. Remove the following parts:
- (1) Trunk box (See TRUNK BOX REMOVAL/INSTALLATION.)
- (2) Seat side box (RH) (See SEAT SIDE BOX REMOVAL/INSTALLATION.)
- (3) Trunk end trim (See TRUNK END TRIM REMOVAL/INSTALLATION.)
- (4) Third-row seat (RH) (See THIRD-ROW SEAT REMOVAL/INSTALLATION.)
- (5) Rear scuff plate inner (RH) (See REAR SCUFF PLATE REMOVAL/INSTALLATION.)
- (6) Third-row seat belt lower anchor installation bolt (RH) (See THIRD-ROW SEAT BELT REMOVAL/INSTALLATION.)
- (7) Trunk side trim (RH) (See TRUNK SIDE TRIM REMOVAL/INSTALLATION.)
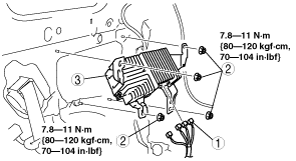
3. Remove in the order indicated in the table.
|
1
|
Connector
|
|
2
|
Nut
|
|
3
|
Audio amplifier
|
4. Install in the reverse order of removal.
5. Perform the audio amplifier configuration after replacing the audio amplifier. (See AUDIO AMPLIFIER CONFIGURATION.)
-
Caution
-
• Perform the audio amplifier configuration after replacing the audio amplifier to assure that the audio system operates correctly.