 |
BRAKE FLUID AIR BLEEDING
id041100700300
Oil and Chemical Type
|
Brake fluid type
Type: Mazda Genuine Brake Fluid or equivalent
|
|
Brake fluid type |
|---|
|
Mazda Genuine Brake Fluid or equivalent
|
1. Disconnect the negative lead-acid battery terminal. (See NEGATIVE LEAD-ACID BATTERY TERMINAL DISCONNECTION/CONNECTION.)
2. Remove the wheel and tire. (See WHEEL AND TIRE REMOVAL/INSTALLATION.)
3. Remove the cap from the brake fluid reserved tank and add brake fluid.
4. Perform air bleeding in the following order. (See Brake Fluid Air Bleeding Note.)
5. Connect the negative lead-acid battery terminal. (See NEGATIVE LEAD-ACID BATTERY TERMINAL DISCONNECTION/CONNECTION.)
6. After air bleeding, inspect the following:
Brake Fluid Air Bleeding Note
1. Remove the bleeder cap on the brake caliper, and attach a vinyl tube to the bleeder screw.
2. Place the other end of the vinyl tube in a clear container and fill the container with fluid during air bleeding.
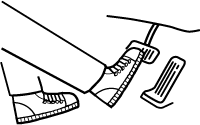
3. Working with two people, one should pump the brake pedal strongly and quickly several times, and then depress and hold the pedal down.
ac4ccw00001649
|
4. While one technician depresses the brake pedal and another technician loosens the bleeder screw using a box-end wrench, drain any fluid containing air bubbles, and then retighten the bleeder screw.
a30zzw00005738
|
5. Repeat Steps 3 and 4 until no air bubbles are seen.
6. Perform air bleeding as described in the above procedures for all brake calipers.