 |
ac30zw00003459
REAR BRAKE CALIPER REMOVAL/INSTALLATION
id041100701800
Replacement Part
|
Gasket
Quantity: 2
Location of use: Rear brake hose
|
Dust boot
Quantity: 2
Location of use: Rear brake caliper
|
Oil and Chemical Type
|
Brake fluid type
Type: Mazda Genuine Brake Fluid or equivalent
|
1. Switch to the maintenance mode. (See MAINTENANCE MODE.)
2. Disconnect the negative battery terminal. (See NEGATIVE BATTERY TERMINAL DISCONNECTION/CONNECTION.)
3. Remove the wheel and tire. (See WHEEL AND TIRE REMOVAL/INSTALLATION.)
4. Disconnect the electric parking brake motor gear unit connector. (See ELECTRIC PARKING BRAKE MOTOR GEAR UNIT REMOVAL/INSTALLATION.)
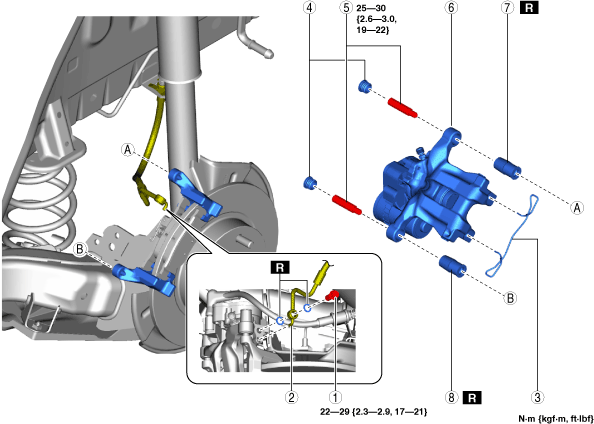
5. Remove in the order indicated in the table.
6. Install in the reverse order of removal.
7. Connect the electric parking brake motor gear unit connector. (See ELECTRIC PARKING BRAKE MOTOR GEAR UNIT REMOVAL/INSTALLATION.)
8. After installation, add brake fluid, bleed the air, and inspect for fluid leakage. (See BRAKE FLUID AIR BLEEDING.)
9. Connect the negative battery terminal. (See NEGATIVE BATTERY TERMINAL DISCONNECTION/CONNECTION.)
10. End the maintenance mode. (See MAINTENANCE MODE.)
ac30zw00003459
|
|
1
|
Bolt
|
|
2
|
Brake hose
(See Brake Hose Removal Note.)
|
|
3
|
Retaining clip
|
|
4
|
Cap
|
|
5
|
Bolt
|
|
6
|
Rear brake caliper
|
|
7
|
Dust boot A
|
|
8
|
Dust boot B
|
Brake Hose Removal Note
1. After disconnecting the brake hose, plug the brake hose installation hole.
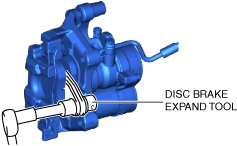
Rear Brake Caliper Installation Note
1. Completely press in the piston using a commercially available disc brake expander tool.
a30zzw00004279
|
2. Install the caliper.
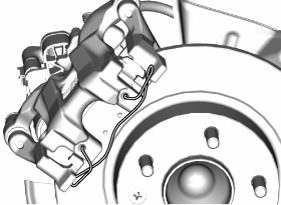
Retaining Clip Installation Note
1. Temporarily install the retaining clip to the rear brake caliper and rear brake mounting support as shown in the figure.
am3zzw00025037
|
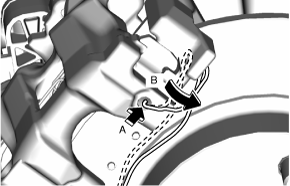
2. While holding retaining clip A so that it does not detach from the rear brake caliper, install retaining clip B to the rear brake mounting support.
am3zzw00025038
|
3. Verify that the retaining clip is installed to the rear brake caliper and rear brake mounting support securely.