 |
a30zzw00006203
A/C UNIT DISASSEMBLY/ASSEMBLY
id071100702500
Replacement Part
|
O-ring (expansion valve)
Quantity: 2
Location of use: expansion valve
|
Oil and chemical type
|
Refrigerant
HFC-134a(R-134a)
|
Engine coolant
Type: Recommended engine coolant
|
Compressor oil
FD46XG
|
1. Disconnect the negative battery terminal and wait for 1 min or more. (See NEGATIVE BATTERY TERMINAL DISCONNECTION/CONNECTION.)
2. Collect the refrigerant. (See REFRIGERANT RECOVERY.)
3. Drain the engine coolant. (See ENGINE COOLANT REPLACEMENT [SKYACTIV-G 2.0].)
4. Remove the A/C unit short-cord. (See A/C UNIT SHORT-CORD REMOVAL/INSTALLATION.)
5. Remove the A/C unit. (See A/C UNIT REMOVAL/INSTALLATION.)
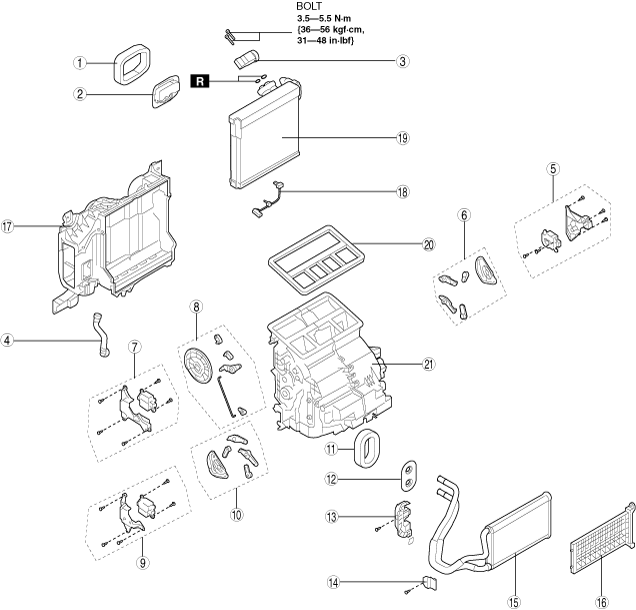
6. Disassemble in the order shown in the figure.
7. Assemble in the reverse order of disassembly.
8. Add engine coolant. (See ENGINE COOLANT REPLACEMENT [SKYACTIV-G 2.0].)
9. Inspect for engine coolant leakage. (See ENGINE COOLANT LEAKAGE INSPECTION [SKYACTIV-G 2.0].)
10. Charge the refrigerant. (See REFRIGERANT CHARGING.)
11. Perform the air-conditioning system performance test. (See REFRIGERANT SYSTEM PERFORMANCE TEST.)
a30zzw00006203
|
|
Step |
Part name |
Disassembly/assembly of main parts |
||
|---|---|---|---|---|
|
HEATER CORE |
Evaporator temperature sensor |
Evaporator |
||
|
1
|
Polyurethane foam
|
-
|
X
|
X
|
|
2
|
Rubber
|
-
|
X
|
X
|
|
3
|
Expansion valve
|
-
|
-
|
X
|
|
4
|
Drain hose
|
-
|
-
|
-
|
|
5
|
Driver-side air mix actuator (full-auto air conditioner)
|
-
|
-
|
-
|
|
6
|
Driver-side air mix link (full-auto air conditioner)
|
-
|
-
|
-
|
|
7
|
Airflow mode actuator
|
-
|
-
|
-
|
|
8
|
Mode link set
|
-
|
-
|
-
|
|
9
|
Passenger-side air mix actuator
|
-
|
-
|
-
|
|
10
|
Passenger-side air mix link
|
-
|
-
|
-
|
|
11
|
Polyurethane foam
|
X
|
X
|
X
|
|
12
|
Rubber
|
X
|
X
|
X
|
|
13
|
Plate (1)
|
X
|
X
|
X
|
|
14
|
Plate (2)
|
X
|
X
|
X
|
|
15
|
HEATER CORE
|
X
|
X
|
X
|
|
16
|
CASE
|
-
|
-
|
-
|
|
17
|
A/C case (1)
|
-
|
X
|
X
|
|
18
|
Evaporator temperature sensor (See Evaporator Temperature Sensor Assembly Note.)
|
-
|
X
|
X
|
|
19
|
Evaporator
|
-
|
-
|
X
|
|
20
|
ADHESIVE POLYURETHANE
|
-
|
-
|
-
|
|
21
|
A/C case (2)
|
-
|
-
|
-
|
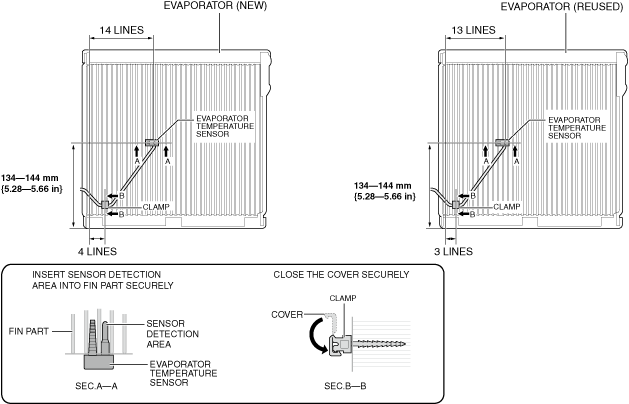
Evaporator Temperature Sensor Assembly Note
1. Assemble the evaporator temperature sensor at the position shown in the figure.
a30zzw00006204
|
Evaporator temperature sensor assembly note
1. When replacing the evaporator, add compressor oil to the refrigeration cycle.
Compressor oil
|
Category |
Supplemental amount (reference) |
|---|---|
|
FD46XG
|
45 ml {45 cc, 1.5 US fl oz}
|