REFRIGERANT LINE REMOVAL/INSTALLATION
id071100705100
Replacement Part
|
O-ring (cooler hose (HI))
Quantity: 2
Location of use: Cooler hose (HI)
|
O-ring (cooler hose (LO))
Quantity: 2
Location of use: Cooler hose (LO)
|
O-ring (cooler pipe)
Quantity: 2
Location of use: Cooler pipe
|
Oil and chemical type
|
Refrigerant
Type: HFC-134a (R-134a)
|
Compressor oil
Type: FD46XG
|
-
Caution
-
• If moisture or foreign matter enters the refrigeration cycle, cooling ability will be lowered and abnormal noise or other malfunction could occur. After removing the refrigeration system parts, plug the opening immediately.
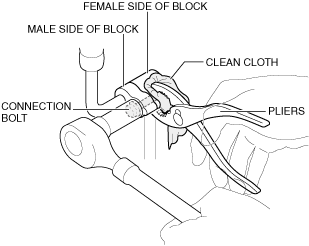
• If you directly pinch and fix the block with pliers it may be damaged. When fixing the block with pliers wrap a clean cloth around the block when working.
• When removing the connection bolts between the block joints, fix the female side block with pliers and remove the connection bolts.
1. Discharge the refrigerant. (See REFRIGERANT RECOVERY.) (See REFRIGERANT CHARGING
2. Remove the plug hole plate (See PLUG HOLE PLATE REMOVAL/INSTALLATION [SKYACTIV-G 2.0].)
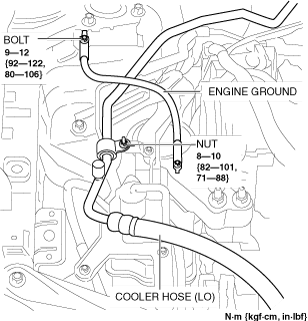
3. If the cooler hose (LO) or the cooler pipe is to be removed, perform the following procedure.
- (1) Remove the bolt.
-
- (2) Disconnect the ground.
-
- (3) Remove the nut.
-
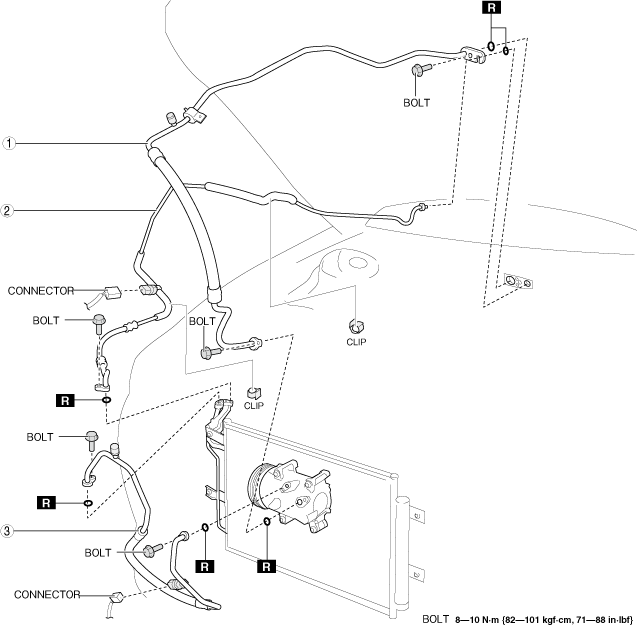
4. Remove according to the procedure shown in the figure being careful not to allow compressor oil to spill.
5. Install in the reverse order of removal.
6. After replacing the refrigerant line, add compressor oil to the refrigeration cycle.
Compressor oil
|
Replaced refrigerant line
|
Category
|
Supplemental oil amount (approx. quantity)
|
|
Cooler Hose (HI)
|
FD46XG
|
2 ml {2 cc, 0.07 US fl oz}
|
|
Cooler Hose (LO)
|
FD46XG
|
3 ml {3 cc, 0.1 US fl oz}
|
|
Cooler Pipe
|
FD46XG
|
1 ml {1 cc, 0.03 US fl oz}
|
7. Charge the refrigerant. (See REFRIGERANT CHARGING.)
8. Perform the air-conditioning system performance test. (See REFRIGERANT SYSTEM PERFORMANCE TEST.)
|
1
|
Cooler Hose (LO)
|
|
2
|
Cooler Pipe
|
|
3
|
Cooler Hose (HI)
|
Refrigerant line removal note
1. Apply compressor oil to the O-ring at the connection.
2. Perform initial tightening of bolts fully by hand.