HEADLIGHT AUTO LEVELING SYSTEM INITIALIZATION
id091800702400
-
Note
-
• The auto leveling control module/adaptive LED headlight control module stores the vehicle attitude angle by performing the headlight auto leveling system initial setting.
• Perform headlight auto leveling system initial setting if any of the following services is performed.
-
― Auto leveling control module/adaptive LED headlight control module replacement
― Any servicing which changes the vehicle attitude angle is performed, such as suspension replacement, removal, or installation
• Two different procedures are available for the headlight auto leveling system initial setting; one which uses the M-MDS, and one which does not.
Procedure Using M-MDS
1. Empty the vehicle except for the jack and vehicle tools.
2. Inspect the wheel alignment. (See WHEEL ALIGNMENT PRE-INSPECTION.) (See FRONT WHEEL ALIGNMENT.) (See REAR WHEEL ALIGNMENT.)
3. Adjust the tire pressure to the standard. (See WHEEL AND TIRE SPECIFICATION.)
4. Move the vehicle to level ground.
5. Connect the M-MDS to the DLC-2.
6. Switch the ignition ON (engine off or on).
7. Activate the M-MDS and perform the following procedure.
- (1) Press [Start] to start the vehicle identification.
-
- (2) Press the [Toolbox] tab.
-
- (3) Press the [Work Support] icon.
-
- (4) Press [LIGHTING SYSTEMS].
-
- (5) Press [Run] for [Calibrating Headlight Leveling Sensor].
-
- (6) Confirm the Calibrating Headlight Leveling Sensor procedure from Step (7) to Step (10), and press [Next].
-
- (7) Verify that the following conditions/operations are met/completed and then press [Next].
-
-
• Wheel alignment and tire pressure are inspected
-
• Vehicle is moved to level ground
-
• Vehicle is not shaken up/down, left/right
-
• Worker is out of vehicle
- (8) When the M-MDS processing is completed, press [Next].
-
- (9) Press [Next] to complete [Calibrating Headlight Leveling Sensor].
-
- (10) Switch the ignition off and press [Next].
-
8. Perform the headlight aiming adjustment. (See HEADLIGHT AIMING.)
Procedure Not Using M-MDS
-
Caution
-
• Perform Steps 4—5 within 30 s.
1. Empty the vehicle except for the jack and vehicle tools.
2. Adjust the tire pressure to the standard. (See WHEEL AND TIRE SPECIFICATION.)
3. Move the vehicle to level ground.
4. Switch the ignition ON (engine off or on).
-
Note
-
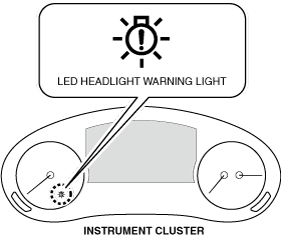
• The LED headlight warning light continues flashing during the first initial setting, however, continue the work because it does not indicate an improper procedure.
-
Caution
-
• If the terminals are mistakenly connected, vehicle damage or fire could occur. When connecting with the jumper wire, thoroughly verify what terminals are being connected to prevent a miss-connection.
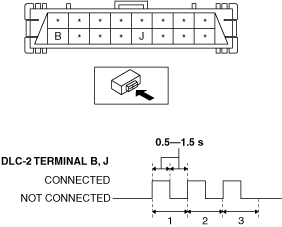
5. Using jumper wires, connect terminal B and terminal J (GND) of DLC-2 three times at 0.5—1.5 s intervals as shown in the figure.
6. Verify the LED headlight warning light.
-
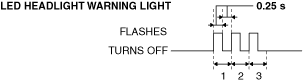
• If the LED headlight warning light flashes three times at 0.25 s intervals and turns off as shown in the figure, it indicates that the headlight auto leveling system initialization is complete. Go to the next step.
• If the LED headlight warning light flashes at intervals of 0.25 s, the servicing may not have completed normally, so start over from Step 5.
• If the LED headlight warning light turns on, the headlight auto leveling system may have a malfunction. Perform DTC inspection. (See
DTC INSPECTION.)
-
― Repair or replace the malfunctioning location, then repeat the procedure from Step 4.
7. Perform the headlight aiming adjustment. (See HEADLIGHT AIMING.)