|
amxzzw00002506
BLACK-OUT FILM INSTALLATION
id091600821600
Applied VIN (assumed)
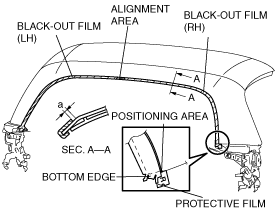
Front
1. Remove any grease or dirt from the affixing surface of the middle roof panel.
2. Peel off the tape backing from the upper area 50-100 mm, and adhere the black-out film to the positioning point shown in the figure.
amxzzw00002506
|
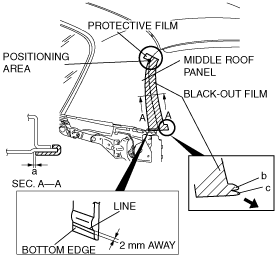
3. Peel off the tape backing, and after verifying that the bottom edge is positioned within 2 mm from the line shown in the figure, adhere the surface of the black-out film.
4. Peel off the transparent protective film on the black-out film.
5. Apply pressure to the black-out film in the order of side and back side.
6. Grasp edges b, c and pull in the direction shown by the arrow making sure there are no wrinkles in the corner area, and adhere.
7. Install the middle roof panel weatherstrip. (See MIDDLE ROOF PANEL WEATHERSTRIP REMOVAL/INSTALLATION.)
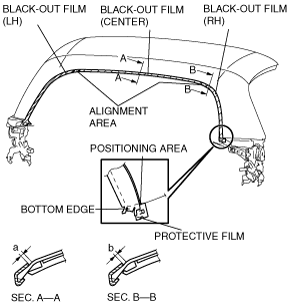
Rear
1. Remove any grease or dirt from the affixing surface of the middle roof panel.
2. Peel off the tape backing from the upper area 50-100 mm, and adhere the black-out film to the positioning point shown in the figure.
amxzzw00002507
|
3. Peel off the tape backing and adhere the black-out film surface.
4. Peel off the transparent protective film on the black-out film.
5. Apply pressure to the black-out film in the order of side and back side.
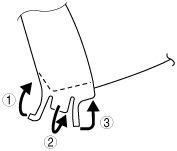
6. Fold in the edges in the order shown in the figure.
amxzzw00002508
|
7. Attach the black out film (LH) using the same procedure as the black out film (RH).
Applied VIN (assumed)
Front
1. Remove any grease or dirt from the affixing surface of the middle roof panel.
2. Peel off the tape backing from the upper area 50-100 mm, and adhere the black-out film to the positioning point shown in the figure.
amxzzw00001923
|
3. Peel off the tape backing, and after verifying that the bottom edge is positioned within 2 mm from the line shown in the figure, adhere the surface of the black-out film.
4. Peel off the transparent protective film on the black-out film.
5. Apply pressure to the black-out film in the order of side and back side.
6. Grasp edges b, c and pull in the direction shown by the arrow making sure there are no wrinkles in the corner area, and adhere.
7. Install the middle roof panel weatherstrip. (See MIDDLE ROOF PANEL WEATHERSTRIP REMOVAL/INSTALLATION.)
Rear
1. Remove any grease or dirt from the affixing surface of the middle roof panel.
2. Peel off the tape backing from the upper area 50-100 mm, and adhere the black-out film to the positioning point shown in the figure.
amxzzw00001924
|
3. Peel off the tape backing and adhere the black-out film surface.
4. Peel off the transparent protective film on the black-out film.
5. Apply pressure to the black-out film in the order of side and back side.
6. Fold in the edges in the order shown in the figure.
amxzzw00001925
|
7. Attach the black-out film (RH) and black-out film (LH) using the same procedure as the black-out film (center).