ACTIVE BONNET ACTUATOR DEPLOYMENT PROCEDURES


id081300001100

Warning
•  An active bonnet actuator that has not been deployed may accidently operate when it is disposed of and cause serious injury. Therefore, never dispose of an active bonnet actuator that has not been deployed.
Caution
•  If the active bonnet actuator is deployed while it is on the vehicle, damage to the vehicle may occur. Deploy an active bonnet actuator while it is on the vehicle only when the vehicle is to be scrapped. If the vehicle is not to be scrapped, deploy it outside of the vehicle.
•  When the vehicle is to be scrapped or when disposing of the active bonnet actuator, deploy it by following the deployment procedures below using the SST (deployment tool).
•  When disposing of a deployed active bonnet actuator, refer to “ACTIVE BONNET ACTUATOR DISPOSAL PROCEDURES”. (See ACTIVE BONNET ACTUATOR DISPOSAL PROCEDURES.)

Deployment procedure on vehicle

1.  Perform the function inspection of the SST (Deployment tool). (See INSPECTION OF SST (DEPLOYMENT TOOL).)

2.  Move the vehicle to a safe location outdoors and always completely close the doors and the door glass.

3.  Switch the ignition to LOCK.

4.  Remove the battery cover.

5.  Disconnect the negative battery cable and wait for 1 min or more. (See BATTERY REMOVAL/INSTALLATION [L8, LF].)

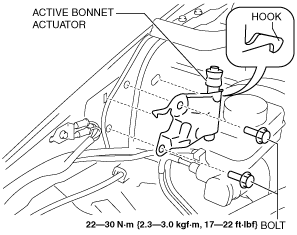
6.  Remove the active bonnet actuator. (See ACTIVE BONNET ACTUATOR REMOVAL/INSTALLATION.)

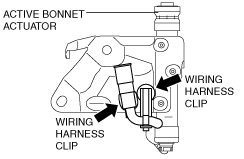
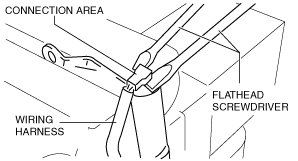
7.  Remove the active bonnet actuator wiring harness.

(1)  Remove the wiring harness clip of the active bonnet actuator.
amxzzw00002688
(2)  Point the ejection end of the piston downward as shown in the figure and secure the active bonnet actuator in a vice.
amxzzw00002689
(3)  Insert two flathead screwdrivers between active bonnet actuator cylinder and the wiring harness connection area.
amxzzw00002690
Note
•  Crush the rubber between the active bonnet actuator cylinder and the wiring harness connection area, and insert the screwdrivers.
(4)  Move the screwdrivers as shown in the figure and lift the wiring harness connection area from the active bonnet actuator cylinder.
amxzzw00002691
Caution
•  Carefully move the screwdrivers so as to not damage or deform the terminal of the active bonnet actuator, and pull up the connector in the perpendicular direction against the cylinder.
(5)  Insert two flathead screwdrivers between active bonnet actuator cylinder and the wiring harness connection area.
amxzzw00002692
(6)  Move the screwdrivers as shown in the figure and widen the gap between the wiring harness connection area and the active bonnet actuator cylinder.
amxzzw00002693
Caution
•  Carefully move the screwdrivers so as to not damage or deform the terminal of the active bonnet actuator, and pull up the connector in the perpendicular direction against the cylinder.
(7)  Remove the wiring harness from the active bonnet actuator.
amxzzw00002694

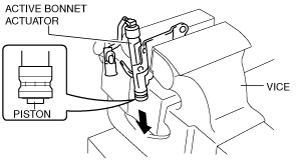
8.  Remove the active bonnet actuator from the vehicle.

amxzzw00002695

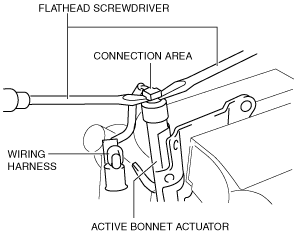
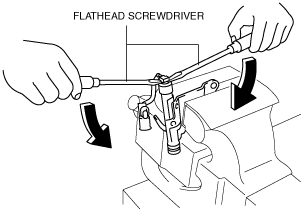
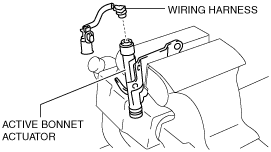
9.  Connect the SST (Adapter wiring harness) to the active bonnet actuator as shown in the figure.

amxzzw00002696

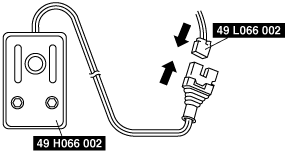
10.  Connect the SST (deployment tool) to the SST (adaptor wiring harness)

ardjjw00000911

11.  Connect the SST (deployment tool) to the battery. (Connect the red clip of the power supply to the positive battery terminal, and the black clip to the negative battery terminal).

12.  Verify that the red lights on both SSTs (deployment tool) are illuminated.

13.  Verify that all persons are standing at least 6 m {20 ft} away from the vehicle.

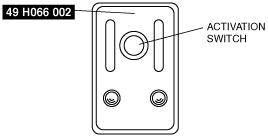
14.  Press the activation switch on the SST (deployment tool) to deploy the active bonnet actuator.

amxzzw00001817

Warning
•  The active bonnet actuator is extremely hot directly after it is deployed and could cause a serious burn if touched. Leave the actuator alone for about 3 min after deployment to let it cool down before handling.

15.  Disconnect the SST (deployment tool) from the SST (adaptor wiring harness).

16.  Disconnect the SST (adaptor wiring harness) from the active bonnet actuator.


Deployment outside of vehicle

1.  Perform the function inspection of the SST (Deployment tool). (See INSPECTION OF SST (DEPLOYMENT TOOL).)

2.  Switch the ignition to LOCK.

3.  Remove the battery cover.

4.  Disconnect the negative battery cable and wait for 1 min or more. (See BATTERY REMOVAL/INSTALLATION [L8, LF].)

5.  Remove the active bonnet actuator. (See ACTIVE BONNET ACTUATOR REMOVAL/INSTALLATION.)

6.  Remove the active bonnet actuator wiring harness.

(1)  Remove the wiring harness clip of the active bonnet actuator.
amxzzw00002688
(2)  Point the ejection end of the piston downward as shown in the figure and secure the active bonnet actuator in a vice.
amxzzw00002689
(3)  Insert two flathead screwdrivers between active bonnet actuator cylinder and the wiring harness connection area.
amxzzw00002690
Note
•  Crush the rubber between the active bonnet actuator cylinder and the wiring harness connection area, and insert the screwdrivers.
(4)  Move the screwdrivers as shown in the figure and lift the wiring harness connection area from the active bonnet actuator cylinder.
amxzzw00002691
Caution
•  Carefully move the screwdrivers so as to not damage or deform the terminal of the active bonnet actuator, and pull up the connector in the perpendicular direction against the cylinder.
(5)  Insert two flathead screwdrivers between active bonnet actuator cylinder and the wiring harness connection area.
amxzzw00002692
(6)  Move the screwdrivers as shown in the figure and widen the gap between the wiring harness connection area and the active bonnet actuator cylinder.
amxzzw00002693
Caution
•  Carefully move the screwdrivers so as to not damage or deform the terminal of the active bonnet actuator, and pull up the connector in the perpendicular direction against the cylinder.
(7)  Remove the wiring harness from the active bonnet actuator.
amxzzw00002694

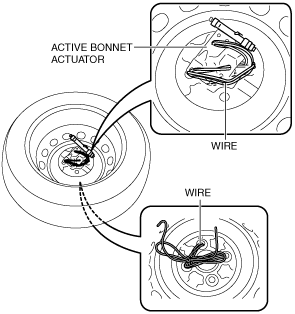
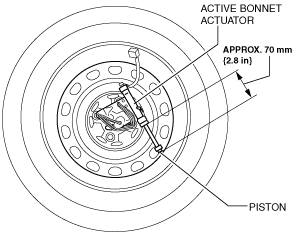
7.  Set the active bonnet actuator in the center of a tire wheel, wrap a wire (cross-section of 1.25 mm2{0.002 in2} or more) at least three times, and secure it to the wheel as shown in the figure.

amxzzw00002697

Warning
•  If the active bonnet actuator is not securely fixed to the tire wheel, the tire could collapse from the force of the actuator deploying and cause injury. To prevent this from occurring, securely fix the active bonnet actuator to the tire wheel.
Caution
•  When deploying the active bonnet actuator, the piston ejects approx. 70 mm {2.8 in}. If the active bonnet actuator is secured to a small tire wheel and deployed, the piston could hit the inner side of the tire wheel. Use a 14 inch or more tire wheel when securing the active bonnet actuator.
amxzzw00002698

8.  Connect the SST (Adapter wiring harness) to the active bonnet actuator as shown in the figure.

ardjjw00003121

9.  Connect the SST (deployment tool) to the SST (adaptor wiring harness)

ardjjw00000911

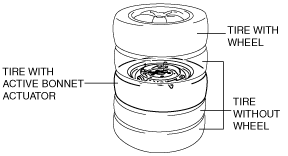
10.  Set the tire with the active bonnet actuator secured to it on a stack of 2 tires with no wheels. Stack a tire without a wheel on top of the tire with the secured active bonnet actuator, and then stack another tire with a wheel on the very top.

amxzzw00002699

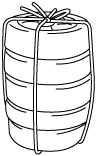
11.  Secure the tires using the wire (cross-section of 1.25 mm2{0.002 in2} or more).

ardjjw00000920

12.  Connect the SST (deployment tool) to the battery. (Connect the red clip of the power supply to the positive battery terminal, and the black clip to the negative battery terminal)

13.  Verify that the red light on the SST (Deployment tool) is illuminated.

14.  Verify that all persons are standing at least 6 m {20 ft} away from the vehicle.

15.  Press the activation switch on the SST (deployment tool) to deploy the active bonnet actuator.

amxzzw00001817

Warning
•  The active bonnet actuator is extremely hot directly after it is deployed and could cause a serious burn if touched. Leave the actuator alone for about 3 min after deployment to let it cool down before handling.

16.  Disconnect the SST (deployment tool) from the SST (adaptor wiring harness).

17.  Disconnect the SST (adaptor wiring harness) from the active bonnet actuator.