|
amxzzw00000890
POWER RETRACTABLE HARDTOP ADJUSTMENT
id091600809300
Top Lock
Type A
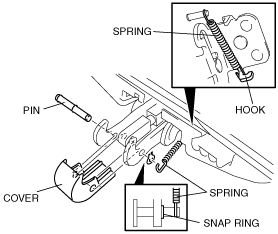
1. Remove the spring.
amxzzw00000890
|
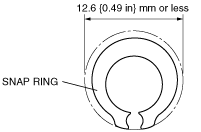
2. Remove the snap ring. (See CONVERTIBLE TOP ADJUSTMENT.)
3. Remove the pin.
4. Remove the screws.
5. Remove the cover.
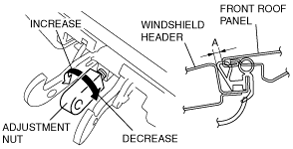
6. Adjust the clearance of part A by rotating the adjustment nut.
amxzzw00000891
|
7. Install in the reverse order of removal.
Type B
1. Remove the spring.
amxzzw00000897
|
2. Remove the snap ring. (See CONVERTIBLE TOP ADJUSTMENT.)
3. Remove the pin.
4. Remove the cover.
5. Adjust the clearance of part A by rotating the adjustment nut.
amxzzw00000891
|
6. Install in the reverse order of removal.
Snap ring removal note
amxzzw00000892
|
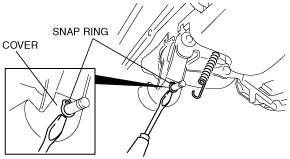
1. Insert a tape-wrapped flathead screwdriver between the cover and snap ring, and remove the snap ring by prying along the perimeter so as not to damage the snap ring.
amxzzw00000893
|
Snap ring installation note
1. Insert the snap ring to the pin while slightly expanding the snap ring end using snap ring pliers.
amxzzw00000894
|
2. After securing the snap ring, verify that there is no excessive play between the snap ring and pin.
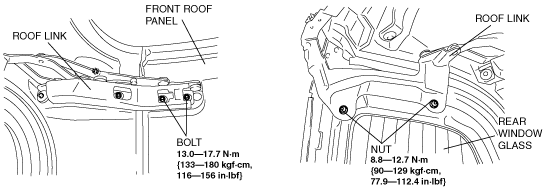
Power Retractable Hardtop
1. Loosen the installation bolts and nut for each link.
amxzzw00000895
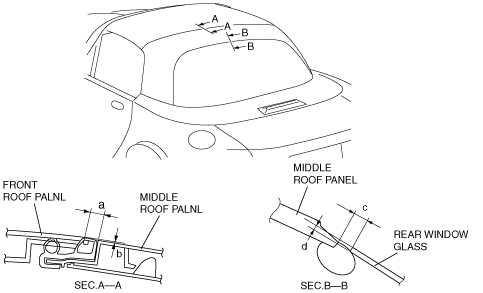
|
2. Adjust the gap and height difference between the front roof panel, middle roof panel and rear window glass within the specification by moving them back and forth, left and right, and by adjusting the number of shims if necessary.
amxzzw00000896
|
3. Tighten the bolts and nuts.