 |
bmm6jm00000021
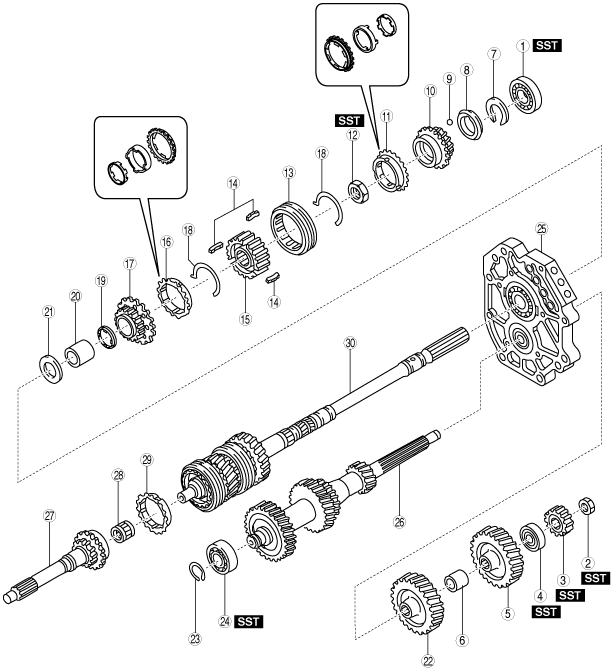
MAINSHAFT AND COUNTERSHAFT PARTS DISASSEMBLY
id051100010600
1. Disassemble in the order shown in the figure.
bmm6jm00000021
|
|
1
|
Main shaft rear bearing
|
|
2
|
Locknut (countershaft)
|
|
3
|
Counter reverse gear
|
|
4
|
Countershaft rear bearing
|
|
5
|
Counter 3rd gear
|
|
6
|
Spacer
|
|
7
|
Snap ring
(See Snap Ring Disassembly Note.)
|
|
8
|
Washer
|
|
9
|
Steel ball
|
|
10
|
3rd gear
|
|
11
|
3rd synchronizer component
|
|
12
|
Locknut (main shaft)
|
|
13
|
3rd/4th clutch hub sleeve
|
|
14
|
Synchronizer key
|
|
15
|
3rd/4th clutch hub
|
|
16
|
4th synchronizer component
|
|
17
|
4th gear
|
|
18
|
Synchronizer key spring
|
|
19
|
Friction damper
|
|
20
|
Gear sleeve
|
|
21
|
Washer
|
|
22
|
Counter 4th gear
|
|
23
|
Snap ring
|
|
24
|
Countershaft front bearing
|
|
25
|
Bearing housing component
|
|
26
|
Countershaft
|
|
27
|
Main drive gear
|
|
28
|
Bearing
|
|
29
|
6th synchronizer ring
|
|
30
|
Main shaft gear component
|
Main Shaft Rear Bearing Disassembly Note
1. Operate the clutch hub sleeve, align the 1st gear and 5th gear and lock the countershaft against rotation.
bmm8um00000018
|
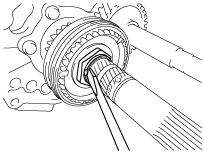
2. Remove the main shaft bearing using the SSTs.
bmm6jm00000023
|
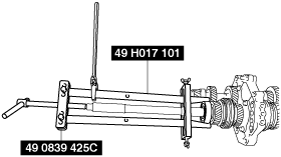
Locknut (Countershaft) Disassembly Note
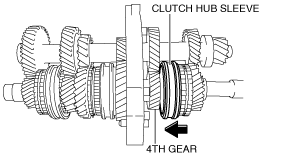
1. Operate the clutch hub sleeve, align the 4th gear and lock the countershaft against rotation.
bmm8um00000019
|
2. Install the SST to the main shaft and secure it to the vice.
bmm6jm00000025
|
3. Remove the crimp of the locknut (countershaft) using a flathead screwdriver.
bmm6jm00000026
|
4. Remove the locknut.
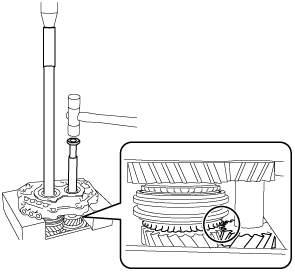
Counter Reverse Gear and Countershaft Rear Bearing Disassembly Note
1. Remove the counter reverse gear and countershaft rear bearing using the SSTs.
bmm6jm00000027
|
Snap Ring Disassembly Note
1. Remove the snap ring using 2 flathead screwdrivers.
bmm6jm00000028
|
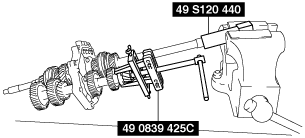
Locknut (Main Shaft) Disassembly Note
1. Remove the crimp of the locknut (main shaft) using a flathead screwdriver.
bmm6jm00000029
|
2. Remove the locknut (main shaft) using the SSTs.
bmm6jm00000030
|
3rd/4th Clutch Hub, 4th Synchronizer Component and 4th Gear Disassembly Note
1. Install the SST tabs to the 4th gear chamfer.
2. Remove the 3rd/4th clutch hub, 4th synchronizer component and 4th gear using the SSTs.
bmm8um00000020
|
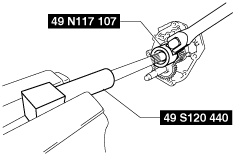
Countershaft Front Bearing Disassembly Note
1. Remove the countershaft front bearing using the SST.
bmm6jm00000032
|
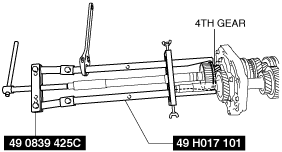
Bearing Housing Component Disassembly Note
1. Tie the main shaft and the countershaft with string as shown in the figure.
bmm6jm00000033
|
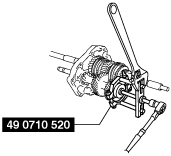
2. Set the main shaft, countershaft and bearing housing component to the press as shown in the figure.
bmm6jm00000034
|
3. While gradually pressing out the main shaft with the press, lightly tap the countershaft using a plastic hammer to remove them from the bearing housing component.