 |
amxzzw00005750
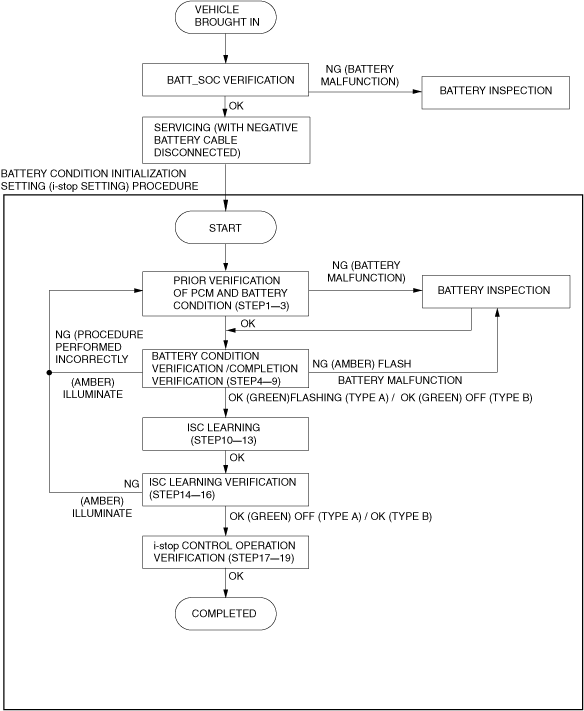
BATTERY CONDITION INITIALIZATION SETTING (i-stop SETTING)
id011700801000
Battery Condition Initial setting (i-stop setting) Procedure
Battery Condition Initial setting (i-stop setting) flow
amxzzw00005750
|
|
Purpose |
Step |
Procedure |
Caution/Note |
|---|---|---|---|
|
Prior verification of PCM and battery condition
|
1
|
Verify the value (BATT_SOC) measured before disconnecting the negative battery cable.
When BATT_SOC value is 75% or more
• Go to the next step.
When BATT_SOC value is not verified or the value is less than 75%
• Perform battery inspection. (See BATTERY INSPECTION.)
|
—
|
|
2
|
Verify that 5 min or more have elapsed since the negative battery cable was disconnected.
|
|
|
|
3
|
Disconnect the current sensor connector. If the current sensor connector has already been disconnected, go to the next step.
|
—
|
|
|
Battery condition verification /completion verification
|
4
|
Connect the negative battery cable and wait for 10 s or more.
|
|
|
5
|
Connect the current sensor connector.
|
—
|
|
|
6
|
Switch the ignition ON (engine off) and wait for 15 s or more (within 1 min.).
|
—
|
|
|
7
|
Vehicles with i-ELOOP
• Display the DC-DC converter (i-ELOOP) voltage reduction circuit operation status (PID: CONV_STAT) using the M-MDS data monitor function. (See PID/DATA MONITOR INSPECTION [i-ELOOP].)
Power Output (Normal) is displayed
Other than Power Output (Normal) is displayed
|
|
|
|
8
|
VERIFY i-stop INDICATOR LIGHT (GREEN) AND i-stop WARNING LIGHT (AMBER) FLASHING CONDITION
• Press and hold the i-stop OFF switch and verify that the i-stop indicator light (green) is flashing (type A) / off (type B) or the i-stop warning light (amber) is flashing. (Approx. 10 s)
When i-stop warning light (green) flashes (type A) / turns off (type B)
When i-stop warning light (amber) flashes
When i-stop warning light (amber) illuminates
|
|
|
|
9
|
Switch the ignition off.
|
—
|
|
|
ISC learning
|
10
|
Close the bonnet.
|
|
|
11
|
Start the engine.
|
||
|
12
|
Warm up the engine completely with no electrical load.
|
||
|
13
|
Switch the ignition off.
|
||
|
ISC learning verification
|
14
|
Perform the following procedure within 25 s.
1. Switch the ignition ON (engine off) and within 5 s, long-press the i-stop OFF switch for 3 s or more. (The i-stop warning light (amber) illuminates.)
2. Start the engine.
3. Long-press the i-stop OFF switch one time.
4. Verify that the i-stop warning light (amber) stop illuminating and the i-stop indicator light (green) flashes (typeA) / turns off (type B).
|
—
|
|
15
|
Type A : Maintain the idle status (no electrical load) until the i-stop indicator light (green) turns off.
Type B : Wait for 40 s while idling (with no electrical load).
|
—
|
|
|
16
|
Type A : After the i-stop indicator light (green) turns off, switch the ignition off.
Type B : Switch the ignition off.
|
—
|
|
|
i-stop control operation verification
|
17
|
Start the engine and verify that the i-stop indicator light (green) is turned off.
|
—
|
|
18
|
Verify the i-stop control operation using the following procedure.
1. Vehicle is traveling at a speed of 4 km/h {2 mph} or more. (EC/Russia specs.)
2. While the vehicle is traveling at a speed of 4 km/h {2 mph} or more, verify that the i-stop indicator light (green) illuminates. (Except EC/Russia specs.)
3. Stop the vehicle and verify that the engine stops via the i-stop control and then restarts.
|
—
|
|
|
19
|
Switch the ignition off.
|
—
|