|
amxzzw00003308
TRANSMISSION FLUID TEMPERATURE (TFT) SENSOR REMOVAL/INSTALLATION [SJ6A-EL]
id051311710400
1. Disconnect the negative battery terminal. (See NEGATIVE BATTERY TERMINAL DISCONNECTION/CONNECTION.)
2. Drain the ATF. (See AUTOMATIC TRANSMISSION FLUID (ATF) REPLACEMENT [SJ6A-EL].)
3. Slide the hose clamp upward and disconnect the electric AT oil pump hose (With i-stop).
amxzzw00003308
|
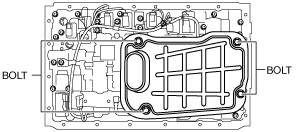
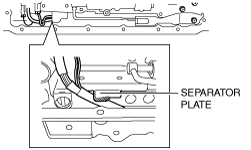
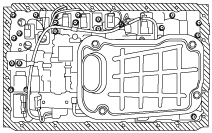
4. Remove the oil pan and gasket.
5. Remove the oil strainer from the control valve body component.
amxuuw00003553
|
6. Remove the O-ring from the oil strainer.
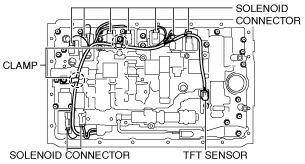
7. Disconnect the connectors from the solenoids.
amxuuw00003554
|
8. Disconnect the coupler component from the clamps.
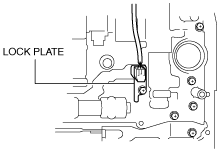
9. Remove the lock plate from the control valve body component.
amxuuw00003555
|
10. Pull the TFT sensor from the control valve body component.
11. Remove the coupler component mounting bolt from the transmission case.
12. Remove the coupler component from the transmission case.
13. Remove the O-ring from the coupler component.
14. Install a new O-ring to the coupler component.
15. Tighten the coupler component mounting bolt to the transmission case.
16. Install the TFT sensor and the lock plate with the bolt to the control valve body component.
amxuuw00003555
|
17. Connect the coupler component to the clamps.
amxuuw00003554
|
amxuuw00003567
|
18. Connect the connectors to the solenoids.
19. Coat a new O-ring with ATF and install it to the oil strainer.
20. Install the oil strainer to the control valve body component with the bolts.
amxuuw00003553
|
21. Clean the contact surface of the oil pan and transmission case.
e5u513zw5069
|
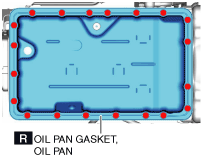
22. Install a new oil pan gasket and the oil pan to the transmission case.
amxuuw00003569
|
23. Tighten the oil pan installation bolt.
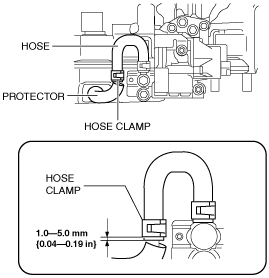
24. Install the electric AT oil pump hose and hose clamp to the position shown in the figure (With i-stop).
amxzzw00003314
|
25. Connect the negative battery terminal. (See NEGATIVE BATTERY TERMINAL DISCONNECTION/CONNECTION.)
26. Add ATF and, with the engine idling, inspect the ATF level and inspect for leakage. (See AUTOMATIC TRANSMISSION FLUID (ATF) LEVEL ADJUSTMENT [SJ6A-EL].)