 |
amxzzw00003490
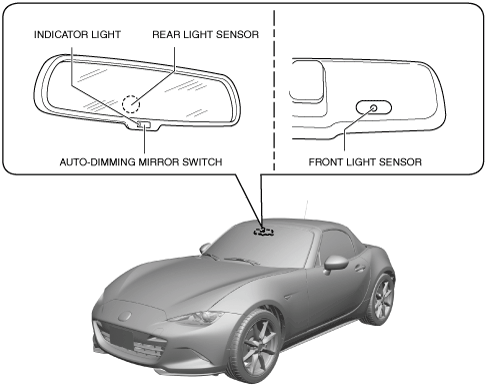
AUTO-DIMMING REARVIEW MIRROR INSPECTION
id091200016100
Operational Inspection
1. Switch the ignition ON (engine off or on).
2. Move the vehicle to a place with a showroom level of brightness.
3. Verify that the indicator light is illuminated.
amxzzw00003490
|
4. Verify that the indicator light switches when the auto-dimming mirror on switch and auto-dimming mirror off switch is pressed.
5. While the indicator light is illuminated, verify that the mirror surface brightens.
6. Cover the front light sensor with a hand and verify that the mirror surface darkens when light is shone on the rear light sensor.
7. Remove your hand covering the front light sensor and verify that the mirror surface brightens.
Terminal Voltage Table (Reference)
1. Measure the voltage at each terminal.
amxzzw00003491
|
|
Terminal |
Signal name |
Connected to |
Measured condition |
Voltage (V) |
Inspection item(s) |
|---|---|---|---|---|---|
|
A
|
—
|
—
|
—
|
—
|
—
|
|
B
|
—
|
—
|
—
|
—
|
—
|
|
C
|
R position signal
|
Electrical supply unit (ESU)
|
R position
|
B+
|
• Electrical supply unit (ESU)
• Related wiring harnesses
|
|
Other than R position
|
1.0 or less
|
||||
|
D
|
GND
|
Power outer mirror (LH)
|
Under any condition
|
1.0 or less
|
• Related wiring harnesses
|
|
E
|
IG1
|
C/U IG1 15A fuse
|
Switch the ignition ON (engine on or off)
|
B+
|
• C/U IG1 15A fuse
• Related wiring harnesses
|
|
Switch the ignition off
|
1.0 or less
|