 |
amxzzw00004634
RETRACTABLE HARDTOP MANUAL OPEN/CLOSE PROCEDURE
id091600105600
Opening the Rear Roof
1. Remove the rod antenna. (See ROD ANTENNA REMOVAL/INSTALLATION.)
2. Remove the wind blocker. (See WIND BLOCKER REMOVAL/INSTALLATION.)
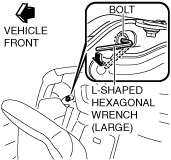
3. Insert the L-shaped hexagonal wrench (Large) into the motor bracket bolt.
amxzzw00004634
|
4. Turn the L-shaped hexagonal wrench (Large) anticlockwise 13 times or more.
amxzzw00005564
|
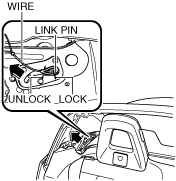
5. Hook the wire to the link pin shown in the figure.
amxzzw00005565
|
6. While one person pushes the rear roof down, another person pulls the wire until a latch sound is heard and the rear roof unlocks.
7. Do the same procedure on the other side.
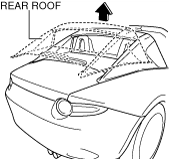
8. While standing on both sides of the vehicle, lift the rear roof to the position it stops while keeping the height of its left and right sides as parallel as possible.
amxzzw00004636
|
Closing the Front Roof
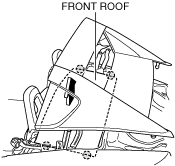
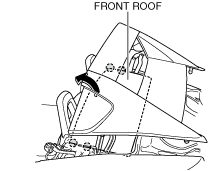
1. While standing on both sides of the vehicle, hold the front and rear sides of the front roof and pull the front roof upward.
amxzzw00004637
|
2. Switch your hand on the rear side of the front roof to the front side and pull the front roof forward.
amxzzw00004638
|
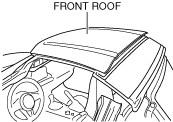
3. Stop pulling the front roof before it completely closes.
amxzzw00004639
|
4. Remove the front roof link cover. (See FRONT ROOF LINK COVER REMOVAL/INSTALLATION.)
5. Remove the front headliner. (See FRONT HEADLINER REMOVAL/INSTALLATION.)
6. Lightly press the front edge of the front roof from outside of the vehicle to close the front roof completely.
amxzzw00004640
|
7. Insert the short end of the hexagonal wrench (Small) into the gear (tool kit) and assemble.
amxzzw00005566
|
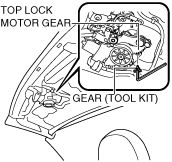
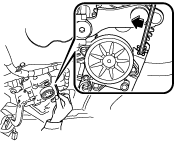
8. Insert the point of the gear (tool kit) into the hole beside the top lock motor gear with the hexagonal wrench inserted into the gear tool.
amxzzw00004642
|
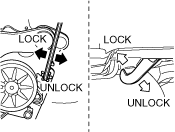
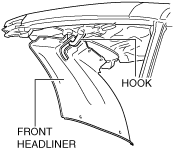
9. Rotate the hexagonal wrench and move the hook in the lock direction so that there is enough space for the opening of the headliner to be attached to the hook.
amxzzw00004643
|
10. Insert the hook into the opening of the front headliner.
amxzzw00004644
|
11. Turn the hexagonal wrench (Small) and gear (tool kit) anticlockwise and engage the hook with the vehicle body side.
amxzzw00004645
|
12. Install the fasteners shown in the figure and temporarily install the front headliner. (See FRONT HEADLINER REMOVAL/INSTALLATION.)
amxzzw00005567
|
13. Install the front roof link cover. (See FRONT ROOF LINK COVER REMOVAL/INSTALLATION.)
Closing the Rear Roof (Temporary Measure)
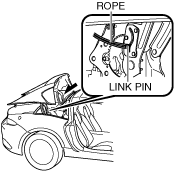
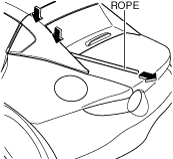
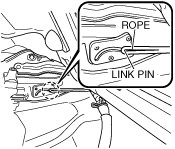
1. Fold the rope in half and hook it to the link pin of the rear roof.
amxzzw00004646
|
2. Do the same procedure on the other side.
3. Close the rear roof uniformly on both sides using two adults, one on each side of the vehicle.
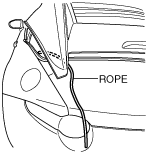
4. Slowly close the rear roof while lightly pulling the rope with one hand so that the rope does not unhook.
amxzzw00004647
|
5. One person pushes the rear roof down and the other person pulls the rope strongly and straight back towards the vehicle rear until a click sound is heard.
amxzzw00004648
|
6. Visually verify that the link pin is at the position shown in the figure in the rear roof link groove from inside the vehicle.
amxzzw00005568
|
7. Do the same procedure on the other side.
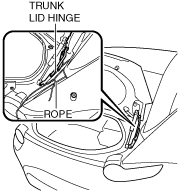
8. Open the trunk lid and tie the rope to the trunk lid hinge.
amxzzw00004649
|
9. Tie off the other side rope the same way.
10. Close the trunk lid.
Recovery Procedure
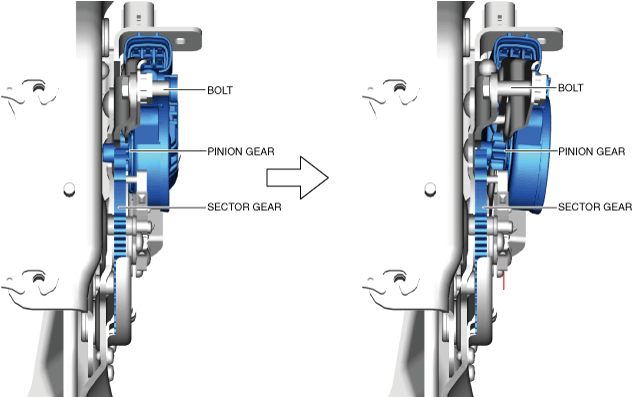
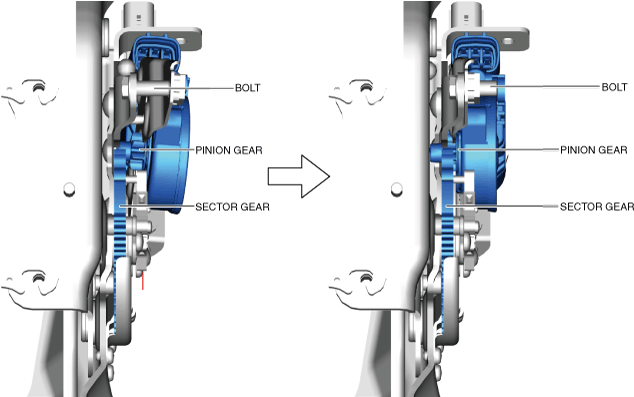
1. Using an L-shaped hexagon wrench (large), rotate the bolt clockwise and tighten it.
amxzzw00005569
|
2. Verify that the rear roof link motor pinion gear and the sector gear are securely engaged.