ELECTRIC VARIABLE VALVE TIMING MOTOR/DRIVER REMOVAL/INSTALLATION [SKYACTIV-G 1.5, SKYACTIV-G 2.0]
id0110h8808100
-
Warning
-
• A hot engine can cause severe burns. Turn off the engine and wait until it is cool before servicing.
-
Caution
-
• Applying excessive force (force of 100 N {10.2 kgf, 22.5 lbf} or more) to the electric variable valve timing motor/driver may cause a malfunction. When servicing, be careful not to apply excessive force to the electric variable valve timing motor/driver using other parts or tools.
• Do not disassemble the electric variable valve timing motor/driver because it is a precision unit.
1. Disconnect the negative battery cable. (See NEGATIVE BATTERY CABLE DISCONNECTION/CONNECTION.)
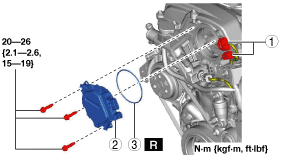
2. Remove in the order indicated in the table.
3. Install in the reverse order of removal.
|
1
|
Electric variable valve timing motor/driver connector
|
|
2
|
Electric variable valve timing motor/driver
|
|
3
|
O-ring
|
Electric Variable Valve Timing Motor/Driver Installation Note
1. Install a new O-ring to the O-ring installation groove of the engine front cover.
-
Caution
-
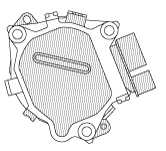
• To prevent damage to the electric variable valve timing motor/driver, do not apply excessive force (force of 100 N {10.2 kgf, 22.5 lbf} or more) to the shaded areas shown in the figure.
2. Install the electric variable valve timing motor/driver using the following procedures.
-
Note
-
• The eccentric shaft on the electric variable valve timing actuator side can be rotated to the left and right.
• The electric variable valve timing motor/driver can be assembled with the joint groove of the eccentric shaft in any position, and it will not lead to vehicle damage or performance reduction.
- (1) Before installation, rotate the joint on the end of the electric variable valve timing motor/driver so that it is aligned to the joint groove on the electric variable valve timing actuator side.
-
- (2) Engage the joint on the end of the electric variable valve timing motor/driver with the joint groove on the electric variable valve timing actuator side.
- (3) Attach the seal surface.
- (4) Tighten the electric variable valve timing motor/driver installation bolts.
-
-
Tightening torque
-
20—26 N·m {2.1—2.6 kgf·m, 15—19 ft·lbf}