ACTIVE BONNET ACTUATOR DEPLOYMENT PROCEDURES
id081300001100
-
Warning
-
• An active bonnet actuator that has not been deployed may accidently operate when it is disposed of and cause serious injury. Therefore, never dispose of an active bonnet actuator that has not been deployed. If the SSTs (Deployment tool and Adapter harness) are not available, consult the nearest Mazda representative for assistance.
• If the piston side of an undeployed active bonnet actuator is pointed towards you and it were to unexpectedly operate, it could cause injury. Always point the piston side of an undeployed active bonnet actuator away from you.
-
Caution
-
• If the active bonnet actuator is deployed while it is in the vehicle, damage to the vehicle may occur. Deploy an active bonnet actuator while it is in the vehicle only when the vehicle is to be scrapped. If the vehicle is not to be scrapped, deploy it outside of the vehicle.
• When the vehicle is to be scrapped or when disposing of the active bonnet actuator, deploy it by following the deployment procedures below using the SST (Deployment tool).
Deployment Procedure for Inside of Vehicle
1. Perform the function inspection of the SST (Deployment tool). (See INSPECTION OF SST (DEPLOYMENT TOOL).)
2. Move the vehicle outdoors (location that ensures safety) and always close all the doors and door glass.
3. Switch the ignition off.
4. Disconnect the negative battery cable and wait for 1 min or more. (See NEGATIVE BATTERY CABLE DISCONNECTION/CONNECTION.)
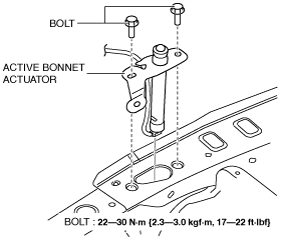
5. Remove the active bonnet actuator. (See ACTIVE BONNET ACTUATOR REMOVAL/INSTALLATION.)
6. Remove the active bonnet actuator wiring harness using the following procedures.
- (1) Remove the active bonnet actuator wiring harness clips.
-
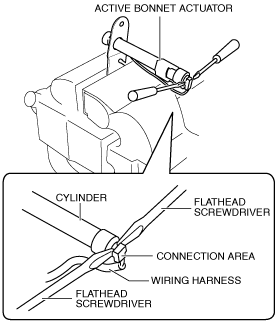
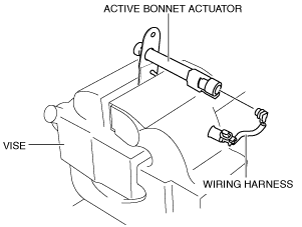
- (2) Secure the active bonnet actuator in a vice as shown in the figure.
-
- (3) Insert two flathead screwdrivers between the active bonnet actuator cylinder and the wiring harness connection area.
-
-
Note
-
• Compress the rubber between the active bonnet actuator cylinder and the wiring harness connection area, and insert the flathead screwdrivers.
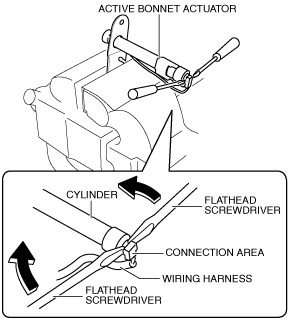
- (4) Move the flathead screwdrivers in the direction of the arrows shown in the figure and lift the wiring harness connection area from the active bonnet actuator cylinder.
-
-
Caution
-
• If the connecting area of the wiring harness is not pulled up in the perpendicular direction, the wiring harness connection area terminal could be deformed or damaged. Carefully move the flathead screwdrivers and pull up the wiring harness connecting area in the perpendicular direction against the cylinder.
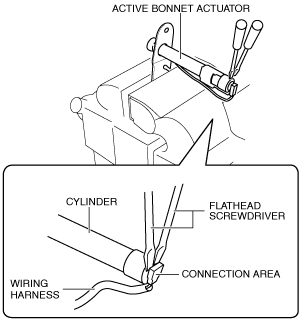
- (5) Insert two flathead screwdrivers between the active bonnet actuator cylinder and the wiring harness connection area as shown in the figure.
-
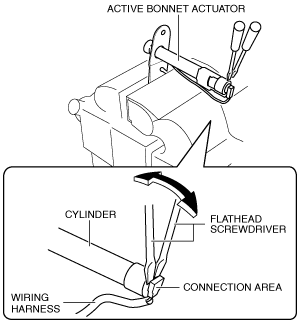
- (6) Move the flathead screwdrivers in the directions of the arrows shown in the figure and widen the gap between the active bonnet actuator cylinder and the wiring harness connection area.
-
-
Caution
-
• If the connecting area of the wiring harness is not pulled up in the perpendicular direction, the wiring harness connection area terminal could be deformed or damaged. Carefully move the flathead screwdrivers and pull up the wiring harness connecting area in the perpendicular direction against the cylinder.
- (7) Remove the wiring harness from the active bonnet actuator.
-
- (8) Remove the active bonnet actuator from the vice.
-
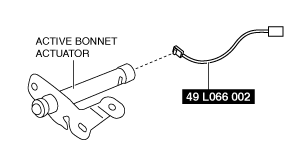
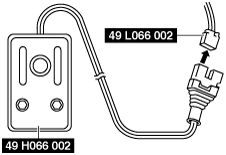
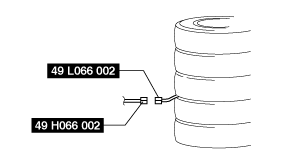
7. Connect the SST (Adapter harness) to the active bonnet actuator.
8. Install the active bonnet actuator to the vehicle.
9. Install the bolts.
10. Connect the SST (Deployment tool) to the SST (Adapter harness).
11. Connect the SST (Deployment tool) to the battery. Connect the red clip of the power supply to the positive battery terminal, and the black clip to the negative battery terminal.
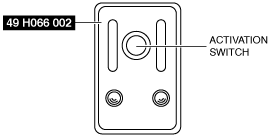
12. Verify that the red light on the SST (Deployment tool) is turned on.
13. Verify that all persons are standing at least 6 m {20 ft} away from the vehicle.
14. Press the activation switch on the SST (Deployment tool) to deploy the active bonnet actuator.
-
Warning
-
• The active bonnet actuator is extremely hot directly after it is deployed and could cause a serious burn if touched. Leave the actuator alone for about 15 min after deployment to let it cool down before handling.
15. Disconnect the SST (Deployment tool) from the SST (Adapter harness).
Deployment Procedure for Outside of Vehicle
1. Perform the function inspection of the SST (Deployment tool). (See INSPECTION OF SST (DEPLOYMENT TOOL).)
2. Switch the ignition off.
3. Disconnect the negative battery cable and wait for 1 min or more. (See NEGATIVE BATTERY CABLE DISCONNECTION/CONNECTION.)
4. Remove the active bonnet actuator. (See ACTIVE BONNET ACTUATOR REMOVAL/INSTALLATION.)
5. Remove the active bonnet actuator wiring harness using the following procedures.
- (1) Remove the active bonnet actuator wiring harness clips.
-
- (2) Secure the active bonnet actuator in the vice as shown in the figure.
-
- (3) Insert two flathead screwdrivers between the active bonnet actuator cylinder and the wiring harness connection area as shown in the figure.
-
-
Note
-
• Compress the rubber between the active bonnet actuator cylinder and the wiring harness connection area, and insert the flathead screwdrivers.
- (4) Move the flathead screwdrivers in the direction of the arrows shown in the figure and lift the wiring harness connection area from the active bonnet actuator cylinder.
-
-
Caution
-
• If the connecting area of the wiring harness is not pulled up in the perpendicular direction, the wiring harness connection area terminal could be deformed or damaged. Carefully move the flathead screwdrivers and pull up the wiring harness connecting area in the perpendicular direction against the cylinder.
- (5) Insert two flathead screwdrivers between the active bonnet actuator cylinder and the wiring harness connection area as shown in the figure.
-
- (6) Move the flathead screwdrivers in the directions of the arrows shown in the figure and widen the gap between the active bonnet actuator cylinder and the wiring harness connection area.
-
-
Caution
-
• If the connecting area of the wiring harness is not pulled up in the perpendicular direction, the wiring harness connection area terminal could be deformed or damaged. Carefully move the flathead screwdrivers and pull up the wiring harness connecting area in the perpendicular direction against the cylinder.
- (7) Remove the wiring harness from the active bonnet actuator.
-
- (8) Remove the active bonnet actuator from the vice.
-
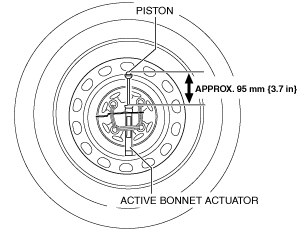
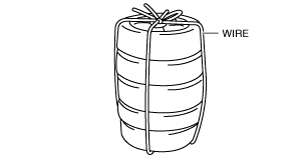
6. Set the active bonnet actuator in the center of a tire wheel and secure it to the wheel by wrapping it with wire (cross-section of 1.25 mm2{0.002 in2} or more) at least 3 times as shown in the figure.
-
Warning
-
• If the active bonnet actuator is not securely fixed to the tire wheel, the tire could collapse from the force of the actuator deploying and cause injury. To prevent this from occurring, securely fix the active bonnet actuator to the tire wheel.
-
Caution
-
• When deploying the active bonnet actuator, the piston ejects approx. 95 mm {3.7 in}. If the active bonnet actuator is secured to a small tire wheel and deployed, the piston could hit the inner side of the tire wheel. Use a 14-inch or more tire wheel when securing the active bonnet actuator.
7. Connect the active bonnet actuator to the SST (adapter harness).
8. Set the tire with the active bonnet actuator secured to it on a stack of 2 tires without wheels and stack 1 tire without a wheel on top of the secured active bonnet actuator, and then stack another tire with a wheel on the very top.
9. Secure the tires using the wire.
10. Connect the SST (Deployment tool) to the SST (Adapter harness).
11. Connect the SST (Deployment tool) to the battery. Connect the red clip of the power supply to the positive battery terminal, and the black clip to the negative battery terminal.
12. Verify that the red light on the SST (Deployment tool) is turned on.
13. Verify that all persons are standing at least 6 m {20 ft} away from the active bonnet actuator.
14. Press the activation switch on the SST (Deployment tool) to deploy the active bonnet actuator.
-
Warning
-
• The active bonnet actuator is extremely hot directly after it is deployed and could cause a serious burn if touched. Leave the actuator alone for about 15 min after deployment to let it cool down before handling.
15. Disconnect the SST (Deployment tool) from the SST (Adapter harness).