HAZARD WARNING SWITCH INSPECTION
id091800803100
Continuity Inspection
1. Disconnect the negative battery cable. (See NEGATIVE BATTERY CABLE DISCONNECTION/CONNECTION.)
2. Remove the following parts:
- (1) Passenger-side scuff plate (See SCUFF PLATE REMOVAL/INSTALLATION.)
- (2) Passenger-side front side trim (See FRONT SIDE TRIM REMOVAL/INSTALLATION.)
- (3) Passenger-side A-pillar trim (See A-PILLAR TRIM REMOVAL/INSTALLATION.)
- (4) Passenger-side lower panel (See PASSENGER-SIDE LOWER PANEL REMOVAL/INSTALLATION.)
- (5) Center panel No.2 (See CENTER PANEL No.2 REMOVAL/INSTALLATION.)
- (6) Hazard warning switch (See HAZARD WARNING SWITCH REMOVAL/INSTALLATION.)
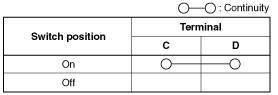
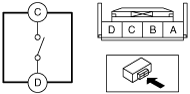
3. Verify that the continuity between the hazard warning switch terminals is as indicated in the table.
-
LED Illumination Inspection
1. Disconnect the negative battery cable. (See NEGATIVE BATTERY CABLE DISCONNECTION/CONNECTION.)
2. Remove the following parts:
- (1) Passenger-side scuff plate (See SCUFF PLATE REMOVAL/INSTALLATION.)
- (2) Passenger-side front side trim (See FRONT SIDE TRIM REMOVAL/INSTALLATION.)
- (3) Passenger-side A-pillar trim (See A-PILLAR TRIM REMOVAL/INSTALLATION.)
- (4) Passenger-side lower panel (See PASSENGER-SIDE LOWER PANEL REMOVAL/INSTALLATION.)
- (5) Center panel No.2 (See CENTER PANEL No.2 REMOVAL/INSTALLATION.)
- (6) Hazard warning switch (See HAZARD WARNING SWITCH REMOVAL/INSTALLATION.)
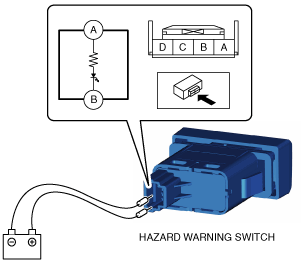
3. Apply battery voltage to hazard warning switch terminal A, and connect terminal B to ground.
4. Verify that the LED is turned on.
-