|
amxzzw00003203
AUTO LEVELING CONTROL MODULE REMOVAL/INSTALLATION
id091800805500
VIN (L.H.D.) : JMZ ND6E***# 100001-200000, JM7 ND*****# 100001-200000 / VIN (R.H.D.) : JMZ ND6E***# 100001-300000, JM0 ND2E***# 100001-200000, JM6 ND2E7**# 100001-200000)
L.H.D.
1. Disconnect the negative battery cable. (See NEGATIVE BATTERY CABLE DISCONNECTION/CONNECTION.)
2. Remove the following parts:
3. Disconnect the connector.
amxzzw00003203
|
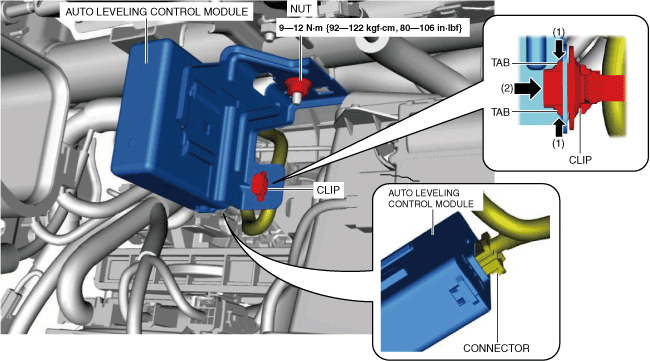
4. Remove the nut.
5. Remove the auto leveling control module.
6. Install in the reverse order of removal.
7. Perform the auto leveling control module automatic configuration using the following procedure.
8. Using the M-MDS, verify that DTCs U2300:54, U2300:55, or U2300:56 is not displayed.
9. If the auto leveling control module replaced with a new one, perform the headlight auto leveling system initialization. (See HEADLIGHT AUTO LEVELING SYSTEM INITIALIZATION.)
10. Adjust the headlight aiming. (See HEADLIGHT AIMING.)
R.H.D.
1. Disconnect the negative battery cable. (See NEGATIVE BATTERY CABLE DISCONNECTION/CONNECTION.)
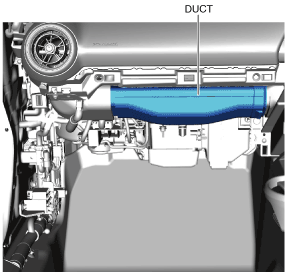
2. Remove the following parts:
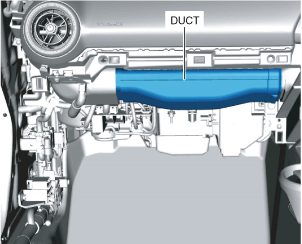
3. Remove the duct.
amxuuw00003327
|
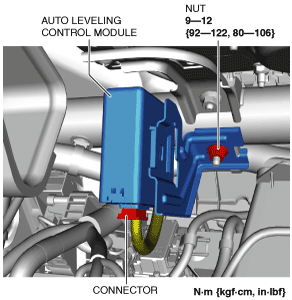
4. Disconnect the connector.
amxuuw00004665
|
5. Remove the nut.
6. Remove the auto leveling control module.
7. Install in the reverse order of removal.
8. Perform the auto leveling control module automatic configuration using the following procedure.
9. Using the M-MDS, verify that DTCs U2300:54, U2300:55, or U2300:56 is not displayed.
10. If the auto leveling control module replaced with a new one, perform the headlight auto leveling system initialization. (See HEADLIGHT AUTO LEVELING SYSTEM INITIALIZATION.)
11. Adjust the headlight aiming. (See HEADLIGHT AIMING.)
VIN (L.H.D.) : JMZ ND6E***# 200001-, JM7 ND*****# 200001- / VIN (R.H.D.) : JMZ ND6E***# 300001-, JM0 ND2E***# 200001-, JM6 ND2E7**# 200001-
L.H.D.
1. Disconnect the negative battery cable. (See NEGATIVE BATTERY CABLE DISCONNECTION/CONNECTION.)
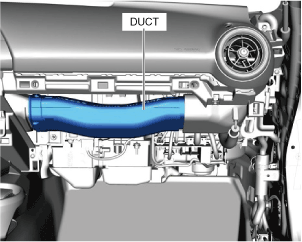
2. Remove the following parts:
3. Remove the duct.
amxzzw00004894
|
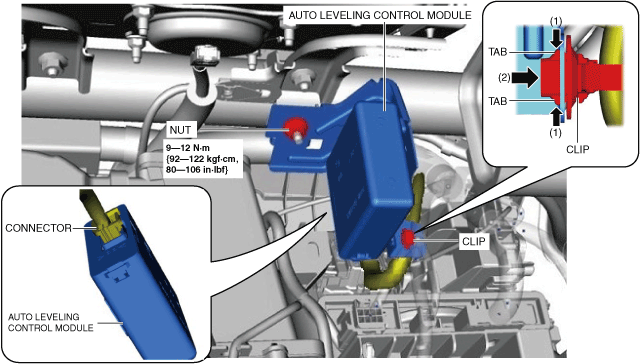
4. While pressing the clip tabs in the direction of arrows (1) shown in the figure, press the clip in the direction of arrow (2) to detach the clip tabs from the auto leveling control module.
amxzzw00004895
|
5. Remove the nut.
6. Disconnect the connector.
7. Remove the auto leveling control module.
8. Install in the reverse order of removal.
9. Perform the auto leveling control module automatic configuration using the following procedure.
10. Using the M-MDS, verify that DTCs U2300:54, U2300:55, or U2300:56 is not displayed.
11. Perform the headlight auto leveling system initialization. (See HEADLIGHT AUTO LEVELING SYSTEM INITIALIZATION.)
12. Adjust the headlight aiming. (See HEADLIGHT AIMING.)
R.H.D.
1. Disconnect the negative battery cable. (See NEGATIVE BATTERY CABLE DISCONNECTION/CONNECTION.)
2. Remove the following parts:
3. Remove the duct.
amxzzw00004896
|
4. While pressing the clip tabs in the direction of arrows (1) shown in the figure, press the clip in the direction of arrow (2) to detach the clip tabs from the auto leveling control module.
amxzzw00004897
|
5. Remove the nut.
6. Disconnect the connector.
7. Remove the auto leveling control module.
8. Install in the reverse order of removal.
9. Perform the auto leveling control module automatic configuration using the following procedure.
10. Using the M-MDS, verify that DTCs U2300:54, U2300:55, or U2300:56 is not displayed.
11. Perform the headlight auto leveling system initialization. (See HEADLIGHT AUTO LEVELING SYSTEM INITIALIZATION.)
12. Adjust the headlight aiming. (See HEADLIGHT AIMING.)