 |
amxzzw00002128
QUICK RELEASE CONNECTOR (EMISSION SYSTEM) REMOVAL/INSTALLATION [L8, LF]
id0116a3805500
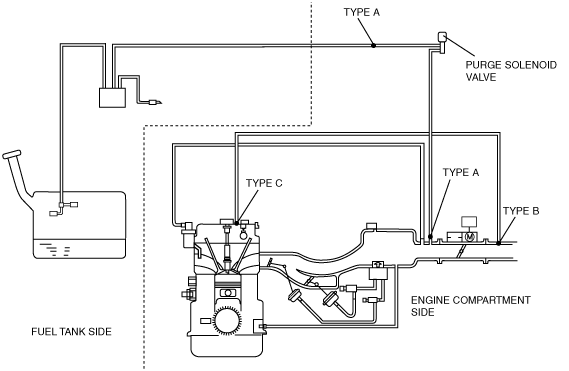
Quick Release Connector Type
amxzzw00002128
|
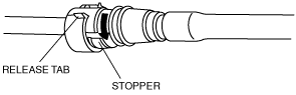
Type A Removal
1. Rotate the release tab on the quick release connector to the stopper position.
amxzzw00002129
|
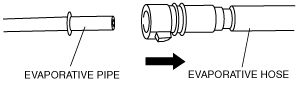
2. Pull out the evaporative hose straight from the evaporative pipe and disconnect it.
amxzzw00002130
|
3. Cover the disconnected quick release connector and evaporative pipe with vinyl sheeting or a similar material to prevent it from scratches or dirt.
amxzzw00002131
|
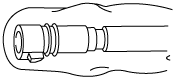
Type B Removal
1. Squeeze the release tab until the locks are released.
2. Pull the quick release connector straight outward.
amxzzw00002132
|
3. Cover the disconnected quick release connector and evaporative pipe with vinyl sheeting or a similar material to prevent it from becoming scratched or dirty.
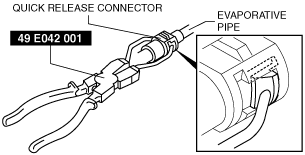
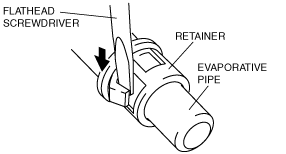
Type C Removal
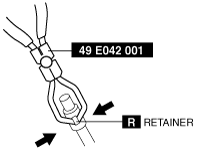
When using SST 49 E042 001
1. Set the SST parallel to the quick release connector.
am6xuw00001913
|
2. Hold the center of the retainer tabs with the SST ends and press the retainer.
3. Pull the connector side and disconnect the quick release connector.
4. Raise a retainer tab using the SST and remove the retainer.
am6xuw00001391
|
5. Cover the disconnected quick release connector and evaporative pipe with vinyl sheeting or a similar material to prevent it from scratches or dirt.
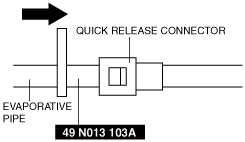
When using SST 49 N013 103A (Part of 49 N013 1A0D)
1. Insert the SST into the quick release connector.
am6xuw00001914
|
2. Pull out the evaporative hose straight from the evaporative pipe and disconnect it.
3. Cover the disconnected quick release connector and evaporative pipe with vinyl sheeting or a similar material to prevent it from scratches or dirt.
Type A Installation
amxzzw00002158
|
1. Inspect the evaporative hose and evaporative pipe sealing surface for damage and deformation.
2. Apply a small amount of clean engine oil to the sealing surface of the evaporative pipe.
3. Reconnect the evaporative hose straight to the evaporative pipe until a click is heard.
4. Lightly pull and push the quick release connector a few times by hand, and then verify that it can move 2.0—3.0 mm {0.08—0.12 in} and is connected securely.
Type B Installation
amxzzw00002133
|
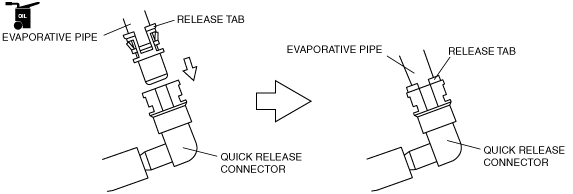
1. When newly replacing the quick release connector, remove the release tab using the following procedure.
amxzzw00002134
|
2. Inspect the quick release connector and evaporative pipe sealing surface for damage and deformation.
3. Apply a small amount of clean engine oil to the sealing surface of the evaporative pipe.
4. Reconnect the quick release connector straight to the evaporative pipe until a click is heard.
5. Lightly pull and push the quick release connector a few times by hand, and then verify that it is connected securely.
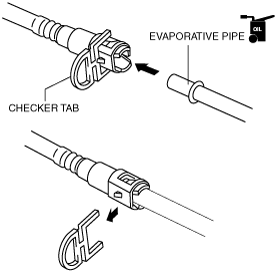
Type C Installation
amxzzw00002159
|
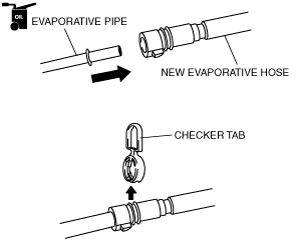
1. Inspect the evaporative hose and evaporative pipe sealing surface for damage and deformation.
2. Apply a small amount of clean engine oil to the sealing surface of the evaporative pipe.
3. Install a new retainer to the quick release connector.
4. Reconnect the hose straight to the pipe until a click is heard.
5. Lightly pull and push the quick release connector a few times by hand, and then verify that it is connected securely.