 |
e5u711zw5011
A/C UNIT REMOVAL/INSTALLATION
id071100800200
1. Remove battery cover.
2. Disconnect the negative battery cable. (See BATTERY REMOVAL/INSTALLATION [L8, LF].)
3. Discharge the refrigerant from the system. (See REFRIGERANT RECOVERY.) (See REFRIGERANT CHARGING.)
4. Drain the engine coolant. (See ENGINE COOLANT REPLACEMENT [L8, LF].)
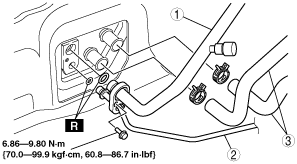
5. Disconnect from A/C unit in the order in the table.
L.H.D.
e5u711zw5011
|
R.H.D.
amxzzw00000679
|
|
1
|
Cooler pipe No.3 (L.H.D.), cooler hose (LO) (R.H.D.)
|
|
2
|
Cooler pipe No.2
|
|
3
|
Heater hose
|
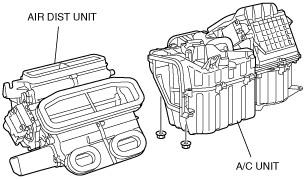
6. Remove the A/C unit and air dist unit. (See AIR DIST UNIT REMOVAL/INSTALLATION.)
7. Disassembly the A/C unit as shown in the figure.
e5u711zw5003
|
8. Install in the reverse order of removal.
9. Perform the refrigerant system performance test. (See REFRIGERANT SYSTEM PERFORMANCE TEST.)
10. Inspect for engine coolant leakage. (See ENGINE COOLANT LEAKAGE INSPECTION [L8, LF].)