|
e5u912zw5059
DOOR GLASS ADJUSTMENT
id091200813100
1. Fully close the door glass.
2. Remove the door trim. (See DOOR TRIM REMOVAL/INSTALLATION.)
3. Remove the door module panel. (See DOOR MODULE PANEL REMOVAL/INSTALLATION.)
4. Connect the power window regulator connector.
5. Loosen the glass stopper installation bolts.
e5u912zw5059
|
6. Loosen the power window regulator and door glass tightening nuts.
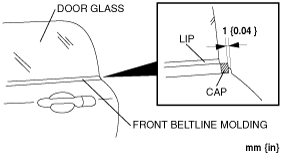
7. Align the door glass with the rear edge of the front beltline molding lip.
amxzzw00000727
|
8. Lightly tighten the power window regulator and door glass tightening nuts.
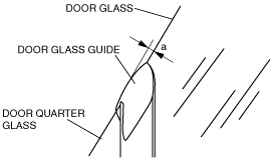
9. Adjust the clearance between the upper edge of the door glass and the door glass guide.
amxzzw00000728
|
|
Clearance |
Standard |
Minimum |
Maximum |
|---|---|---|---|
|
a
|
1.0 {0.04}
|
0 {0}
|
1.5 {0.06}
|
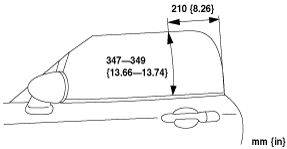
10. Adjust the door glass position.
amxzzw00000729
|
11. Tighten the power window regulator and door glass tightening nuts.
e5u912zw5062
|
12. Tighten the bolts while pressing the glass stopper in the direction of the arrows.
e5u912zw5063
|
13. Verify that the door glass opens and closes smoothly.
14. Install the door module panel. (See DOOR MODULE PANEL REMOVAL/INSTALLATION.)
15. Install the door trim. (See DOOR TRIM REMOVAL/INSTALLATION.)
16. Close the door with the soft top closed and verify that the door glass opens and closes smoothly.