HEADLIGHT AIMING
id091800800400
-
Note
-
• The reflectors for the low and high beams are integrated. Therefore, perform the headlight aiming adjustment on either the low or high beam.
Without LED Headlight
2-Beam type headlight
-
Low-beam adjustment
-
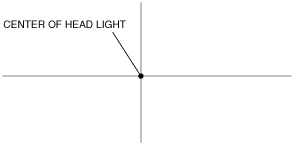
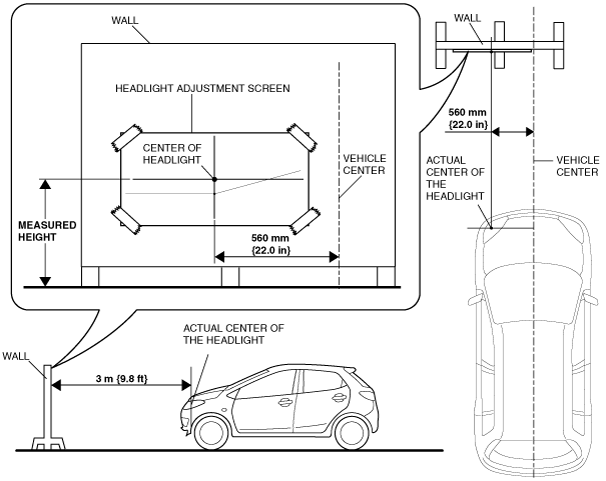
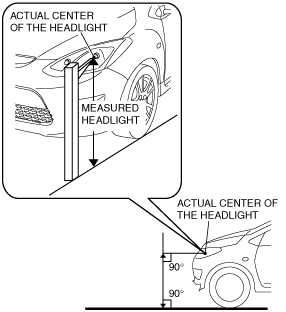
1. Point the headlight beams to a wall and verify that the headlight beams are as shown in the figure.
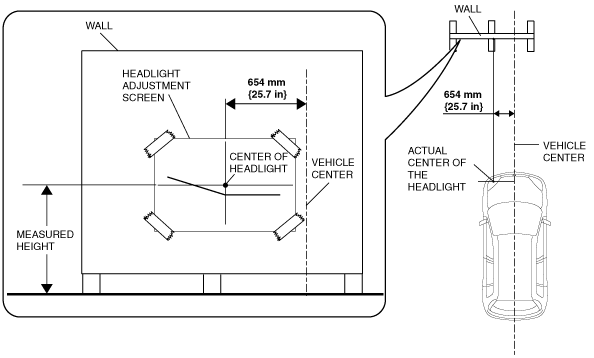
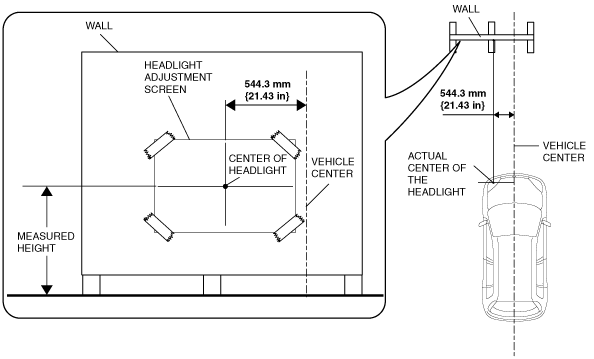
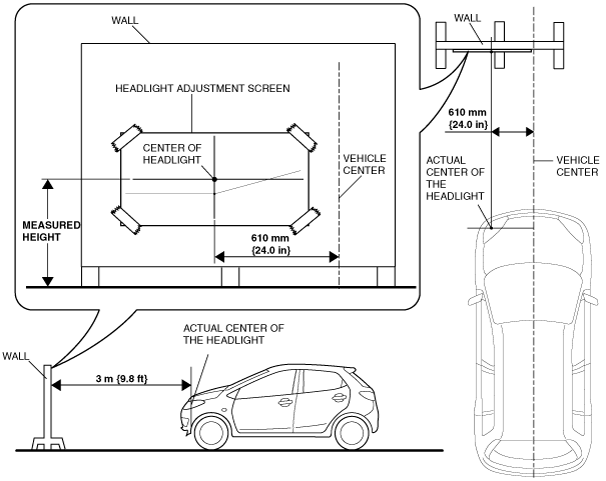
2. Make a headlight adjustment screen as shown in the figure using double-weight, white paper.
3. Adjust the tire pressure to the specification.
4. Park the vehicle on level ground, in an unloaded condition.
5. Sit on the driver-side seat alone.
6. Put the white screen in front of the vehicle.
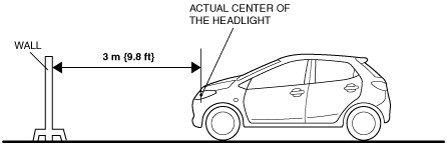
7. Line up the headlights with the white screen at a distance of 3 m {9.8 ft} apart.
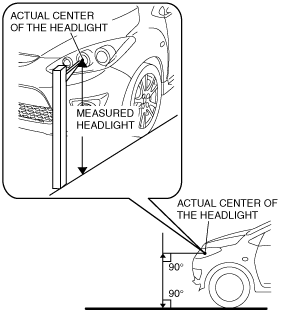
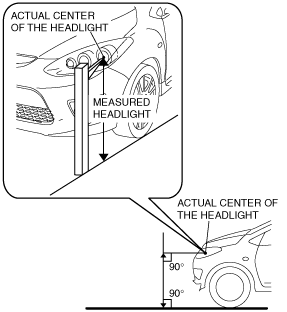
8. Measure the height at the center of the headlight.
-
Note
-
• Since the height of the vehicle varies depending on the vehicle situation, measure the height of the center of the headlight using the actual vehicle.
9. Align the center of the adjustment screen with the position indicated in the figure, then affix the screen to the wall.
10. Start the engine and charge the battery.
11. Turn on the headlight low beams.
12. Block the light of the headlight which is not adjusted.
13. Switch the headlight leveling switch at “0” position.
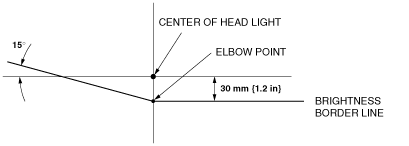
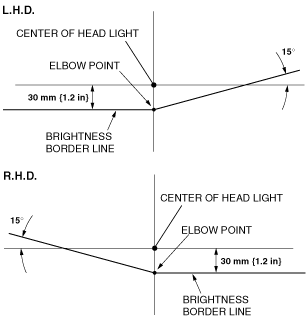
14. Verify that the elbow point of the headlight is at the position indicated by the adjustment screen.
-
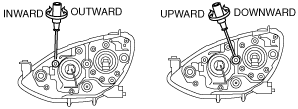
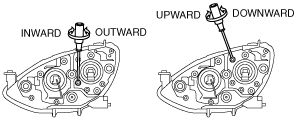
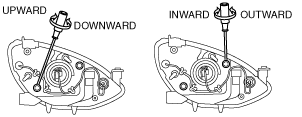
― If the elbow point is not at the position indicated by the adjustment screen, turn the adjustment screw as shown in the figure to adjust the elbow point to the position indicated by the adjustment screen.
-
High-beam adjustment
-
1. Make a headlight adjustment screen as shown in the figure using double-weight, white paper.
2. Adjust the tire pressure to the specification.
3. Park the vehicle on level ground, in an unloaded condition.
4. Sit on the driver-side seat alone.
5. Put the wall in front of the vehicle.
6. Line up the headlights with the wall at a distance of 3 m {9.8 ft} apart.
7. Measure the height at the center of the headlight.
-
Note
-
• Since the height of the vehicle varies depending on the vehicle situation, measure the height of the center of the headlight using the actual vehicle.
8. Align the center of the adjustment screen with the position indicated in the figure, then affix the screen to the wall.
9. Start the engine and charge the battery.
10. Turn on the headlight high beams.
11. Block the light of the headlight which is not adjusted using a partition.
12. Switch the headlight leveling switch at “0” position.
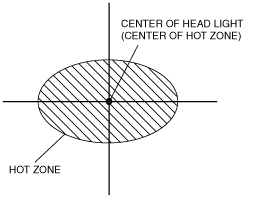
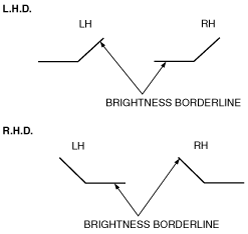
13. Verify that the center of the hot zone (the bright part of high beam) is at the center of the headlight on the adjustment screen.
-
― If the center of the hot zone is not at the center of the headlight on the adjustment screen, turn the adjustment screw to adjust the center of the hot zone.
4-Beam type headlight
-
Low-beam adjustment
-
1. Point the headlight beams to a wall and verify that the headlight beams are as shown in the figure.
2. Make a headlight adjustment screen as shown in the figure using double-weight, white paper.
3. Adjust the tire pressure to the specification.
4. Park the vehicle on level ground, in an unloaded condition.
5. Sit on the driver-side seat alone.
6. Put the white screen in front of the vehicle.
7. Line up the headlights with the white screen at a distance of 3 m {9.8 ft} apart.
8. Measure the height at the center of the headlight.
-
Note
-
• Since the height of the vehicle varies depending on the vehicle situation, measure the height of the center of the headlight using the actual vehicle.
9. Align the center of the adjustment screen with the position indicated in the figure, then affix the screen to the wall.
10. Start the engine and charge the battery.
11. Turn on the headlight low beams.
12. Block the light of the headlight which is not adjusted.
13. Switch the headlight leveling switch at “0” position.
14. Verify that the elbow point of the headlight is at the position indicated by the adjustment screen.
-
― If the elbow point is not at the position indicated by the adjustment screen, turn the adjustment screw as shown in the figure to adjust the elbow point to the position indicated by the adjustment screen.
-
High-beam adjustment
-
1. Make a headlight adjustment screen as shown in the figure using double-weight, white paper.
2. Adjust the tire pressure to the specification.
3. Park the vehicle on level ground, in an unloaded condition.
4. Sit on the driver-side seat alone.
5. Put the wall in front of the vehicle.
6. Line up the headlights with the wall at a distance of 3 m {9.8 ft} apart.
7. Measure the height at the center of the headlight.
-
Note
-
• Since the height of the vehicle varies depending on the vehicle situation, measure the height of the center of the headlight using the actual vehicle.
8. Align the center of the adjustment screen with the position indicated in the figure, then affix the screen to the wall.
9. Start the engine and charge the battery.
10. Turn on the headlight high beams.
11. Block the light of the headlight which is not adjusted using a partition.
12. Switch the headlight leveling switch at “0” position.
13. Verify that the center of the hot zone (the bright part of high beam) is at the center of the headlight on the adjustment screen.
-
― If the center of the hot zone is not at the center of the headlight on the adjustment screen, turn the adjustment screw to adjust the center of the hot zone.
With LED Headlight
Low Beam Adjustment
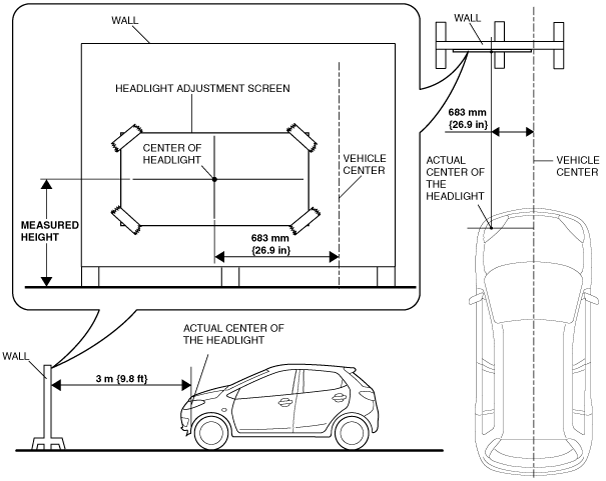
1. Make a screen shown in the figure using double-weight, white paper.
2. Sit on the driver-side seat alone.
3. Line up the vehicle with the wall so that the center of the headlight is 3 m {9.8 ft} away from the wall.
4. Measure the height at the center of the headlight.
-
Note
-
• Measure the height at the center of the headlight in which the aiming is being adjusted because the vehicle height differs depending on vehicle conditions such as tire wear.
5. Align the center of the headlight with the center of the screen.
6. Block the light of the other headlight using a partition.
7. Start the engine.
-
Note
-
• If servicing is performed with the engine stopped and the headlight illuminated, it could result in a discharged battery. Start the engine and perform the aiming adjustment while the engine is idling.
8. Turn on the headlight low beams.
9. Verify that the elbow point of the headlight is in the position indicated on the screen.
-
• If the elbow point is not at the position indicated on the screen, turn the adjustment screw to adjust the elbow point to the position indicated on the screen.
High Beam Adjustment
1. Make a screen shown in the figure using double-weight, white paper.
2. Sit on the driver-side seat alone.
3. Line up the vehicle with the wall so that the center of the headlight is 3 m {9.8 ft} away from the wall.
4. Measure the height at the center of the headlight.
-
Note
-
• Measure the height at the center of the headlight in which the aiming is being adjusted because the vehicle height differs depending on vehicle conditions such as tire wear.
5. Align the center of the headlight with the center of the screen.
6. Block the light of the other headlight using a partition.
7. Start the engine.
-
Note
-
• If servicing is performed with the engine stopped and the headlight illuminated, it could result in a discharged battery. Start the engine and perform servicing while the engine is idling.
8. Turn on the headlight high beams.
9. Verify that the center of the hot zone (the bright part of high beam) is at the center indicated on the screen.
-
• If the center of the hot zone is not at the position indicated on the screen, turn the adjustment screw to adjust the center of the hot zone to the position indicated on the screen.
-
Note
-
• Because the headlight moves also in the left/right direction when the up/down screw is turned, adjust it in the left/right direction after adjusting in the up/down direction.
 am2zzw00003354