REAR SHOCK ABSORBER INSPECTION [REAR BRAKE (DRUM)]
id0214c9128900
1. Remove the rear shock absorber. (See REAR SHOCK ABSORBER REMOVAL/INSTALLATION [REAR BRAKE (DRUM)].)
2. Inspect the rear shock absorber for damage or oil leakage.
-
3. Compress and extend the rear shock absorber piston rod at least three times at a steady rate. From the fourth compression stroke, verify that the operational force does not change and that there is no unusual noise.
-
4. Remove the wheel and tire.
5. Remove the rear shock absorber. (See REAR SHOCK ABSORBER REMOVAL/INSTALLATION [REAR BRAKE (DRUM)].)
6. Inspect the rear shock absorber for damage.
-
7. Inspect the rear shock absorber for oil leakage and if there is any malfunction, replace the rear shock absorber. (See REAR SHOCK ABSORBER REMOVAL/INSTALLATION [REAR BRAKE (DRUM)].)
-
Caution
-
• Even if there is no oil leakage, there may be gas leakage or internal part damage. Gas leakage and internal part damage cause a lowered vehicle height, unstable vehicle movement, or abnormal noise. Perform the stroke inspection and verify that there is no malfunction.
|
SYMPTOM
|
DETAIL
|
ACTION
|
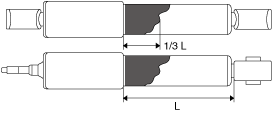 |
OIL STAIN BELOW DUST BOOT
• Oil stain is below the dust boot as shown in the figure.
• The oil stain area is 1/3 of L or less.
-
Note
-
• The oil stain is not progressive because the area dampens and dries repeatedly.
• The damping function is operating normally.
|
Wipe off any dust or oil on the surface.
|
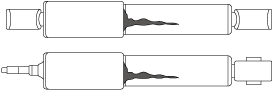 |
OIL LEAKAGE RUNS DOWN IN STRIP
• Oil is running down in a strip along the side of the rear shock absorber as shown in the figure.
|
|
 |
OIL LEAKAGE BELOW DUST BOOT
• The oil leakage area is 1/2 of L or more as shown in the figure.
|
8. Expand and contract the rear shock absorber piston rod 3 times or more at a certain speed and after the 4th time verify that the weight in a full stroke is constant with no abnormal response and noise.
-