 |
am2zzb00000471
FRONT SIDE FRAME (PARTIAL CUTTING) INSTALLATION [PANEL REPLACEMENT]
id098008742200
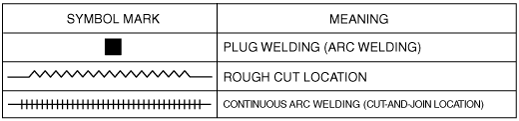
Symbol Marks
am2zzb00000471
|
Installation Procedure
LH
1. When installing new parts, measure and adjust the body as necessary to conform with standard dimensions.
2. Drill holes for the plug welding before installing the new parts.
3. After temporarily installing new parts, make sure the related parts fit properly.
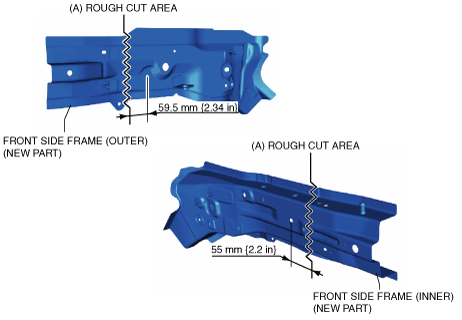
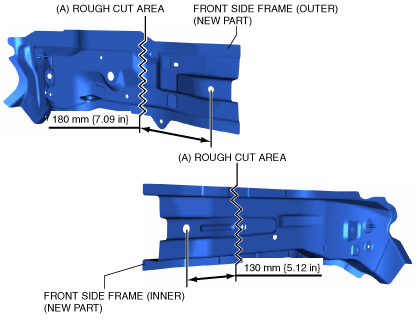
4. To cut and join the new and existing parts, rough cut the new part at the specified location indicated by (A) shown in the figure, and chamfer the joint surfaces of the new and existing parts.
am2zzb00000472
|
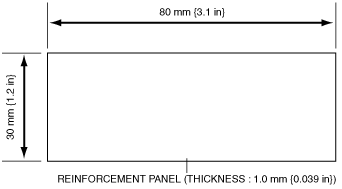
5. Make a 2 reinforcement panels using the material from the front side frame (outer).
am2zzb00000473
|
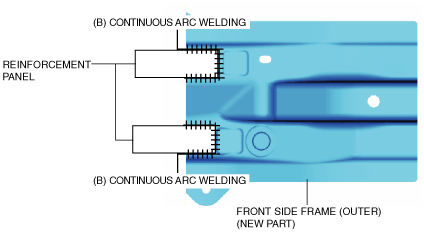
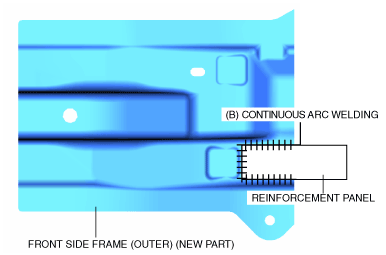
6. Continuous arc weld the location indicated by (B) shown in the figure, then install the reinforcement panels.
am2zzb00000474
|
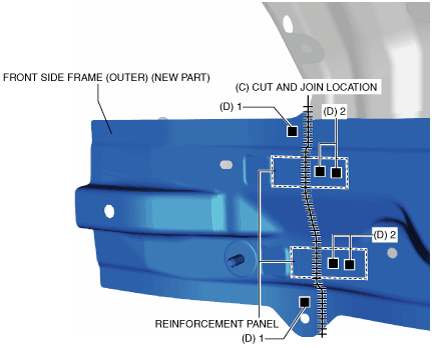
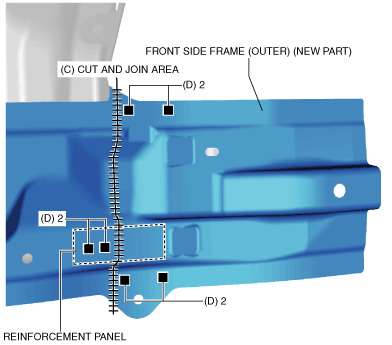
7. Cut and join the location indicated by (C) shown in the figure.
8. Plug weld the 6 locations indicated by (D) shown in the figure, then install the new part of front side frame (outer).
am2zzb00000475
|
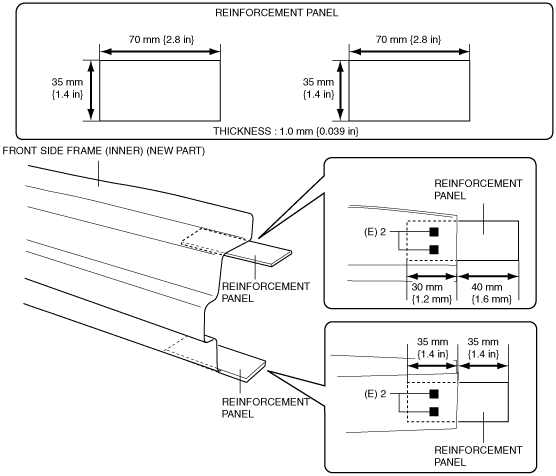
9. Make a 2 reinforcement panels using the material from the front side frame (inner).
10. Plug weld the 4 locations indicated by (E) shown in the figure, then install the reinforcement panels to the new part of front side frame (inner).
am2zzb00000476
|
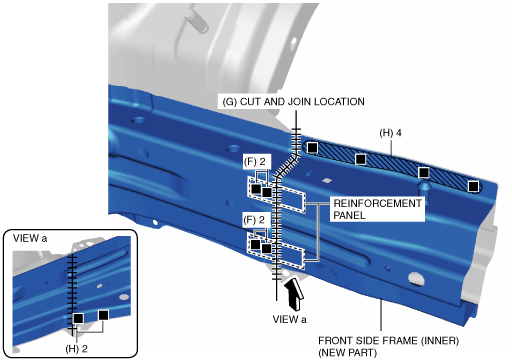
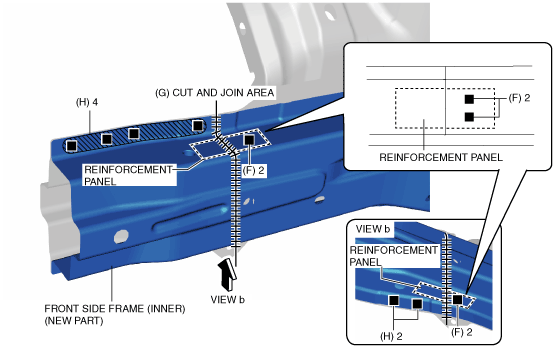
11. Plug weld the 4 locations indicated by (F) shown in the figure.
12. Cut and join the location indicated by (G) shown in the figure.
13. Plug weld the 6 locations indicated by (H) shown in the figure, then install the new part of front side frame (inner).
am2zzb00000477
|
14. Install the light bracket. (See LIGHT BRACKET INSTALLATION [PANEL REPLACEMENT].)
15. Install the bumper bracket. (See BUMPER BRACKET INSTALLATION [PANEL REPLACEMENT].)
RH
1. When installing new parts, measure and adjust the body as necessary to conform with standard dimensions.
2. Drill holes for the plug welding before installing the new parts.
3. After temporarily installing new parts, make sure the related parts fit properly.
4. To cut and join the new and existing parts, rough cut the new part at the specified location indicated by (A) shown in the figure, and chamfer the joint surfaces of the new and existing parts.
am2zzb00000478
|
5. Make a reinforcement panel using the material from the front side frame (outer).
am2zzb00000473
|
6. Continuous arc weld the location indicated by (B) shown in the figure, then install the reinforcement panels.
am2zzb00000479
|
7. Cut and join the location indicated by (C) shown in the figure.
8. Plug weld the 6 locations indicated by (D) shown in the figure, then install the new part of front side frame (outer).
am2zzb00000480
|
9. Make a 2 reinforcement panels using the material from the front side frame (inner).
10. Plug weld the 4 locations indicated by (E) shown in the figure, then install the reinforcement panels to the new part of front side frame (inner).
am2zzb00000481
|
11. Plug weld the 4 locations indicated by (F) shown in the figure.
12. Cut and join the location indicated by (G) shown in the figure.
13. plug weld the 6 locations indicated by (H) shown in the figure, then install the new part of front side frame (inner).
am2zzb00000482
|
14. Install the light bracket. (See LIGHT BRACKET INSTALLATION [PANEL REPLACEMENT].)
15. Install the bumper bracket. (See BUMPER BRACKET INSTALLATION [PANEL REPLACEMENT].)