 |
PCM REMOVAL/INSTALLATION [ZJ, ZY]
id0140c4802400
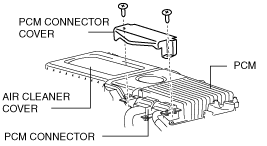
Except U.K. Specs.
1. When replacing the PCM, perform the following:
2. Disconnect the negative battery cable.
3. Remove the PCM connector cover.
am2zzw00000585
|
4. Disconnect the PCM connector.
5. Remove the air cleaner cover.
6. Install in the reverse order of removal.
U.K. Specs.
1. When replacing the PCM, perform the following:
2. Disconnect the negative battery cable.
3. Remove the PCM bracket.
am2zzw00002589
|
4. Disconnect the PCM connector.
5. Remove the air cleaner cover.
6. Install in the reverse order of removal.
Set Bolt Removal Note
1. Drill the set bolt using a drill bit with a diameter larger than the shank until the head is removed.
2. Clean all foreign material from the PCM connectors.
Set Bolt Installation Note
1. Install a new set bolt and tighten it until the neck of the bolt breaks off.
PCM Connector Connection Note
acxaaw00000768
|
1. Verify that the PCM connector lever is tilted towards the wiring harness side as shown in the figure.
acxaaw00000766
|
2. Insert the PCM connector straight until it contacts the PCM and verify that the lever reverts upward naturally.
3. Push the lever until a click is heard.
acxaaw00000767
|