 |
am2zzw00000511
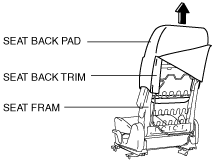
FRONT SEAT BACK TRIM REMOVAL/INSTALLATION [VEHICLES WITH SIDE AIR BAGS]
id091300487737
L.H.D.
1. Turn the ignition switch to the LOCK position.
2. Disconnect the negative battery cable and wait 1 min or more.
3. Remove the front seat. (See FRONT SEAT REMOVAL/INSTALLATION.)
4. Remove the headrest.
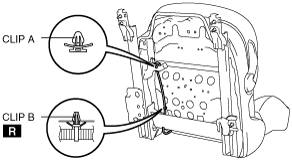
5. Detach clip A shown in the figure.
am2zzw00000511
|
6. Cut clip B shown in the figure.
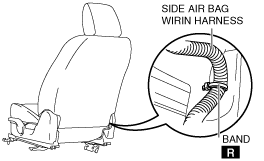
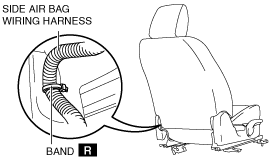
7. Cut the band securing the side air bag wiring harness. (See Band Installation Note.)
am2zzw00003752
|
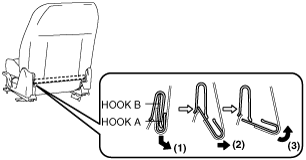
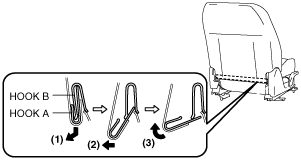
8. Slide hook A in the order shown in the figure to detach it from hook B.
am2zzw00002070
|
9. Open the fastener.
am2zzw00003753
|
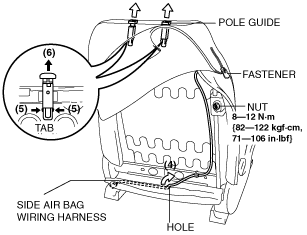
10. Pull out the side air bag wiring harness from the hole of the seat back trim and seat back pad by pulling it in the direction of arrow (4) shown in the figure.
11. Partially peal back the front seat back trim, release the pole guide tabs in the direction of arrow (5) shown in the figure, then pull the pole guide out in the direction of arrow (6).
12. Remove the nut.
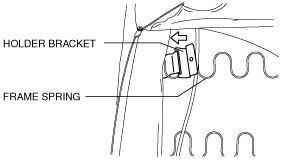
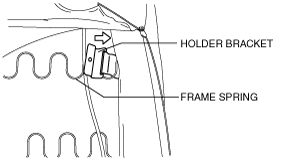
13. Press in the holder bracket to the seat back pad being careful not to catch the frame spring. (See Holder Bracket Installation Note.)
am2zzw00000515
|
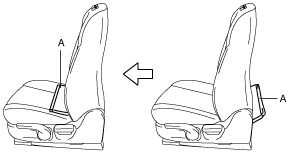
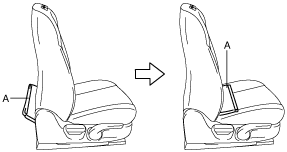
14. Pull out part A shown in the figure to the front.
am2zzw00000516
|
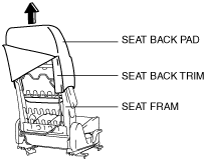
15. Remove the seat back trim and the seat back pad as a single unit from the seat frame by pulling them in the direction of the arrow.
am2zzw00000517
|
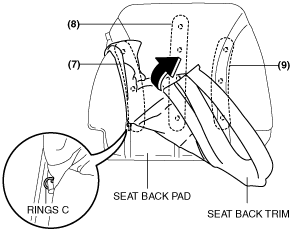
16. Partially peal back the seat back trim from the seat back pad, remove rings C in the order of (7), (8), (9) shown in the figure, then remove the seat back trim.
am2zzw00000518
|
17. Install in the reverse order of removal.
R.H.D.
1. Turn the ignition switch to the LOCK position.
2. Disconnect the negative battery cable and wait 1 min or more.
3. Remove the front seat. (See FRONT SEAT REMOVAL/INSTALLATION.)
4. Remove the headrest.
5. Detach clip A shown in the figure.
adejjw00001860
|
6. Cut clip B shown in the figure.
7. Cut the band securing the side air bag wiring harness. (See Band Installation Note.)
am2zzw00003754
|
8. Slide hook A in the order shown in the figure to detach it from hook B.
am2zzw00002072
|
9. Open the fastener.
am2zzw00003755
|
10. Pull out the side air bag wiring harness from the hole of the seat back trim and seat back pad by pulling it in the direction of arrow (4) shown in the figure.
11. Partially peal back the front seat back trim, release the pole guide tabs in the direction of arrow (5) shown in the figure, then pull the pole guide out in the direction of arrow (6).
12. Remove the nut.
13. Press in the holder bracket to the seat back pad being careful not to catch the frame spring. (See Holder Bracket Installation Note.)
am2zzw00002074
|
14. Pull out part A shown in the figure to the front.
adejjw00001864
|
15. Remove the seat back trim and the seat back pad as a single unit from the seat frame by pulling them in the direction of the arrow.
am2zzw00002075
|
16. Partially peal back the seat back trim from the seat back pad, remove rings C in the order of (7), (8), (9) shown in the figure, then remove the seat back trim.
am2zzw00002076
|
17. Install in the reverse order of removal.
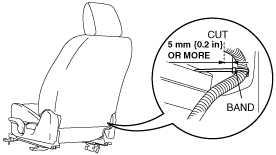
Band Installation Note
L.H.D.
1. Install the band with the end pointed to the front.
adejjw00003339
|
2. Cut the band end so that the length of the band end is 5 mm or less from the securing point.
R.H.D.
1. Install the band with the end pointed to the front.
adejjw00003319
|
2. Cut the band end so that the length of the band end is 5 mm or less from the securing point.
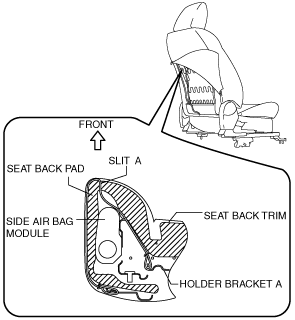
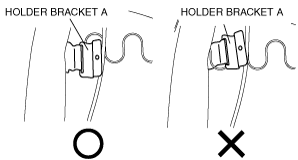
Holder Bracket Installation Note
L.H.D.
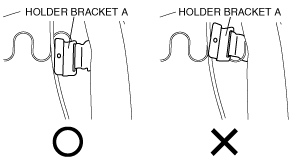
1. Pass holder bracket A through slit A of the seat back pad.
am2zzw00002454
|
adejjw00003329
|
2. Pass holder bracket B through slit B of the seat back pad.
am2zzw00002455
|
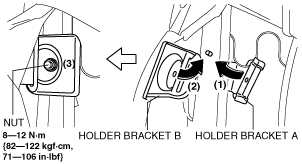
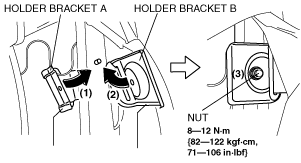
3. Assemble the holder bracket A to the frame.(1)
adejjw00003338
|
4. Assemble the holder bracket B to the frame.(2)
5. Install holder bracket A and B to the frame using the nut.(3)
R.H.D.
1. Pass holder bracket A through slit A of the seat back pad.
am2zzw00002456
|
am2zzw00002078
|
2. Pass holder bracket B through slit B of the seat back pad.
am2zzw00002457
|
3. Assemble the holder bracket A to the frame.(1)
am2zzw00002080
|
4. Assemble the holder bracket B to the frame.(2)
5. Install holder bracket A and B to the frame using the nut.(3)