FUEL LINE PRESSURE INSPECTION
CDA011400000W03
-
Warning
-
• Fuel line spills and leakage are dangerous. Fuel can ignite and cause serious injuries or death and damage. Fuel can also irritate skin and eyes. To prevent this, complete the following inspection with the engine stopped.
1. Complete the "BEFORE REPAIR PROCEDURE". (See BEFORE REPAIR PROCEDURE.)
2. Disconnect the negative battery cable.
3. Perform the following procedure for easier access.
-
(1) Disconnect the PCM connector, MAF sensor connector, and IAT sensor connector.
-
(2) Remove the air cleaner cover.
-
(3) Disconnect the HO2S sensor connector.
-
(4) Set the wiring harness bracket out of the way.
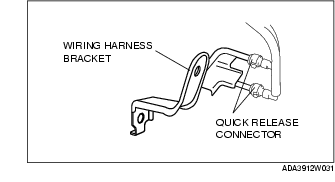
4. Disconnect the quick release connector. (See FUEL HOSE (ENGINE ROOM SIDE) REMOVAL/INSTALLATION.)
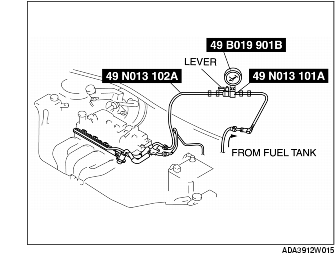
5. Turn the SST lever so that it is parallel to the hose as shown in the figure.
6. Insert the SST quick release connector into the fuel pipe until a click is heard.
7. Verify that the quick release connector is firmly connected by pulling it by hand.
8. Connect the negative battery cable.
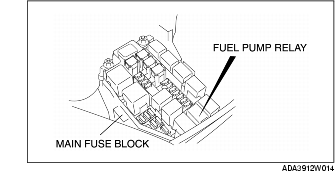
9. Remove the fuel pump relay.
-
Caution
-
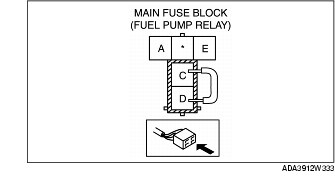
• Be careful to short the specified terminal as shorting the wrong terminal of the main fuse block may cause a malfunction.
10. Using a jumper wire, short fuel pump relay terminals C and D in the main fuse block and start the fuel pump.
11. Operate the fuel pump for 10 s.
12. Measure the fuel line pressure.
-
• If not within the specification, inspect the following.
If the fuel line pressure is less than the specification:
-
- Fuel pump unit
-
- Pressure regulator
-
- Fuel line leakage
If the fuel line pressure exceeds the specification:
-
- Pressure regulator
-
- Fuel line clogging
Fuel line pressure
-
280-320 kPa {2.9-3.2 kgf/cm2, 41-46 psi}
13. Disconnect the jumper wire and stop the fuel pump.
14. Measure the fuel hold pressure after 5 min.
-
• If not within the specification, inspect the following.
-
- Fuel line for clogged or leakage
Fuel hold pressure
-
150 kPa {1.6 kgf/cm2, 22 psi} or more
15. Disconnect the SST.
16. Connect the quick release connector. (See FUEL HOSE (ENGINE ROOM SIDE) REMOVAL/INSTALLATION.)
17. Complete the "AFTER REPAIR PROCEDURE". (See AFTER REPAIR PROCEDURE.)