PRIMARY SHAFT COMPONENTS INSPECTION
B3E051517201103
4th Gear, 3rd Gear Inspection
1. Inspect the synchronizer cones for wear.
-
• If there is any malfunction, replace parts as necessary.
2. Inspect the gear teeth for damage, wear, and cracks.
-
• If there is any malfunction, replace parts as necessary.
3. Inspect the synchronizer ring matching teeth for damage and wear.
-
• If there is any malfunction, replace the synchronizer ring.
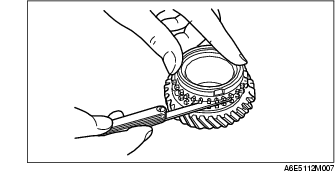
4th Synchronizer Ring, 3rd Synchronizer Ring Inspection
1. Inspect the synchronizer ring teeth for damage, wear, and cracks.
-
• If there is any malfunction, replace parts as necessary.
2. Inspect the tapered surface for wear and cracks.
-
• If there is any malfunction, replace parts as necessary.
3. Measure the clearance between the synchronizer ring and the flank surface of the gear.
-
• If it is less than the minimum specification, replace the synchronizer ring.
-
Note
-
• Set the synchronizer ring squarely in the gear and measure around the circumference.
Standard clearance
-
1.12-1.88 mm {0.044-0.074 in}
Minimum clearance
-
0.80 mm {0.031 in}
3rd/4th Clutch Hub Component Inspection
1. Inspect the clutch hub sleeve and hub operation.
-
• If there is any malfunction, replace parts as necessary.
2. Inspect the gear teeth for damage, wear, and cracks.
-
• If there is any malfunction, replace parts as necessary.
3. Inspect the synchronizer keys for damage, wear, and cracks.
-
• If there is any malfunction, replace parts as necessary.
4. Measure the clearance between the hub sleeve and shift forks.
-
• If it exceeds the maximum specification, replace the hub sleeve and shift fork as a set.
Standard clearance
-
0.20-0.50 mm {0.008-0.020 in}
Maximum clearance
-
1.00 mm {0.039 in}
Primary Shaft Gear Inspection
1. Inspect the gear contact surface for damage and wear.
-
• If there is any malfunction, replace the primary shaft.
2. Inspect the splines for damage and wear.
-
• If there is any malfunction, replace the primary shaft.
3. Inspect the gear teeth for damage, wear, and cracks.
-
• If there is any malfunction, replace the primary shaft.
4. Inspect the oil passage for clogging.
-
• If there is any malfunction, replace the primary shaft.
5. Measure the shaft gear runout.
-
• If it exceeds the maximum specification, replace the primary shaft.
Maximum runout
-
0.050 mm {0.0020 in}
6. Measure the clearance between the shaft gears and the gears.
-
• If not within the specification, replace parts as necessary.
|
Gear
|
Shaft
(Outer dia.)
|
Gear
(Inner dia.)
|
Clearance
|
|
3rd
|
35.15-35.17 {1.384-1.385}
|
35.21-35.23 {1.386-1.387}
|
0.040-0.080 {0.0016-0.0031}
|
|
4th
|
31.95-31.97 {1.258-1.259}
|
32.01-31.03 {1.260-1.261}
|
