 |
am2zzw00002022
REFRIGERANT PRESSURE SWITCH REMOVAL/INSTALLATION [FULL-AUTO AIR CONDITIONER]
id0740a1802600
1. Disconnect the negative battery cable.
2. Collect the refrigerant. (See REFRIGERANT CHARGING.)
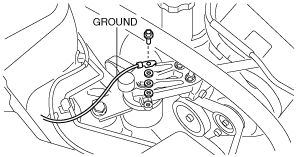
3. Remove the ground from the engine mount No.3.
am2zzw00002022
|
4. Remove the air cleaner installation bolt and slide the air cleaner component aside.
5. Disconnect the refrigerant pressure switch connector.
6. Remove the cooler pipe. Do not allow compressor oil to spill.
7. Loosen the refrigerant pressure switch using two spanners.
8. Remove the refrigerant pressure switch. (See Refrigerant Pressure Switch Installation Note.)
am2zzw00002031
|
9. Install in the reverse order of removal.
10. Perform the refrigerant system performance test. (See REFRIGERANT SYSTEM PERFORMANCE TEST.)
Refrigerant Pressure Switch Installation Note
1. Apply compressor oil to the O-rings and connect the joints.
