 |
am2zzw00007021
ULTRASONIC SENSOR INSTALLATION
id092200035600
Replacing with New Bracket
1. Using a utility knife, remove the double-sided adhesive tape left on the rear bumper.
2. Clean and degrease the tape adhering position on the rear bumper to adhere the double-sided adhesive tape of the bracket.
3. Peel off the tape backing from the double-sided adhesive tape.
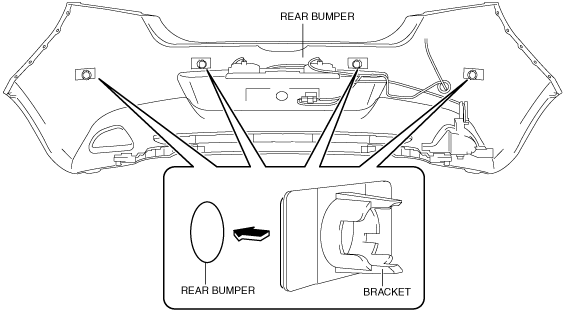
4. Align the hole positions of the rear bumper and the bracket, and adhere the double-sided adhesive tape of the bracket.
am2zzw00007021
|
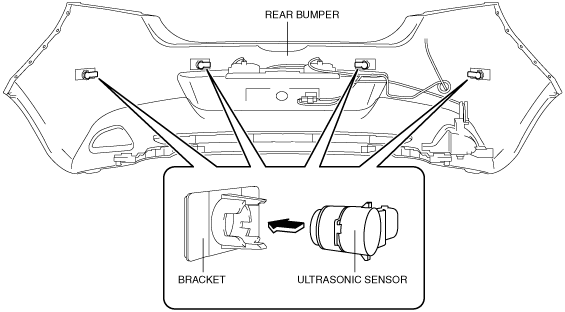
5. Install the ultrasonic sensors to the brackets.
am2zzw00007022
|
6. Remove the rear bumper. (See REAR BUMPER REMOVAL/INSTALLATION.)
7. Remove the rear combination light. (See REAR COMBINATION LIGHT REMOVAL/INSTALLATION.)
8. Remove the splash shield. (See SPLASH SHIELD REMOVAL/INSTALLATION.)
Reusing Bracket
1. Using a utility knife, remove the double-sided adhesive tape left on the rear bumper and the bracket.
2. Clean and degrease the tape adhering position on the bracket to adhere the double-sided adhesive tape to the bracket.
3. Peel off the tape backing from the double-sided adhesive tape.
4. Adhere the double-sided adhesive tape to the position shown in the figure for the bracket.
am2zzw00007023
|
5. Clean and degrease the tape adhering position on the rear bumper to adhere the double-sided adhesive tape of the bracket.
6. Peel off the tape backing from the double-sided adhesive tape.
7. Align the hole positions of the rear bumper and the bracket, and adhere the double-sided adhesive tape of the bracket.
am2zzw00007021
|
8. Install the ultrasonic sensors to the brackets.
am2zzw00007022
|
9. Remove the rear bumper. (See REAR BUMPER REMOVAL/INSTALLATION.)
10. Remove the rear combination light. (See REAR COMBINATION LIGHT REMOVAL/INSTALLATION.)
11. Remove the splash shield. (See SPLASH SHIELD REMOVAL/INSTALLATION.)