 |
am3zzw00034672
NEUTRAL SENSOR REMOVAL/INSTALLATION [F66M-R]
id0515n2999900
Replacement Part
|
O-ring
Quantity: 1
Location of use: Neutral sensor No.1
|
Bolt
Quantity: 1
Location of use: Neutral sensor No.1
|
O-ring
Quantity: 1
Location of use: Neutral sensor No.2
|
|
Bolt
Quantity: 1
Location of use: Neutral sensor No.2
|
—
|
—
|
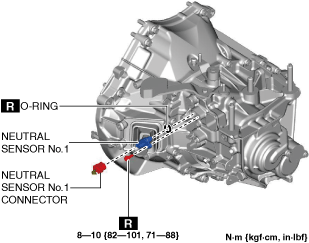
Neutral Sensor No.1
1. Disconnect the negative battery terminal. (See NEGATIVE BATTERY TERMINAL DISCONNECTION/CONNECTION [(E)].)
2. Remove the following parts as a single unit. (See INTAKE-AIR SYSTEM REMOVAL/INSTALLATION [SKYACTIV-G (WITHOUT CYLINDER DEACTIVATION (E))].)
3. Remove the neutral sensor No.1 using the following procedure.
am3zzw00034672
|
4. Install in the reverse order of removal. (See Neutral sensor No.1 installation note.)
Neutral sensor No.1 installation note
1. Clean neutral sensor No.1 and the neutral sensor No.1 installation hole.
2. Apply manual transaxle oil to the neutral sensor No.1 installation hole.
3. Install a new O-ring to neutral sensor No.1.
4. Install neutral sensor No.1 and the O-ring as a single unit.
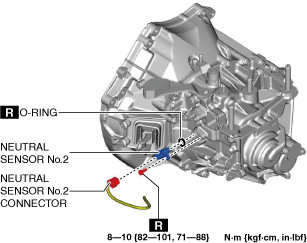
Neutral Sensor No.2 (With i-stop)
1. Disconnect the negative battery terminal. (See NEGATIVE BATTERY TERMINAL DISCONNECTION/CONNECTION [(E)].)
2. Remove the following parts as a single unit. (See INTAKE-AIR SYSTEM REMOVAL/INSTALLATION [SKYACTIV-G (WITHOUT CYLINDER DEACTIVATION (E))].)
3. Remove the neutral sensor No.2 using the following procedure.
am3zzw00034673
|
4. Install in the reverse order of removal. (See Neutral sensor No.2 installation note.)
Neutral sensor No.2 installation note
1. Clean neutral sensor No.2 and the neutral sensor No.2 installation hole.
2. Apply manual transaxle oil to the neutral sensor No.2 installation hole.
3. Install a new O-ring to neutral sensor No.2.
4. Install neutral sensor No.2 and the O-ring as a single unit.