|
am3zzw00035169
AUTOMATIC TRANSAXLE FLUID (ATF) INSPECTION [CW6A-EL]
id0517l1118500
Oil and Chemical Type
|
ATF
Type: ATF FZ
|
ATF level inspection
1. Remove the front under cover No.1. (See FRONT UNDER COVER No.1 REMOVAL/INSTALLATION.)
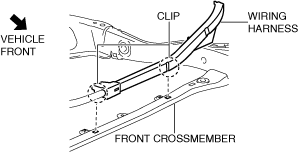
2. Disconnect the wiring harness from the front crossmember. (With i-ELOOP)
am3zzw00035169
|
3. Remove the dipstick securing bolt.
4. Connect the M-MDS to the DLC-2 and display the TCM PID TFT. (See PID/DATA MONITOR INSPECTION.) (See PID/DATA MONITOR TABLE [TCM (CW6A-EL)].)
5. Warm up the engine until the ATF temperature is 50 °C {122 °F}.
6. Remove the dipstick and wipe ATF off using a nylon cloth while leaving the engine idling.
am3zzw00026423
|
7. Insert the dipstick and pull it out again.
8. Verify that the ATF is adhering between L and F on the dipstick.
adejjw00010651
|
|
ATF type |
|---|
|
ATF FZ
|
9. Insert the dipstick and install the securing bolt.
am3zzw00032228
|
10. Connect the wiring harness to the front crossmember. (With i-ELOOP)
am3zzw00035170
|
11. Install the front under cover No.1. (See FRONT UNDER COVER No.1 REMOVAL/INSTALLATION.)