|
ac5wzb00000416
REAR DOOR OUTER PANEL INSTALLATION [(E)]
id0980085603x4
Symbol Mark
ac5wzb00000416
|
Installation Procedure
Using hemming tool
1. Drill the plug weld holes at the locations for the plug welds before installing a new part.
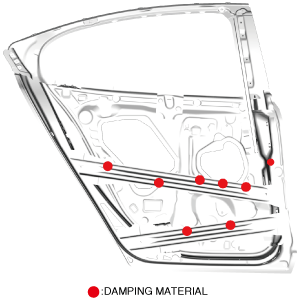
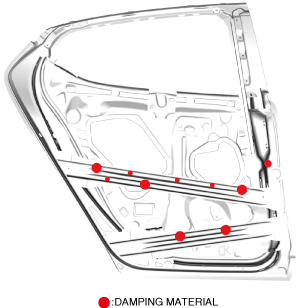
2. Apply body sealer to the contact surface of the damping material shown in the figure and the rear door (outer) panel.
4SD
am3zzb00000710
|
5HB
am3zzb00000686
|
3. Apply adhesive agent to the shaded area of the rear door (inner) panel.
am3zzb00000674
|
4. Adjust the rear door (inner) panel so that it fits properly before installing a rear door (outer) panel (new part) and before the adhesive dries.
|
Recommended agent |
Handleability time (minute) |
Hardening time (minute) |
|---|---|---|
|
ThreeBond 2088E
|
70
|
• 25°C {77°F}:1,440
• 120°C {248°F}:60
|
|
3M Panel Bonding Adhesive PN 8115
|
45
|
• 25°C {77°F}:1,440
• 60°C {140°F}:90
|
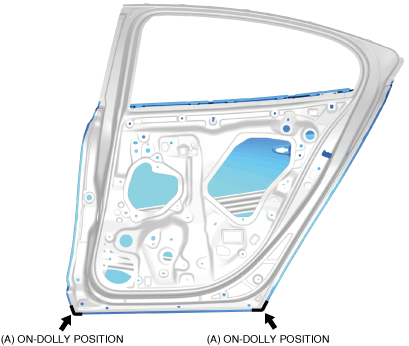
5. After the adhesive agent has dried, perform on-dolly work for the 2 locations in area A shown in the figure using a hammer and a hard-plastic dolly.
am3zzb00000675
|
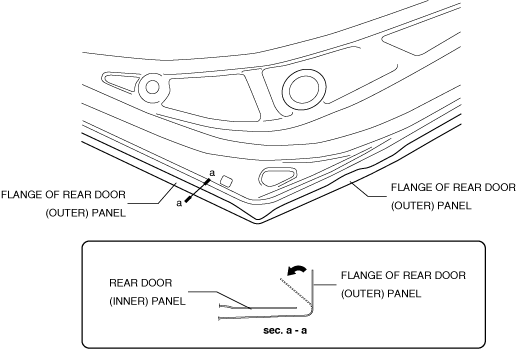
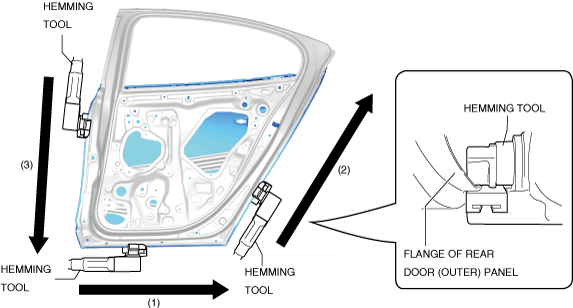
6. Using a hammer, bend the flange of the rear door (outer) panel to the angle where the flange can be pinched using a hemming tool.
am3zzb00000676
|
7. Set the hemming tool to the flange part of the rear door (outer) panel.
8. Move the hemming tool in the direction of the arrows in the order of (1), (2), and (3), and adhere the flange of the rear door (outer) panel to the rear door (inner) panel by applying pressure.
am3zzb00000677
|
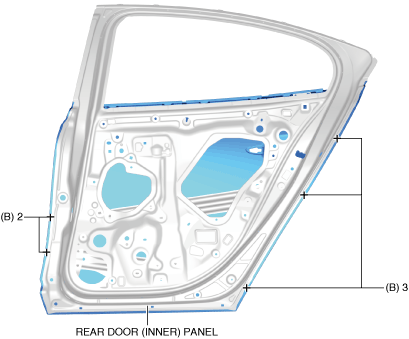
9. Arc spot welds in the 5 locations in area B shown in the figure from the rear door (inner) panel.
am3zzb00000678
|
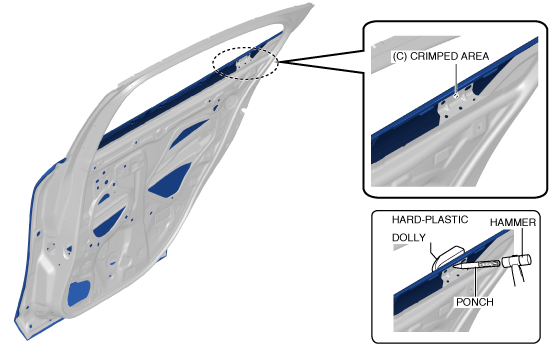
10. After crimping the flange in the upper part of the rear door (outer) panel using pliers, crimp the location in area C shown in the figure using a hammer, hard-plastic dolly, and ponch.
am3zzb00000679
|
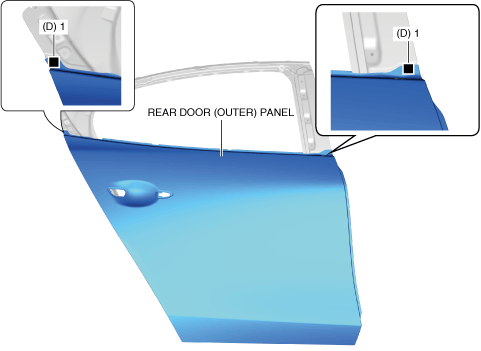
11. Plug welds in the 2 locations in area D shown in the figure from the rear door (outer) panel and install the rear door (outer) panel.
am3zzb00000680
|
12. Apply body sealer to the hemming part of the rear door (outer) panel. (See BODY SEALING [(E)].)
13. Apply rust prevention oil to the specified position. (See RUST PREVENTIVE TREATMENT [WATER-PROOF AND RUST PREVENTIVE].)
Not using hemming tool
1. Drill the plug weld holes at the locations for the plug welds before installing a new part.
2. Apply body sealer to the contact surface of the damping material shown in the figure and the rear door (outer) panel.
4SD
am3zzb00000710
|
5HB
am3zzb00000686
|
3. Apply adhesive agent to the shaded area of the rear door (inner) panel.
am3zzb00000674
|
4. Adjust the rear door (inner) panel so that it fits properly before installing a rear door (outer) panel (new part) and before the adhesive dries.
|
Recommended agent |
Handleability time (minute) |
Hardening time (minute) |
|---|---|---|
|
ThreeBond 2088E
|
70
|
• 25°C {77°F}:1,440
• 120°C {248°F}:60
|
|
3M Panel Bonding Adhesive PN 8115
|
45
|
• 25°C {77°F}:1,440
• 60°C {140°F}:90
|
5. After the adhesive agent has dried, perform on-dolly work for the 2 locations in area A shown in the figure using a hammer and a hard-plastic dolly.
am3zzb00000675
|
6. Using a hammer, bend the flange of the rear door (outer) panel to the angle where the flange can be pinched using a hemming tool.
am3zzb00000676
|
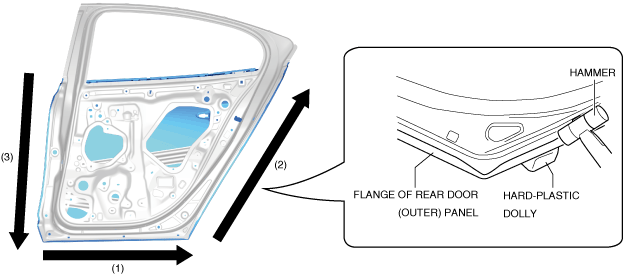
7. Perform on-dolly work in the direction of the arrows in the order of (1), (2), and (3) using a hammer and a hard-plastic dolly, and adhere the flange of the rear door (outer) panel to the rear door (inner) panel by applying pressure.
am3zzb00000684
|
8. Arc spot welds in the 5 locations in area B shown in the figure from the rear door (inner) panel.
am3zzb00000678
|
9. After crimping the flange in the upper part of the rear door (outer) panel using pliers, crimp the location in area C shown in the figure using a hammer, hard-plastic dolly, and ponch.
am3zzb00000679
|
10. Plug welds in the 2 locations in area D shown in the figure from the rear door (outer) panel and install the rear door (outer) panel.
am3zzb00000680
|
11. Apply body sealer to the hemming part of the rear door (outer) panel. (See BODY SEALING [(E)].)
12. Apply rust prevention oil to the specified position. (See RUST PREVENTIVE TREATMENT [WATER-PROOF AND RUST PREVENTIVE].)