|
am6zzb00000411
REAR FENDER PANEL REMOVAL [PANEL REPLACEMENT]
id098008744900
Symbol Mark
am6zzb00000411
|
Removal Procedure
4SD
am3zzb00000377
|
1. Rough cut the 2 locations in area A shown in the figure.
am3zzb00000378
|
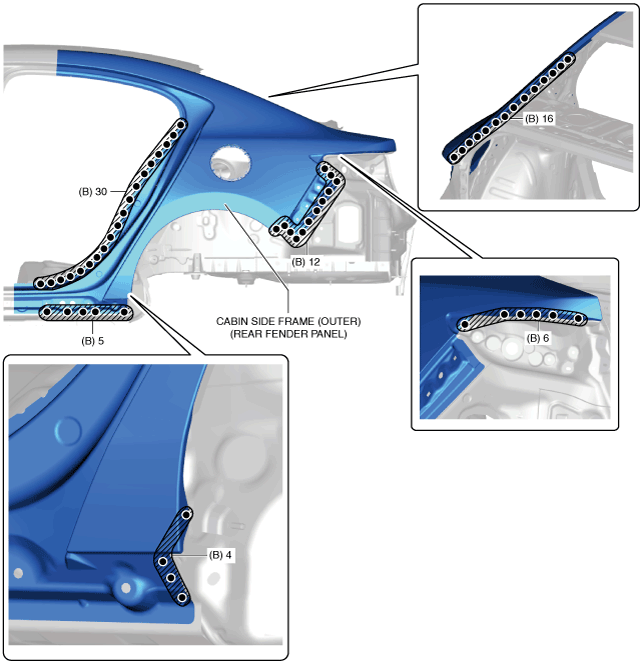
2. Drill the spot welds in the 73 locations in area B shown in the figure.
am3zzb00000379
|
3. Grind the rear fender panel hemming area using a belt sander.
am3zzb00000570
|
4. Insert a chisel into the locations in area C shown in the figure and peel off the adhesive adhering to the cabin side frame (outer) (rear fender panel) and the wheel housing (outer).
am3zzb00000571
|
5. Remove the cabin side frame (outer) (rear fender panel).
5HB
am3zzb00000380
|
1. Rough cut the 2 locations in area A shown in the figure.
am3zzb00000402
|
2. Drill the spot welds in the 63 locations in area B shown in the figure.
am3zzb00000403
|
3. Grind the rear fender panel hemming area using a belt sander.
am3zzb00000572
|
4. Insert a chisel into the locations in area C shown in the figure and peel off the adhesive adhering to the cabin side frame (outer) (rear fender panel) and the wheel housing (outer).
am3zzb00000573
|
5. Remove the cabin side frame (outer) (rear fender panel).