|
am3zzw00008557
FUEL INJECTOR REMOVAL/INSTALLATION [LF, L5]
id0114a7800600
1. Complete the “BEFORE SERVICE PRECAUTION”. (See BEFORE SERVICE PRECAUTION [LF, L5].)
2. Remove the battery cover. (See BATTERY REMOVAL/INSTALLATION [LF, L5].)
3. Disconnect the negative battery cable. (See BATTERY REMOVAL/INSTALLATION [LF, L5].)
4. Remove the plug hole plate. (See PLUG HOLE PLATE REMOVAL/INSTALLATION [LF, L5].)
5. Disconnect the fuel injector connector.
6. Remove in the order indicated in the table.
am3zzw00008557
|
|
1
|
Quick release connector
|
|
2
|
Fuel distributor
|
|
3
|
Injector clip
(See Fuel Injector Removal Note.)
|
|
4
|
Fuel injector
|
7. Install in the reverse order of removal.
8. Complete the “AFTER SERVICE PRECAUTION”. (See AFTER SERVICE PRECAUTION [LF, L5].)
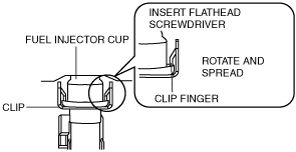
Fuel Injector Removal Note
1. Insert a flathead screwdriver between the fuel injector cup and clip finger.
am3uuw00002502
|
am6zzw00000254
|
2. Push the clip finger outward using a flathead screwdriver.
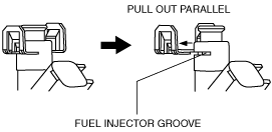
3. Remove the fuel injector with the clip.
4. Remove the clip from the fuel injector using the following procedure:
am3uuw00002503
|
Fuel Injector Installation Note
1. Apply a small amount of clean oil to the fuel injector groove and the new O-ring, and assemble them.
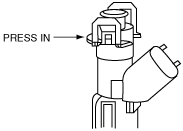
2. Temporarily attach a new clip to the fuel injector groove.
3. Hold the fuel injector firmly and push the clip into the fuel injector until the clip stops sliding.
am6zzw00000256
|
4. Verify that the fuel injector connector position is correct.
5. Press the fuel injector into the fuel injector cup. Continue pressing until the clip contacts the lower surface of the fuel injector cup.
6. Verify that the fuel injector and clip are correctly installed with the clip locked onto the fuel injector cup notch.