FUEL INJECTOR REMOVAL/INSTALLATION [ZY, Z6]


id0114b0800600

Warning
•  Fuel is very flammable liquid. If fuel spills or leaks from the pressurized fuel system, it will cause serious injury or death and facility breakage. Fuel can also irritate skin and eyes. To prevent this, always complete the “Fuel Line Safety Procedure”, while referring to the “BEFORE SERVICE PRECAUTION”.
•  A person charged with static electricity could cause a fire or explosion, resulting in death or serious injury. Before performing work on the fuel system, discharge static electricity by touching the vehicle body.
Caution
•  Disconnecting/connecting the quick release connector without cleaning it may possibly cause damage to the fuel pipe and quick release connector. Always clean the quick release connector joint area before disconnecting/connecting using cloth or soft brush, and make sure that it is free of foreign material.

1.  Complete the “BEFORE SERVICE PRECAUTION”. (See BEFORE SERVICE PRECAUTION [ZY, Z6].)

2.  Remove the battery cover. (See BATTERY REMOVAL/INSTALLATION [ZY, Z6].)

3.  Disconnect the negative battery cable. (See BATTERY REMOVAL/INSTALLATION [ZY, Z6].)

4.  Perform the following procedure.

Except U.K. specs.
1.  Remove the fresh-air duct and the air cleaner as a single unit. (See INTAKE-AIR SYSTEM REMOVAL/INSTALLATION [ZY, Z6].)
U.K. specs.
1.  Set the air cleaner cover out of the way with the PCM connector still connected. (See INTAKE-AIR SYSTEM REMOVAL/INSTALLATION [ZY, Z6].)
2.  Remove the fresh-air duct and the air cleaner case as a single unit. (See INTAKE-AIR SYSTEM REMOVAL/INSTALLATION [ZY, Z6].)

5.  Disconnect the fuel injector connector.

6.  Remove in the order indicated in the table.

am3zzw00005199

1
Quick release connector
2
Fuel distributor
3
Injector clip
4
Fuel injector
5
Insulator

7.  Install in the reverse order of removal.

8.  Complete the “AFTER SERVICE PRECAUTION”. (See AFTER SERVICE PRECAUTION [ZY, Z6].)


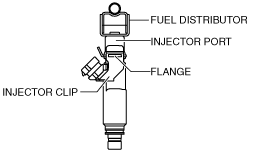
Injector Clip Removal Note

Caution
•  If the injector port flange or fuel distributor coated part is damaged, it might cause fuel leakage. To prevent damage, carefully remove the injector clip.
am3zzw00005200
•  Use of a deformed injector clip will cause the fuel injector to be connected incorrectly and could result in fuel leakage. Make sure to replace with a new injector clip after removing it.

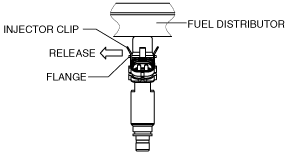
1.  Detach one side of the injector clip from the injector port flange.

am3zzw00005201

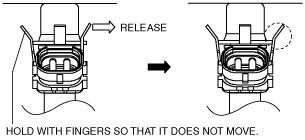
2.  While holding one side of the injector clip removed in Step 1 to prevent it shifting, release the other side of injector clip.

am3zzw00005202

3.  Detach the injector clip by sliding it in the axial direction of the fuel injector.

am3zzw00005203


Fuel Injector Installation Note

1.  Apply a small amount of clean oil to a new O-ring.

Caution
•  A damaged O-ring could cause fuel leakage. Be careful not to damage the O-ring when installing the fuel injector.
•  If there is foreign material on the fuel injector connecting part, it might damage the fuel injector and fuel distributor. To prevent this, clean the connecting part before connecting the fuel injector.

2.  Install the fuel injector straight to the injector port.

am3zzw00005204

3.  Verify that the fuel injector rotates smoothly.

•  If it does not rotate smoothly, reinstall the fuel injector.


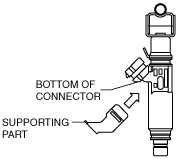
Injector Clip Installation Note

1.  Install a new injector clip to the fuel injector and insert the supporting part completely to the lower part of the injector connector.

am3zzw00005205

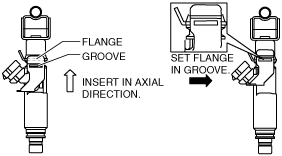
2.  Insert the injector port flange into the injector clip groove, sliding the injector clip along the fuel injector with the injector clip groove and injector port flange parallel.

am3zzw00005206

3.  Verify that the injector port flange is completely inserted into the groove.