AUTO LEVELING SYSTEM INITIALIZATION
id091800805800
-
Caution
-
• Perform with the vehicle in an unloaded condition (no occupants; spare tire, jack and tools are in designated positions.)
With AFS (Adaptive front lighting system)
Without using M-MDS
-
Note
-
• If the following servicing is to be done, perform the procedure for the case where system initialization has never been done. (See
Without using M-MDS.)
-
― AFS control module is newly replaced.
-
― Auto leveling sensor is removed/installed.
― Auto leveling sensor is replaced.
― Procedure for changing vehicle height is performed such as changing suspension.
Initialization has never been performed
-
Caution
-
• Perform the procedures in Steps 2 to 5 within 30 s.
1. Switch the ignition to off.
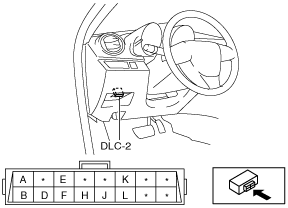
2. Set a jumper wire to the DLC-2 B terminal.
3. Switch the ignition to ON.
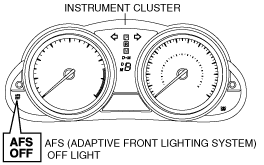
4. Verify that the AFS OFF light flashes every 0.5 s.
5. Ground the DLC-2 B terminal 3 times or more at 1 s intervals using the jumper wire.
6. After the AFS OFF light flashes three times at 0.5 s intervals, verify that it turns off.
-
• If the AFS OFF light continues to flash at 0.5 s intervals, the following malfunction can be considered. Repair or replace the malfunctioning area, then repeat the procedure from Step 1.
-
― AFS control module malfunction
― Malfunction in the related wiring harnesses
7. Disconnect the jumper wire from DLC-2.
8. Verify that the AFS OFF light is not illuminated.
Initialization operation implemented and resetting to be performed
-
Caution
-
• Perform the procedures in Steps 4 to 7 within 30 s.
• Perform the procedures in Steps 6 to 7 within 5 s.
-
1. Switch the ignition to off.
2. Set a jumper wire to the DLC-2 B terminal.
3. Turn on the headlights TNS position.
4. Switch the ignition to ON.
5. Verify that the AFS OFF light turns off after it illuminates for approx. 3 s.
6. Connect terminal B (INIT) of the DLC-2 to terminal J (GND) using a jumper wire.
7. The headlight switch switches in the following order: TNS→ON→OFF→ON→OFF→ON→OFF
8. After the AFS OFF light flashes three times at 0.5 s intervals, verify that it turns off.
-
• If the AFS OFF light continues to flash at 0.5 s intervals, the following malfunction can be considered. Repair or replace the malfunctioning area, then repeat the procedure from Step 1.
-
― AFS control module malfunction
― Malfunction in the related wiring harnesses
9. Pull out the jumper wire from DLC-2.
10. Verify that the AFS OFF light is not illuminated.
Using M-MDS
-
Caution
-
• Perform with the vehicle in an unloaded condition (no occupants; spare tire, jack and tools are in designated positions).
1. Connect the M-MDS to the DLC-2.
2. After the vehicle is identified, select the following items from the initial screen of the M-MDS.
-
• When using the IDS (laptop PC)
-
1. Select “Electrical”.
2. Select “Exterior Lighting”.
3. Select “Headlamp”.
4. Select “Auto Leveling Sensor Re-zero Procedure”
• When using the PDS (Pocket PC)
-
1. Select the “All Tests and Calibrations”.
2. Select “Auto Leveling Sensor Re-zero Procedure”.
3. Perform the procedure according to the directions on the screen.
Without AFS (Adaptive front lighting system)
Without using M-MDS
-
Note
-
• If the following servicing is to be done, perform the procedure for the case where system initialization has never been done. (See
Without using M-MDS.)
-
― Auto leveling control module is newly replaced.
-
― Auto leveling sensor is removed/installed.
― Auto leveling sensor is replaced.
― Procedure for changing vehicle height is performed such as changing suspension.
Initialization has never been performed
-
Caution
-
• Perform the procedures in Steps 2 to 5 within 30 s.
1. Switch the ignition to off.
2. Set a jumper wire to the DLC-2 B terminal.
3. Switch the ignition to ON.
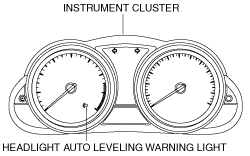
4. Verify that the headlight auto leveling warning light flashes every 0.5 s.
5. Ground the DLC-2 B terminal 3 times or more at 1 s intervals using the jumper wire.
6. After the headlight auto leveling warning light flashes three times at 0.5 s intervals, verify that it turns off.
-
• If the headlight auto leveling warning light continues to flash at 0.5 s intervals, the following malfunction can be considered. Repair or replace the malfunctioning area, then repeat the procedure from Step 1.
-
― Auto leveling control module malfunction
― Malfunction in the related wiring harnesses
7. Disconnect the jumper wire from DLC-2.
8. Verify that the headlight auto leveling warning light is not illuminated.
Initialization operation implemented and resetting to be performed
-
Caution
-
• Perform the procedures in Steps 4 to 7 within 30 s.
• Perform the procedures in Steps 6 to 7 within 5 s.
-
1. Switch the ignition to off.
2. Set a jumper wire to the DLC-2 B terminal.
3. Turn on the headlights TNS position.
4. Switch the ignition to ON.
5. Verify that the headlight auto leveling warning light turns off after it illuminates for approx. 3 s.
6. Connect terminal B (INIT) of the DLC-2 to terminal J (GND) using a jumper wire.
7. The headlight switch switches in the following order: TNS→ON→OFF→ON→OFF→ON→OFF
8. After the headlight auto leveling warning light flashes three times at 0.5 s intervals, verify that it turns off.
-
• If the headlight auto leveling warning light continues to flash at 0.5 s intervals, the following malfunction can be considered. Repair or replace the malfunctioning area, then repeat the procedure from Step 1.
-
― Auto leveling control module malfunction
― Malfunction in the related wiring harnesses
9. Pull out the jumper wire from DLC-2.
10. Verify that the headlight auto leveling warning light is not illuminated.
Using M-MDS
-
Caution
-
• Perform with the vehicle in an unloaded condition (no occupants; spare tire, jack and tools are in designated positions).
1. Connect the M-MDS to the DLC-2.
2. After the vehicle is identified, select the following items from the initial screen of the M-MDS.
-
• When using the IDS (laptop PC)
-
1. Select “Electrical”.
2. Select “Exterior Lighting”.
3. Select “Headlamp”.
4. Select “Auto Leveling Sensor Re-zero Procedure”
• When using the PDS (Pocket PC)
-
1. Select the “All Tests and Calibrations”.
2. Select “Auto Leveling Sensor Re-zero Procedure”.
3. Perform the procedure according to the directions on the screen.