 |
am3zzw00000490
VARIABLE VALVE TIMING ACTUATOR INSPECTION[ZJ, ZY, Z6]
id0110b1801200
1. Remove the battery cover.
2. Disconnect the negative battery cable.
3. Remove the air cleaner component. (Except U.K. specs.) (See INTAKE-AIR SYSTEM REMOVAL/INSTALLATION[ZJ, ZY, Z6].)
4. Remove the air cleaner cover and position the air cleaner case out of the way with the PCM connector still connected. (U.K. specs.) (See INTAKE-AIR SYSTEM REMOVAL/INSTALLATION[ZJ, ZY, Z6].)
5. Remove the ignition coils. (See IGNITION COIL REMOVAL/INSTALLATION[ZJ, ZY, Z6].)
6. Disconnect the ventilation hose.
7. Remove the cylinder head cover.
8. Remove the under cover and splash shield (RH).
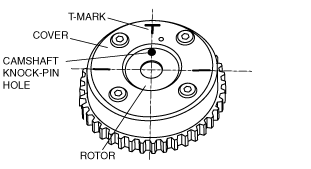
9. Verify that the camshaft knock pin hole of the variable valve timing actuator and the T- mark of the cover are aligned and fixed as shown in the figure.
am3zzw00000490
|
10. Install the under cover splash shield (RH). (See DRIVE BELT REPLACEMENT[ZJ, ZY, Z6].)
11. Install the cylinder head cover. (See TIMING CHAIN REMOVAL/INSTALLATION[ZJ, ZY, Z6].)
12. Install the ventilation hose.
13. Install the ignition coils. (See IGNITION COIL REMOVAL/INSTALLATION[ZJ, ZY, Z6].)
14. Install the air cleaner component. (See INTAKE-AIR SYSTEM REMOVAL/INSTALLATION[ZJ, ZY, Z6].)