|
am3zzw00001756
FUEL PUMP UNIT REMOVAL/INSTALLATION[LF, L3]
id0114c2800900
1. Follow “BEFORE SERVICE PRECAUTION” before performing any work operations to prevent fuel from spilling from the fuel system. (See BEFORE SERVICE PRECAUTION[LF, L3].)
2. Remove the battery cover. (See BATTERY REMOVAL/INSTALLATION[LF, L3].)
3. Disconnect the negative battery cable.
4. Remove the fuel tank. (See FUEL TANK REMOVAL/INSTALLATION[LF, L3].)
5. Remove in the order indicated in the table.
6. Install in the reverse order of removal.
7. Inspect all related parts by performing “AFTER SERVICE PRECAUTION”. (See AFTER SERVICE PRECAUTION[LF, L3].)
Without the fuel filter (high-pressure)
am3zzw00001756
|
With the fuel filter (high-pressure)
am3zzw00001757
|
|
1
|
Quick release connector
|
|
2
|
Fuel pump cap
(See Fuel Pump Cap Removal Note.)
|
|
3
|
Fuel pump unit
|
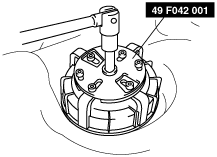
Fuel Pump Cap Removal Note
1. Remove the fuel pump cap using the SST.
am3zzw00000134
|
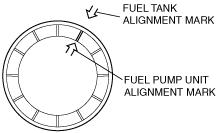
Fuel Pump Cap Installation Note
1. Align the fuel tank and fuel pump unit alignment marks as shown in the figure.
am3zzw00000135
|
2. Set the SST as shown in the figure.
am3zzw00000134
|
3. Using the SST, tighten the fuel pump cap within the specified tightening torque without shifting the alignment marks.