 |
am3zzw00001491
QUICK RELEASE CONNECTOR REMOVAL/INSTALLATION[MZ-CD 1.6 (Y6)]
id0114c3801700
Quick Release Connector Type
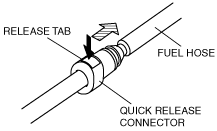
Type A Removal
1. Follow “ BEFORE SERVICE PRECAUTION” and remove dirt from the connecting surfaces before performing any work operations. (See BEFORE SERVICE PRECAUTION[MZ-CD 1.6 (Y6)].)
2. Push the release tab on the quick release connector.
am3zzw00001491
|
3. Pull out the hose straight from the pipe and disconnect it.
4. Cover the disconnected quick release connector and fuel pipe with vinyl sheeting or a similar material to prevent scratches or dirt.
am3zzw00001492
|
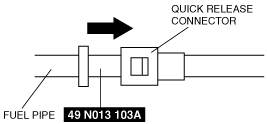
Type B Removal
Using the SST (Mazda SST number: 49 N013 103A)
am3zzw00001493
|
1. Follow “ BEFORE SERVICE PRECAUTION” and remove dirt from the connecting surfaces before performing any work operations. (See BEFORE SERVICE PRECAUTION[MZ-CD 1.6 (Y6)].)
2. Insert the SST into the quick release connector.
am3zzw00001494
|
3. Pull out the fuel hose straight from the fuel pipe and disconnect it.
4. Cover the disconnected quick release connector and fuel pipe with vinyl sheeting or a similar material to prevent it from scratches or dirt.
am3zzw00001492
|
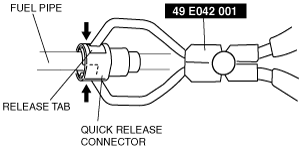
Using the SST (49 E042 001)
1. Follow “ BEFORE SERVICE PRECAUTION” and remove dirt from the connecting surfaces before performing any work operations. (See BEFORE SERVICE PRECAUTION[MZ-CD 1.6 (Y6)].)
2. Push the release tab using the SST.
am3zzw00001495
|
3. Pull out the fuel hose straight from the fuel pipe and disconnect it.
4. Cover the disconnected quick release connector and fuel pipe with vinyl sheeting or a similar material to prevent scratches or dirt.
am3zzw00001492
|
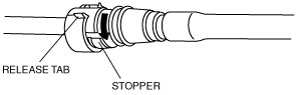
Type C Removal
1. Follow “BEFORE SERVICE PRECAUTION” before performing any work operations to prevent fuel from spilling from the fuel system. (See BEFORE SERVICE PRECAUTION[MZ-CD 1.6 (Y6)].)
2. Rotate the release tab on the quick release connector to the stopper position.
am3zzw00001496
|
3. Pull out the fuel hose straight from the fuel pipe and disconnect it.
am3zzw00001497
|
4. Cover the disconnected quick release connector and fuel pipe with vinyl sheeting or a similar material to prevent scratches or dirt.
am3zzw00001492
|
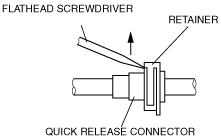
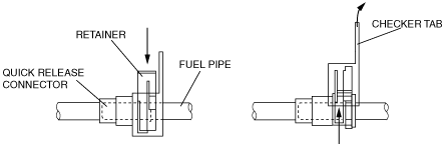
Type D Removal
1. Follow “ BEFORE SERVICE PRECAUTION” and remove dirt from the connecting surfaces before performing any work operations. (See BEFORE SERVICE PRECAUTION[MZ-CD 1.6 (Y6)].)
2. Release the retainer using a flathead screwdriver or a similar tool.
am3zzw00001498
|
3. Pull out the hose straight from the pipe and disconnect it.
4. Cover the disconnected quick release connector and fuel pipe with vinyl sheeting or a similar material to prevent scratches or dirt.
am3zzw00001492
|
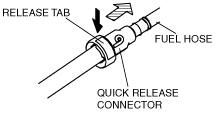
Type E Removal
1. Follow “ BEFORE SERVICE PRECAUTION” and remove dirt from the connecting surfaces before performing any work operations. (See BEFORE SERVICE PRECAUTION[MZ-CD 1.6 (Y6)].)
2. Push the release tab on the retainer to unlock.
am3zzw00001499
|
3. Pull out the fuel hose straight from the fuel pipe and disconnect it.
4. Cover the disconnected quick release connector and fuel pipe with vinyl sheeting or a similar material to prevent scratches or dirt.
am3zzw00001492
|
Type F Removal
1. Follow “ BEFORE SERVICE PRECAUTION” and remove dirt from the connecting surfaces before performing any work operations. (See BEFORE SERVICE PRECAUTION[MZ-CD 1.6 (Y6)].)
2. Push the release tab on the retainer to unlock.
am3zzw00001500
|
3. Pull out the fuel hose straight from the fuel pipe and disconnect it.
4. Cover the disconnected quick release connector and fuel pipe with vinyl sheeting or a similar material to prevent scratches or dirt.
am3zzw00001492
|
Type G Removal
1. Follow “ BEFORE SERVICE PRECAUTION” and remove dirt from the connecting surfaces before performing any work operations. (See BEFORE SERVICE PRECAUTION[MZ-CD 1.6 (Y6)].)
2. Push the release tab on the retainer to unlock.
am3zzw00001499
|
3. Pull out the fuel hose straight from the fuel pipe and disconnect it.
4. Cover the disconnected quick release connector and fuel pipe with vinyl sheeting or a similar material to prevent scratches or dirt.
am3zzw00001492
|
Type A Installation
1. Verify that there is retainer in the quick release connector.
2. Inspect the fuel hose and fuel pipe sealing surface for damage and deformation.
3. When disconnecting and reconnecting the quick release connector, verify if the metal reinforcement pipe protrudes from the resin pipe end while pressing the end with a finger.
4. Reconnect the fuel hose straight to the fuel pipe until a click is heard.
5. Lightly pull and push the quick release connector a few times by hand, and then verify that it is connected securely.
6. Inspect all related parts by performing “AFTER SERVICE PRECAUTION”. (See AFTER SERVICE PRECAUTION[MZ-CD 1.6 (Y6)].)
Type B Installation
am3zzw00001501
|
1. Inspect the fuel hose and fuel pipe sealing surface for damage and deformation.
2. Reconnect the fuel hose straight to the fuel pipe until a click is heard.
3. Lightly pull and push the quick release connector a few times by hand, and then verify that it is connected securely.
4. Inspect all related parts by performing “AFTER SERVICE PRECAUTION”. (See AFTER SERVICE PRECAUTION[MZ-CD 1.6 (Y6)].)
Type C Installation
am3zzw00001501
|
1. Inspect the fuel hose and fuel pipe sealing surface for damage and deformation.
2. Reconnect the fuel hose straight to the fuel pipe until a click is heard.
3. Lightly pull and push the quick release connector a few times by hand, and then verify that it is connected securely.
4. Inspect all related parts by performing “AFTER SERVICE PRECAUTION”. (See AFTER SERVICE PRECAUTION[MZ-CD 1.6 (Y6)].)
Type D Installation
1. Inspect the fuel hose and fuel pipe sealing surface for damage and deformation.
2. Reconnect the fuel hose straight to the fuel pipe until a click is heard.
3. Push the retainer then remove the checker tab.
am3zzw00001502
|
4. Lightly pull and push the quick release connector a few times by hand, and then verify that it is connected securely.
5. Perform the “AFTER FUEL ADDITIVE SYSTEM REPAIR PROCEDURE” when remove/disconnect the fuel additive hose. (High power-Euro 4) (See AFTER SERVICE PRECAUTION[MZ-CD 1.6 (Y6)].)
6. Inspect all related parts by performing “AFTER SERVICE PRECAUTION”. (See AFTER SERVICE PRECAUTION[MZ-CD 1.6 (Y6)].)
Type E Installation
1. Inspect the fuel hose and fuel pipe sealing surface for damage and deformation.
2. Reconnect the fuel hose straight to the fuel pipe until a click is heard.
3. Lightly pull and push the quick release connector a few times by hand, and then verify that it is connected securely.
4. Inspect all related parts by performing “AFTER SERVICE PRECAUTION”. (See AFTER SERVICE PRECAUTION[MZ-CD 1.6 (Y6)].)
Type F Installation
1. Inspect the fuel hose and fuel pipe sealing surface for damage and deformation.
2. Reconnect the fuel hose straight to the fuel pipe until a click is heard.
3. Lightly pull and push the quick release connector a few times by hand, and then verify that it is connected securely.
4. Inspect all related parts by performing “AFTER SERVICE PRECAUTION”. (See AFTER SERVICE PRECAUTION[MZ-CD 1.6 (Y6)].)
Type G Installation
1. Inspect the fuel hose and fuel pipe sealing surface for damage and deformation.
2. Reconnect the fuel hose straight to the fuel pipe until a click is heard.
3. Lightly pull and push the quick release connector a few times by hand, and then verify that it is connected securely.
4. Inspect all related parts by performing “AFTER SERVICE PRECAUTION”. (See AFTER SERVICE PRECAUTION[MZ-CD 1.6 (Y6)].)