 |
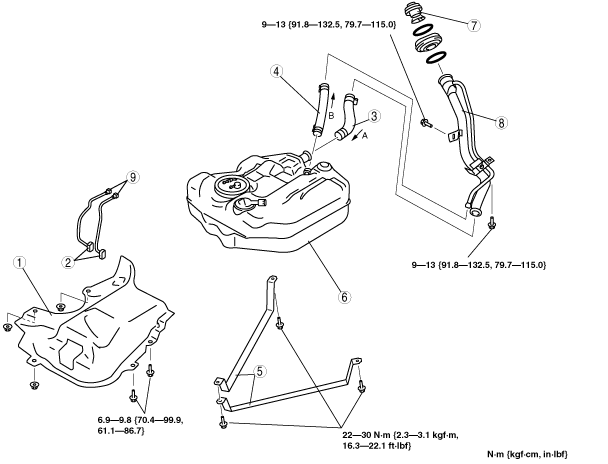
FUEL TANK REMOVAL/INSTALLATION [MZR-CD (RF Turbo)]
id0114f1801600
1. Disconnect the negative battery cable. (See BATTERY REMOVAL/INSTALLATION [MZR-CD (RF Turbo)].)
2. Open the fuel-filler cap.
3. Follow “BEFORE REPAIR PROCEDURE” before performing any work operations to prevent fuel from spilling from the fuel system. (See BEFORE REPAIR PROCEDURE [MZR-CD (RF Turbo)].)
4. Drain the fuel using the following procedure.
5. Remove the rear seat cushion. (See REAR SEAT REMOVAL/INSTALLATION.)
6. Remove the service hole cover.
7. Disconnect the fuel sender unit connector.
8. Remove the tunnel member
9. Remove the main silencer, presilencer.
10. Remove the main silencer, presilencer insulator.
11. Remove the rear under cover.
12. Remove in the order indicated in the table.
13. Install in the reverse order of removal.
14. Inspect all parts by performing “AFTER REPAIR PROCEDURE”. (See AFTER REPAIR PROCEDURE [MZR-CD (RF Turbo)].)
am3zzw00004268
|
|
1
|
Insulator
|
|
2
|
Quick release connector
|
|
3
|
Joint hose
(See Joint Hose Installation Note.)
|
|
4
|
Breather hose
|
|
5
|
Strap
|
|
6
|
Fuel tank
|
|
7
|
Fuel-filler cap
|
|
8
|
Fuel-filler pipe
|
|
9
|
Quick release connector
|
Fuel-filler Pipe Removal Note
1. Remove the rear tire (RH).
2. Remove the rear mudguard (RH).
3. Support the rear crossmember using a transmission jack.
4. Remove the rear shock absorber lower bolts. (See REAR SHOCK ABSORBER REMOVAL/INSTALLATION.)
5. Loosen the rear crossmember installation nuts (6 locations) and lower the rear crossmember 30 mm {1.2 in}. (See REAR CROSSMEMBER REMOVAL/INSTALLATION.)
6. Remove the fuel-filler pipe.
Fuel-filler Pipe Installation Note
1. Temporarily tighten bolt A. then tighten in the order of B, then A.
Breather Hose Installation Note
1. Fit the breather hose onto the respective fittings, and install clamps as shown.
am3zzw00004269
|
Joint Hose Installation Note
1. Fit the joint hose onto the respective fittings, and install clamps as shown.
am3zzw00001476
|