 |
am3zzw00004288
CALIPER (REAR) DISASSEMBLY/ASSEMBLY
id041100800600
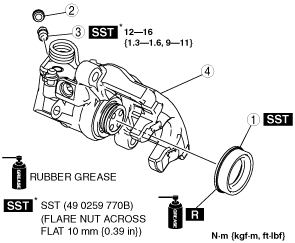
1. Disassemble in the order indicated in the table.
am3zzw00004288
|
|
1
|
Dust seal
(See Dust Seal Assembly Note.)
|
|
2
|
Bleeder cap
|
|
3
|
Bleeder screw
|
|
4
|
Caliper body
|
2. Assemble in the reverse order of disassembly.
Dust Seal Assembly Note
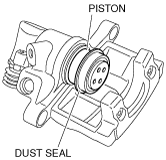
1. While rotating the piston counterclockwise using the SST, pull it out to the position shown in the figure.
am3zzw00004289
|
2. As shown in the figure, assemble a new dust seal to the piston.
am3uuw00001151
|
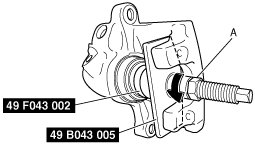
3. Install the SST (49 F043 002) to the SST (49 B043 005).
aaxjjw00003404
|
4. Align the SST projection to the piston groove.
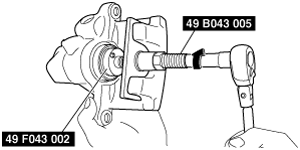
5. Rotate part A on the SST in the direction of the arrow and secure the SST to the caliper.
aaxjjw00003405
|
6. Rotate the SST (49 B043 005) in the direction of the arrow and push the piston completely into the caliper.
aaxjjw00003406
|
7. Rotate part A on the SST (49 B043 005) in the direction of the arrow using the tool and remove the SST from the caliper.
aaxjjw00003407
|
8. Assemble the dust seal to the caliper body using the SSTs and a press with a press-in force of 834 N {85 kgf, 187 lbf}.
am3uuw00000912
|
9. Verify that there is no gap between the dust seal and caliper body.