WINDSHIELD REMOVAL
id091200801300
1. Disconnect the negative battery cable.
2. Remove the following parts:
- (1) Windshield wiper arm and blade (See WINDSHIELD WIPER ARM AND BLADE REMOVAL/INSTALLATION.)
-
- (2) Cowl grille (See COWL GRILLE REMOVAL/INSTALLATION.)
-
- (3) Rearview mirror (See REARVIEW MIRROR REMOVAL/INSTALLATION.)
-
- (4) Rain sensor (Vehicles with auto wiper system) (See RAIN SENSOR REMOVAL/INSTALLATION.)
-
- (5) A-pillar trim (See A-PILLAR TRIM REMOVAL/INSTALLATION.)
-
- (6) Sunvisor (See SUNVISOR REMOVAL/INSTALLATION.)
-
- (7) Map light (See MAP LIGHT REMOVAL/INSTALLATION.)
-
3. Set the headliner out of the way.
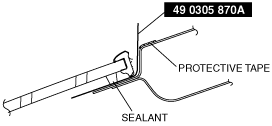
4. Apply protective tape along the edge of the body.
5. Apply protective tape to the dashboard to protect it from damage.
6. Cut the windshield molding lip using a razor.
-
Warning
-
• Using a razor with bare hands can cause injury. Always wear gloves when using a razor.
-
Note
-
• The windshield molding is a replacement part.
• Vehicles with the auto wiper system have a lens sensor which is embedded in the windshield. If the lens sensor has a malfunction, it must be replaced together with the windshield. Since once the rain sensor initial setting has been performed, it cannot be used with any other lens sensor, also replace the rain sensor with a new one.
Not Reusing Windshield
-
Note
-
• For the areas of the sealant that are difficult to cut, use the SST (piano wire) and follow the procedure under “Reusing Windshield”.
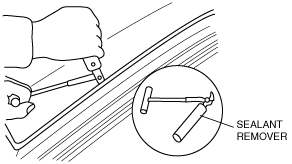
1. Cut out the sealant all around the glass using a sealant remover.
2. Remove the sealant by pulling it off.
3. Remove the windshield.
Reusing Windshield
-
Note
-
• Before removing the windshield from the body, mark the position of the windshield by affixing tape to the windshield and body panel.
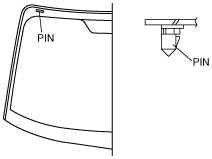
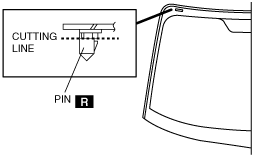
1. Make a hole through the sealant from the inside of the vehicle using an awl, avoiding the pins.
2. Pass the SST (piano wire), cut to sufficient length, through the hole.
-
Warning
-
• Using the SST (piano wire) with bare hands can cause injury. Always wear gloves when using the SST (piano wire).
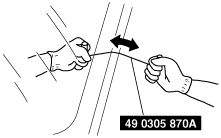
3. Wind each end of the SST (piano wire) around a bar.
-
Note
-
• Use a long sawing action to spread the work over the whole length of the SST (piano wire) to prevent it from breaking due to localized heating.
4. Fix one end of the SST (piano wire), and while pulling the other end, cut the sealant around the windshield.
-
Note
-
• As the upper part of the pin adheres to the sealant, cut it using the SST (piano wire).
5. Cut the pins out.
6. Remove the windshield.
7. Mark the seating positions of the pins and remove the pins from the windshield.
8. Remove the windshield molding from the windshield.