 |
bd62zm00000190
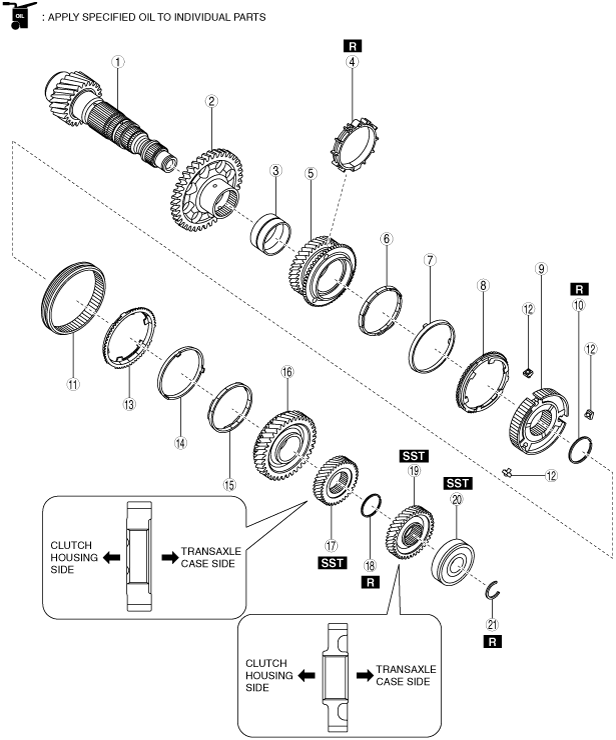
SECONDARY SHAFT NO.1 COMPONENT ASSEMBLY
id051500176300
1. Assemble the secondary shaft component in the order shown in the figure.
bd62zm00000190
|
|
1
|
Secondary shaft No.1
|
|
2
|
Reverse gear
(See Reverse Gear Assembly Note.)
|
|
3
|
Needle bearing
|
|
4
|
Oil fin
|
|
5
|
Secondary 4th gear
|
|
6
|
Inner cone ring (4GR)
|
|
7
|
Middle cone ring (4GR)
|
|
8
|
Synchronizer ring (4GR)
|
|
9
|
Clutch hub
(See Clutch Hub Assembly Note.)
|
|
10
|
Clip
|
|
11
|
Clutch hub sleeve
|
|
12
|
Synchronizer key
|
|
13
|
Synchronizer ring (3GR)
|
|
14
|
Middle cone ring (3GR)
|
|
15
|
Inner cone ring (3GR)
|
|
16
|
Secondary 3rd gear
|
|
17
|
Secondary 6th gear
|
|
18
|
Clip
|
|
19
|
Secondary 5th gear
|
|
20
|
Ball bearing
(See Ball Bearing Assembly Note.)
|
|
21
|
Clip
|
Reverse Gear Assembly Note
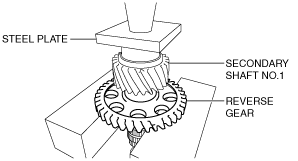
1. Set the secondary shaft No.1 and reverse gear in a press as shown in the figure.
bd62zm00000191
|
2. Assemble the reverse gear using the press.
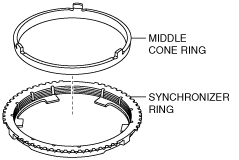
Inner Cone Ring, Middle Cone Ring, Synchronizer Ring (4GR) Assembly Note
1. Assemble the middle cone ring to the synchronizer ring.
bd62zm00000099
|
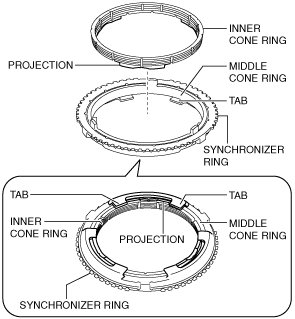
2. Assemble the inner cone ring to the synchronizer ring with the projections of the inner cone ring fit between the tabs of the synchronizer ring as shown in the figure.
bd62zm00000100
|
3. Assemble the synchronizer ring, middle cone ring, and inner cone ring as a single unit to the secondary shaft No.1 component with the projections of the middle cone ring fit to the holes of the secondary 4th gear.
bd62zm00000101
|
4. Verify that the ends of the inner cone ring, middle cone ring, and synchronizer ring are arranged in a flat plane.
Clutch Hub Assembly Note
1. Put the clutch hub on the synchronizer ring.
bd62zm00000102
|
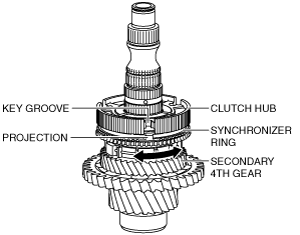
2. By rotating the secondary 4th gear in the drive direction, align the key groove of the clutch hub with the projection of the synchronizer ring and assemble the clutch hub.
bd62zm00000103
|
Clutch Hub Sleeve Assembly Note
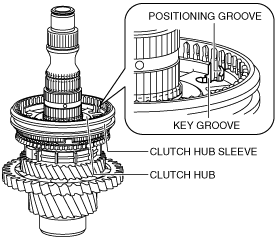
1. Align the positioning groove of the clutch hub sleeve so that it is lined up with the center of the key groove of the clutch hub, and assemble the clutch hub sleeve.
bd62zm00000104
|
Synchronizer Key Assembly Note
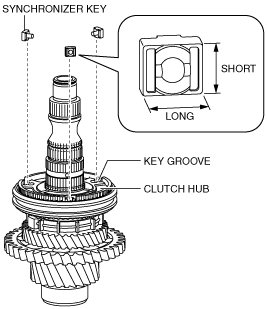
1. Align with the direction of the synchronizer key as shown in the figure, and assemble the clutch hub.
bd62zm00000105
|
2. After the synchronizer key is assembled, verify that the detent ball of the synchronizer key is engaged with the positioning groove of the clutch hub sleeve.
bc61um00000130
|
Synchronizer Ring, Middle Cone Ring, Inner Cone Ring (3GR) Assembly Note
1. Assemble the middle cone ring to the synchronizer ring.
bd62zm00000099
|
2. Assemble the inner cone ring to the synchronizer ring with the projections of the inner cone ring fit between the tabs of the synchronizer ring as shown in the figure.
bd62zm00000100
|
3. Assemble the synchronizer ring, middle cone ring, and inner cone ring as a single unit to the secondary shaft No.1 component with the projections of the synchronizer ring fit to the key groove of the clutch hub.
bd62zm00000106
|
4. Verify that the ends of the inner cone ring, middle cone ring, and synchronizer ring are arranged in a flat plane.
Secondary 3rd Gear Assembly Note
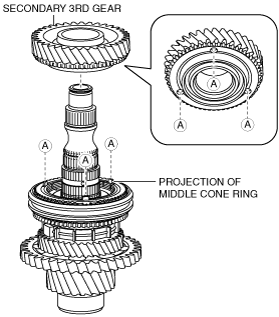
1. Assemble the secondary 3rd gear so that the groove of the secondary 3rd gear and middle cone ring projection are engaged as shown in the figure.
bd62zm00000107
|
Secondary 6th Gear Assembly Note
1. Set the secondary shaft No.1 component, secondary 6th gear and SST in a press as shown in the figure.
bd62zm00000192
|
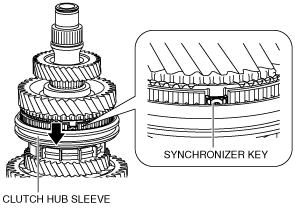
2. Move the clutch hub sleeve in the axial direction while pressing the secondary 4th gear by hand so that it does not move, and verify that the synchronizer key is assembled correctly.
bd62zm00000109
|
3. Assemble the secondary 6th gear using the press.
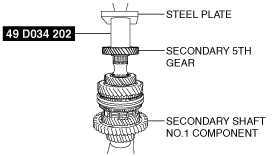
Secondary 5th Gear Assembly Note
1. Set the secondary shaft No.1 component, secondary 5th gear and SST in a press as shown in the figure.
bd62zm00000193
|
2. Assemble the secondary 5th gear using the press.
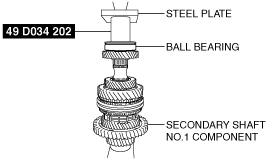
Ball Bearing Assembly Note
1. Set the secondary shaft No.1 component, ball bearing, SST, and an appropriate steel plate in a press as shown in the figure.
bd62zm00000194
|
2. Assemble the ball bearing using the press.
3. Assemble a new clip.