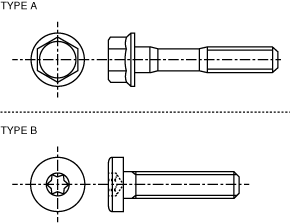
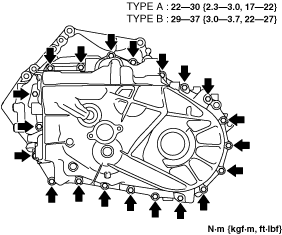
TRANSAXLE ASSEMBLY


id051500177300


Step 1

Note
•  There are two types of transaxle case installation bolts.
bd62zm00000211

1.  Perform the primary shaft and secondary shaft preload adjustment and select a shim of the appropriate thickness. (See BEARING PRELOAD ADJUSTMENT.)

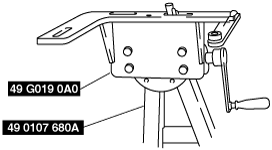
2.  Assemble the SST (49 G019 0A0) to the SST (49 0107 680A).

bd62zm00000205

Bolt used
Part No.: 9YA02 A220 or M12×1.75 length 40 mm {1.6 in}
Tightening torque
88—118 N·m {9.0—12 kgf·m, 65—87 ft·lbf}

3.  Assemble the clutch housing component to the SST.

bd62zm00000157

Bolt A
Part No.: 99450 1055 or M10×1.25 length 55 mm {2.2 in}, and nut (M10×1.25)
Bolt A tightening torque
38—52 N·m {3.9—5.3 kgf·m, 29—38 ft·lbf}
Bolt B
SST (49 G019 003 part of 49 G019 0A0)
Bolt B tightening torque
88—118 N·m {9.0—12 kgf·m, 65—87 ft·lbf}

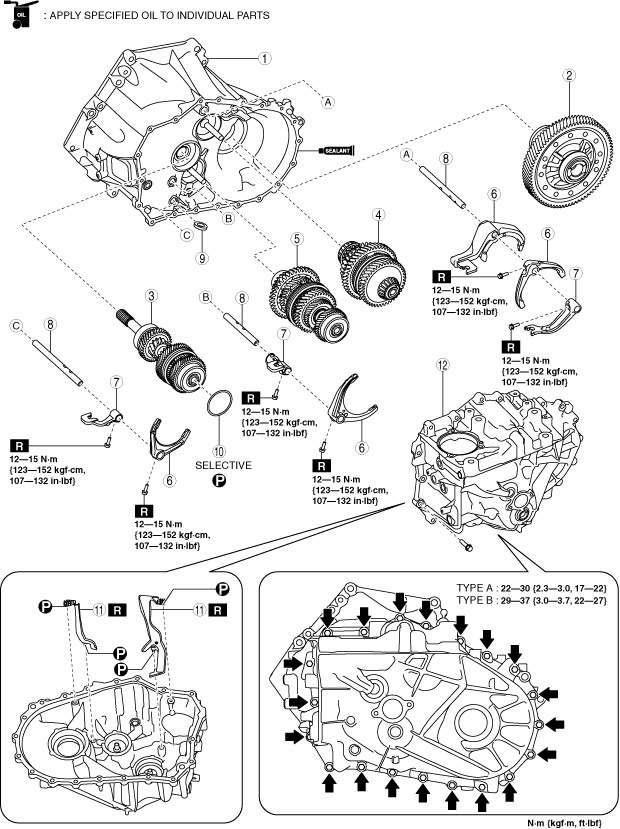
4.  Assemble the MTX in the order shown in the figure.

bd62zm00000158

1
Clutch housing component
2
Differential
3
Primary shaft component
4
Secondary shaft No.2 component
5
Secondary shaft No.1 component
6
Shift fork
7
Shift rod end
8
Shift rod
9
Magnet
10
Shim
11
Oil path
12
Transaxle case component


Differential, Primary shaft component, secondary shaft No.1 component and secondary shaft No.2 component assembly note

•  Perform the following servicing using two people.

1.  Perform the following servicing simultaneously.

bd62zm00000160

(1)  Assemble the secondary shaft No.2 component straight so that it does not contact the funnel.
(2)  Assemble the primary shaft component and secondary shaft No.1 component as a single unit so that they are nestled with the secondary shaft No.2 component.
(3)  Assemble the differential.

2.  Shake the assembled parts and assemble each one completely.


Shift fork, shift rod end, shift rod assembly note

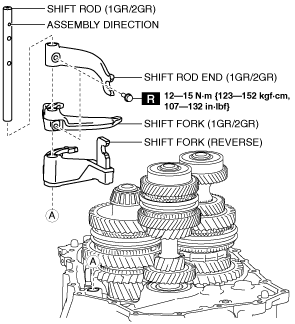
1.  Assemble the shift fork (1GR/2GR) (reverse), shift rod end (1GR/2GR), and shift rod (1GR/2GR) using the following procedure:

bd62zm00000161

(1)  Assemble the shift fork (1GR/2GR) to the clutch hub sleeve (1GR/2GR).
(2)  Assemble the shift fork (reverse) to the clutch hub sleeve (reverse).
(3)  Pass the shift rod through the assembly hole of the shift fork (1GR/2GR).
(4)  Pass the shift rod through the assembly hole of the shift fork (reverse).
(5)  Assemble the shift rod to the clutch housing.
(6)  Pass the shift rod through the assembly hole of the shift rod end.
(7)  Rotate the shift rod so that the pits used for verifying the shift rod assembly direction are aligned with the shift rod end and the bolt insertion area of the shift fork (1GR/2GR).
(8)  Tighten new bolts and secure the shift rod end and the shift fork (1GR/2GR) to the shift rod.

2.  Assemble the shift rod end (5GR/6GR), shift fork (5GR/6GR), and shift rod (5GR/6GR) using the following procedure:

bd62zm00000162

(1)  Assemble the shift fork to the clutch hub sleeve.
(2)  Pass the shift rod through the assembly hole of the shift fork.
(3)  Pass the shift rod through the assembly hole of the shift rod end.
(4)  Assemble the shift rod to the clutch housing.
(5)  Rotate the shift rod so that the pits used for verifying the shift rod assembly direction are aligned with the shift fork end and the bolt insertion area of the shift rod end.
(6)  Tighten new bolts and secure the shift fork and the shift rod end to the shift rod.

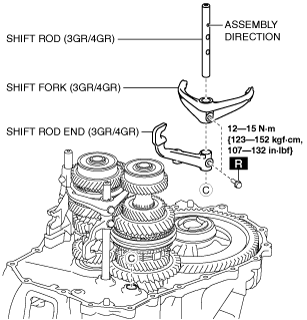
3.  Assemble the shift rod end (3GR/4GR), shift fork (3GR/4GR), and shift rod (3GR/4GR) using the following procedure:

bd62zm00000163

(1)  Assemble the shift fork to the clutch hub sleeve.
(2)  Pass the shift rod through the assembly hole of the shift fork.
(3)  Pass the shift rod through the assembly hole of the shift rod end.
(4)  Assemble the shift rod to the clutch housing.
(5)  Rotate the shift rod so that the pits used for verifying the shift rod assembly direction are aligned with the shift fork end and the bolt insertion area of the shift rod end.
(6)  Tighten new bolts and secure the shift fork and the shift rod end to the shift rod.


Shim, oil path, transaxle case component assembly note

1.  Apply petroleum jelly to the shim to prevent it from falling off, and assemble to the primary shaft component.

bd62zm00000164

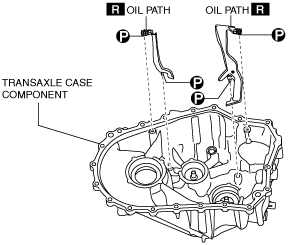
2.  Apply petroleum jelly to the oil path to prevent it from falling off, and assemble to the transaxle case component.

bd62zm00000165

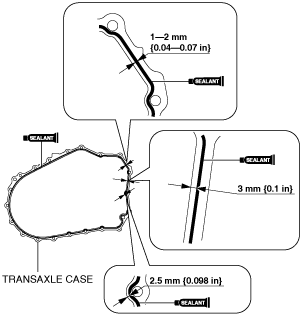
3.  Apply silicone sealant to the transaxle case component as shown in the figure.

bd62zm00000166

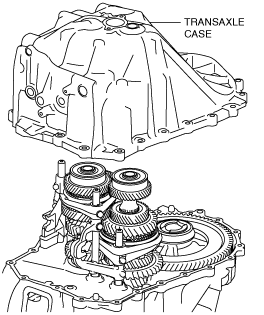
4.  Assemble the transaxle case component.

Caution
•  Assemble the transaxle case component before the applied silicone sealant starts to harden.
(1)  Set the transaxle case.
bd62zm00000167
(2)  Insert the bolt into the service hole of the transaxle case and assemble the bolt to the secondary shaft No.1 component.
bd62zm00000168
Bolt
M12×1.5 length 140 mm {5.51 in}
(3)  Spread the clip using snap ring pliers as shown in the figure to verify that the transaxle case drops slightly under its own weight.
bd62zm00000169
(4)  Lift the bolt assembled to the secondary shaft No.1 component and engage the clip to the ball bearing groove of the secondary shaft No.1 component.
bd62zm00000170
(5)  Tighten the transaxle case installation bolts and assemble the transaxle case component.
bd62zm00000171


Step 2

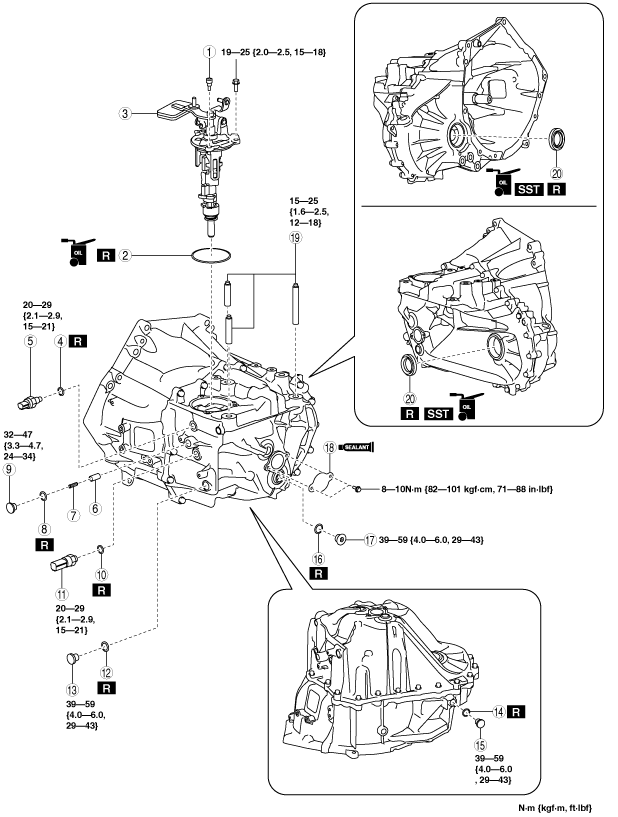
1.  Assemble the parts around the MTX in the order shown in the figure.

bd62zm00000172

1
Breather
2
O-ring
3
Shift control module
4
Gasket
5
Neutral switch
6
Detent ball pin
7
Spring
8
Gasket
9
Plug
10
Gasket
11
Back-up light switch
12
Gasket
13
Oil level plug
14
Gasket
15
Drain plug
16
Gasket
17
Service hole plug
18
Service hole plate
19
Stud bolt
20
Oil seal


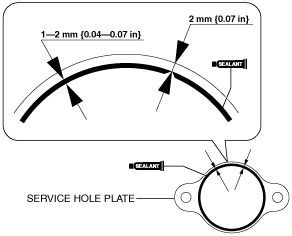
Service hole plate assembly note

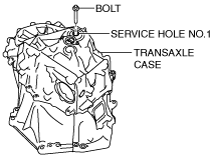
1.  Apply silicone sealant to the service hole plate as shown in the figure.

bd62zm00000173

2.  Assemble the service hole plate.

Caution
•  Assemble the service hole plate before the applied silicone sealant starts to harden.


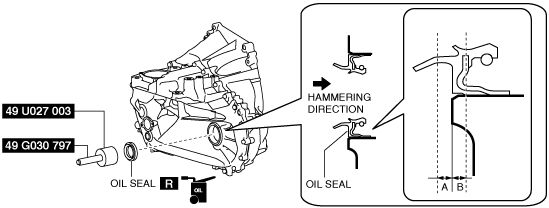
Oil seal assembly note

1.   Assemble a new oil seal (LH) to the transaxle case using the SSTs.

bd62zm00000206

A: 0.3 mm {0.01 in}
B: 0.3 mm {0.01 in}

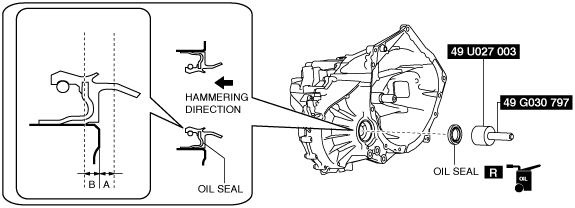
2.   Assemble a new oil seal (RH) to the clutch housing using the SSTs. (2WD)

bd62zm00000207

A: 0.3 mm {0.01 in}
B: 0.3 mm {0.01 in}

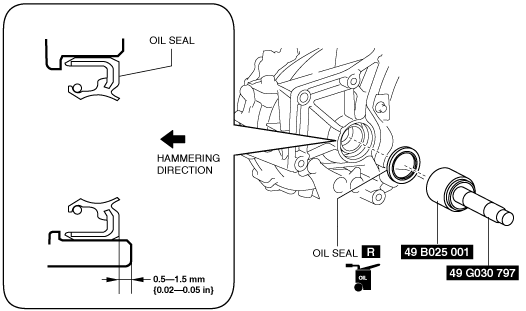
3.   Assemble a new oil seal (RH) to the clutch housing using the SSTs. (4WD)

bd62zm00000208