RECEIVER/DRIER REMOVAL/INSTALLATION
id071100801400
1. Disconnect the negative battery cable. (See NEGATIVE BATTERY CABLE DISCONNECTION/CONNECTION [MZR 1.6].)(See NEGATIVE BATTERY CABLE DISCONNECTION/CONNECTION [SKYACTIV-G 1.5, SKYACTIV-G 2.0, SKYACTIV-G 2.5].)(See NEGATIVE BATTERY CABLE DISCONNECTION/CONNECTION [SKYACTIV-D 1.5].)(See NEGATIVE BATTERY CABLE DISCONNECTION/CONNECTION [SKYACTIV-D 2.2].)
2. Discharge the refrigerant. (See REFRIGERANT CHARGING.)
3. Remove the front under cover No.1. (See FRONT UNDER COVER No.1 REMOVAL/INSTALLATION.)
4. Drain the engine coolant. (See ENGINE COOLANT REPLACEMENT [MZR 1.6].)(See ENGINE COOLANT REPLACEMENT [SKYACTIV-G 1.5, SKYACTIV-G 2.0, SKYACTIV-G 2.5].)(See ENGINE COOLANT REPLACEMENT [SKYACTIV-D 1.5].)(See ENGINE COOLANT REPLACEMENT [SKYACTIV-D 2.2].)
5. Remove the following parts: (MZR 1.6, SKYACTIV-G 1.5, SKYACTIV-G 2.0, SKYACTIV-G 2.5)
- (1) Plug hole plate (See PLUG HOLE PLATE REMOVAL/INSTALLATION [SKYACTIV-G 1.5, SKYACTIV-G 2.0, SKYACTIV-G 2.5].)
-
- (2) Air cleaner, air hose and fresh air duct component (See INTAKE-AIR SYSTEM REMOVAL/INSTALLATION [MZR 1.6].)(See INTAKE-AIR SYSTEM REMOVAL/INSTALLATION [SKYACTIV-G 1.5, SKYACTIV-G 2.0, SKYACTIV-G 2.5].)
-
- (3) Coolant reserve tank (See COOLANT RESERVE TANK REMOVAL/INSTALLATION [MZR 1.6].)(See COOLANT RESERVE TANK REMOVAL/INSTALLATION [SKYACTIV-G 1.5, SKYACTIV-G 2.0, SKYACTIV-G 2.5].)
-
- (4) Cooling fan component (See COOLING FAN MOTOR REMOVAL/INSTALLATION [MZR 1.6].)(See COOLING FAN MOTOR REMOVAL/INSTALLATION [SKYACTIV-G 1.5, SKYACTIV-G 2.0, SKYACTIV-G 2.5].)
-
- (5) Radiator (See RADIATOR REMOVAL/INSTALLATION [MZR 1.6].)(See RADIATOR REMOVAL/INSTALLATION [SKYACTIV-G 1.5, SKYACTIV-G 2.0, SKYACTIV-G 2.5].)
-
6. Remove the following parts: (SKYACTIV-D 1.5, SKYACTIV-D 2.2)
- (1) Engine cover (See ENGINE COVER REMOVAL/INSTALLATION [SKYACTIV-D 1.5].)(See ENGINE COVER REMOVAL/INSTALLATION [SKYACTIV-D 2.2].)
-
- (2) Air cleaner, air hose and fresh air duct component (See INTAKE-AIR SYSTEM REMOVAL/INSTALLATION [SKYACTIV-D 1.5].)(See INTAKE-AIR SYSTEM REMOVAL/INSTALLATION [SKYACTIV-D 2.2].)
-
- (3) Coolant reserve tank (See ENGINE COOLANT RESERVE TANK REMOVAL/INSTALLATION [SKYACTIV-D 1.5].)(See COOLANT RESERVE TANK REMOVAL/INSTALLATION [SKYACTIV-D 2.2].)
-
- (4) Cooling fan component (See COOLING FAN MOTOR REMOVAL/INSTALLATION [SKYACTIV-D 1.5].)(See COOLING FAN MOTOR REMOVAL/INSTALLATION [SKYACTIV-D 2.2].)
-
- (5) Radiator (See ENGINE RADIATOR REMOVAL/INSTALLATION [SKYACTIV-D 1.5].)(See RADIATOR REMOVAL/INSTALLATION [SKYACTIV-D 2.2].)
-
- (6) Remove the water-cooled charge air cooler radiator. (SKYACTIV-D 1.5)(See WATER-COOLED CHARGE AIR COOLER RADIATOR REMOVAL/INSTALLATION [SKYACTIV-D 1.5].)
-
7. Remove the condenser. (See CONDENSER REMOVAL/INSTALLATION.)
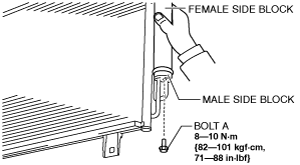
8. Disconnect the block joint type pipes by grasping the female side of the block with a hand firmly, then loosen connection bolt A.
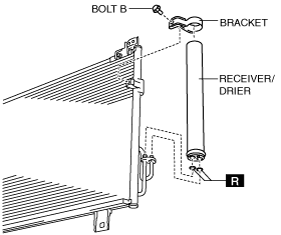
9. Remove bolt B.
10. Remove the bracket.
11. Remove the receiver/drier. Do not allow compressor oil to spill.
-
Caution
-
• If moisture or foreign matter enters the refrigeration cycle, cooling ability will be lowered and abnormal noise will occur. Always immediately plug all open fittings after removing any refrigeration cycle parts to keep moisture or foreign matter out of the cycle.
12. Install in the reverse order of removal.
13. Inspect for engine coolant leakage. (See ENGINE COOLANT LEAKAGE INSPECTION [MZR 1.6].)(See ENGINE COOLANT LEAKAGE INSPECTION [SKYACTIV-G 1.5, SKYACTIV-G 2.0, SKYACTIV-G 2.5].)(See ENGINE COOLANT LEAKAGE INSPECTION [SKYACTIV-D 1.5].)(See ENGINE COOLANT LEAKAGE INSPECTION [SKYACTIV-D 2.2].)
14. Perform the refrigerant system performance test. (See REFRIGERANT SYSTEM PERFORMANCE TEST.)
Receiver/drier Installation Note
1. After replacing the receiver/drier, add compressor oil to the refrigeration cycle.
-
Supplemental oil amount (approx. quantity)
-
2 ml {2 cc, 0.1 US fl oz}