 |
am3zzw00018124
SUPPLIER IDENTIFICATION PROCEDURE [AUDIO UNIT]
id09021q803800
Identification With the Label
1. Disconnect the negative battery cable. (See NEGATIVE BATTERY CABLE DISCONNECTION/CONNECTION [SKYACTIV-G 1.5, SKYACTIV-G 2.0, SKYACTIV-G 2.5].) (See NEGATIVE BATTERY CABLE DISCONNECTION/CONNECTION [SKYACTIV-D 1.5].) (See NEGATIVE BATTERY CABLE DISCONNECTION/CONNECTION [SKYACTIV-D 2.2].) (See NEGATIVE BATTERY CABLE DISCONNECTION/CONNECTION [MZR 1.6].)
2. Remove the glove compartment. (See GLOVE COMPARTMENT REMOVAL/INSTALLATION.)
3. Remove the decoration panel. (See DECORATION PANEL REMOVAL/INSTALLATION.)
4. Remove the audio unit. (See AUDIO UNIT REMOVAL/INSTALLATION.)
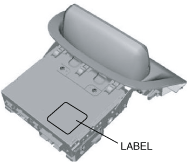
5. Verify the supplier name by referring to the label attached to the unit.
am3zzw00018124
|
Verify Using the Diagnostic Assist Function
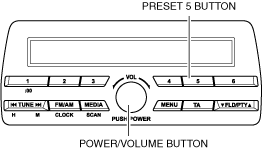
1. Switch the ignition to ACC or ON (engine off or on).
2. While pressing the POWER/VOLUME button, press PRESET 5 button for 3 s or more.
am3zzw00018125
|
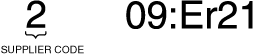
3. Identify the supplier code by referring to the display.
am3zzw00018126
|
|
Supplier code |
Supplier name |
|---|---|
|
01
|
—
|
|
02
|
Panasonic
|
|
03
|
CLARION
|
|
04
|
PIONEER
|
|
05
|
Visteon
|
|
06
|
DESAY
|
am3zzw00018127
|
4. Switch the ignition off to end the diagnostic assist function.