 |
belbze00000203
CYLINDER BLOCK ASSEMBLY (II)
id011000504100
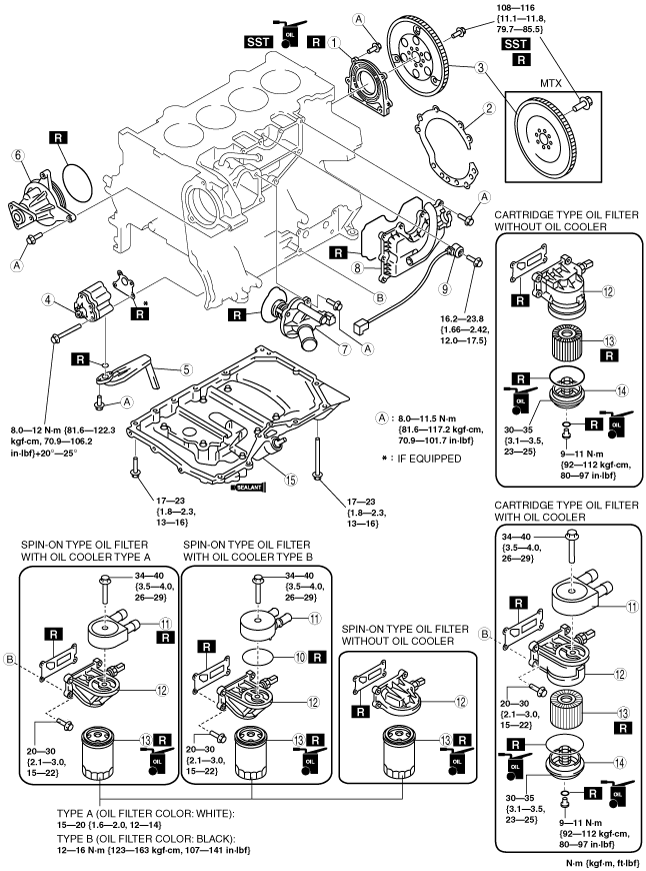
1. Assemble in the order indicated in the table.
belbze00000203
|
|
1
|
Rear oil seal
|
|
2
|
End plate (MTX)
|
|
3
|
Flywheel (MTX), Drive plate (ATX)
|
|
4
|
Oil pump
|
|
5
|
Oil strainer
|
|
6
|
Water pump
|
|
7
|
Thermostat
|
|
8
|
Oil separator
|
|
9
|
Knock sensor
|
|
10
|
Gasket
(See Gasket Assembly Note)
|
|
11
|
Oil cooler
|
|
12
|
Oil filter adapter
|
|
13
|
Oil filter
|
|
14
|
Oil filter cover (cartridge type)
|
|
15
|
Oil pan
(See Oil pan Assembly Note)
|
Rear Oil Seal Assembly Note
1. Apply clean engine oil to the new oil seal lip.
2. Install the SST to the non-woven fabric side of the rear oil seal.
belbze00000070
|
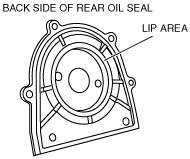
3. From the back side of the rear oil seal, verify that there is no damage or separation in the lip area of the rear oil seal.
belbze00000071
|
4. Install the rear oil seal to the engine.
5. Tighten the rear oil seal bolts in the order as shown in the figure. (Except TRIBUTE (L.H.D.) Face-lifted model.)
bel8je00000077
|
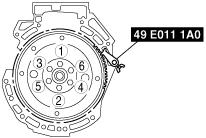
Drive Plate (ATX), Flywheel (MTX) Assembly Note
1. Hold the crankshaft using the SST.
2. Tighten the bolts in the 3 steps in the figure.
bel8je00000078
|
Gasket Assembly Note
1. Apply engine oil to a new gasket.
2. Align the gasket lip to the gasket positioning areas of the oil cooler and assemble the gasket to the oil cooler.
am5uuw00002988
|
Oil Cooler Type B Assembly Note
1. Align one of the positioning tabs on the oil cooler as shown in the figure to the oil filter adapter hole, and install the oil cooler.
amxuuw00002246
|
am5uuw00002985
|
Oil Filter (Spin-on type) Assembly Note
1. Tighten the oil filter according to the instructions on the package or side of the oil filter.
Oil pan Assembly Note
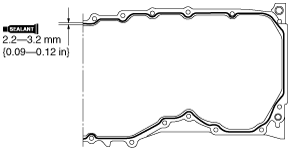
1. Apply a continuous bead of silicone sealant to the oil pan as indicated in the figure.
belbze00000207
|
2. Use a square ruler to unite the oil pan and the cylinder block junction side on the engine front cover side.
belbze00000075
|
3. Tighten the rear oil pan bolts in the order as shown in the figure.
belbze00000076
|