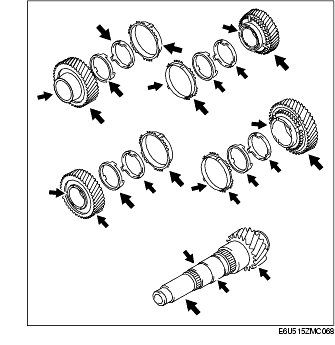
SECONDARY SHAFT (NO.1) COMPONENTS INSPECTION
D6E051517040106
Synchronizer ring, Secondary Shaft (No.1) and Gear Inspection
1. Inspect the shaft for damage, abnormal wear, dents, flaking, or bending.
-
• If there is any malfunction, replace the shaft.
2. Inspect the gears for damage, abnormal wear, dents, flaking, or bending.
-
• If there is any malfunction, replace the gear.
3. Inspect the synchronizer ring teeth and each rings for damage, abnormal wear, and cracks.
-
• If there is a malfunction, replace the ring.
4. Inspect the tapered surface for abnormal wear and cracks.
-
• If there is a malfunction, replace parts as necessary.
5. Inspect the oil passage for clogging.
-
• If there is a malfunction, replace parts as necessary.
Clutch Hub Component Inspection
1. Verify that the clutch hub sleeve and clutch hub move smoothly.
-
• If there is any malfunction, replace parts if necessary.
Synchronizer Ring Clearance Inspection
1. Set the synchronizer ring evenly in the gear, and measure the clearance between the synchronizer ring and flank surface of the gear all around the circumference using a feeler gauge.
-
Synchronizer ring clearance
(mm {in})
|
Gear
|
Clearance
|
|
1st
|
0.98-1.82 {0.0386-0.0716}
|
|
2nd
|
1.08-1.92 {0.0426-0.0755}
|
|
3rd
|
1.00-2.00 {0.0394-0.0787}
|
|
4th
|
0.92-1.88 {0.0363-0.0740}
|
• If not within the specification, replace the synchronizer ring set.
Bearing Inspection
1. Verify that the bearing rotates smoothly.
-
• If there is any malfunction, replace the bearing.
Clutch Hub Sleeve and Shift Fork Inspection
1. Measure the shift fork thickness and the groove width of the clutch hub sleeve with a vernier caliper, and calculate the clearance.
-
Clutch hub sleeve and shift fork clearance
(mm {in})
|
Gear
|
Clearance
|
|
1st/2nd
|
0.10-0.50 {0.0039-0.0196}
|
|
3rd/4th
|
-
• If not within the specification, replace the clutch hub sleeve and shift fork.
