HIGH PRESSURE FUEL PUMP REMOVAL/INSTALLATION [MZR 2.0 DISI i-stop]
id0114b9801400
-
Caution
-
• Do not disassemble the high pressure fuel pump.
• Do not scratch or damage the fuel sealing surface of the high and low fuel ports.
• When removing the high pressure fuel pipe, secure the joint (pump side) so that it dose not rotate, and loosen the screw (pipe side).
• Fuel is very flammable liquid. If fuel spills or leaks from the pressurized fuel system, it will cause serious injury or death and facility breakage. Fuel can also irritate skin and eyes. To prevent this, always complete the “Fuel Line Safety Procedure”, while referring to the “BEFORE SERVICE PRECAUTION”.
• A person charged with static electricity could cause a fire or explosion, resulting in death or serious injury. Before draining fuel, make sure to discharge static electricity by touching the vehicle body.
-
Note
-
• If the high pressure fuel pump is removed, replace the O-ring with a new one.
1. Complete the “BEFORE SERVICE PRECAUTION”. (See BEFORE SERVICE PRECAUTION [MZR 2.0 DISI i-stop].)
2. Remove the battery cover. (See BATTERY REMOVAL/INSTALLATION [MZR 2.0 DISI i-stop].)
3. Disconnect the negative battery cable. (See BATTERY REMOVAL/INSTALLATION [MZR 2.0 DISI i-stop].)
4. Disconnect the quick release connector on the high pressure fuel pump. (See QUICK RELEASE CONNECTOR REMOVAL/INSTALLATION [MZR 2.0 DISI i-stop].)
5. Remove the battery and battery tray. (SeeBATTERY REMOVAL/INSTALLATION [MZR 2.0 DISI i-stop].)
-
Warning
-
• If the high pressure fuel pump joint nut is loosened, fuel leakage may occur resulting in death or serious injury, or damage to the equipment or the vehicle. Fuel can also irritate the skin and eyes. When removing the high pressure line pipe, always tighten the high pressure line pipe installation nut while fixing the high pressure fuel pump joint nut with a wrench. If the high pressure fuel pump joint nut has rotated, replace the high pressure fuel pump with a new one.
6. Disconnect the high pressure line pipe of the high pressure fuel pump.
- (1) Fix the joint nut with a wrench on the high pressure fuel pump side as shown in the figure.
- (2) Loosen the high pressure line pipe installation nut.
7. Drain engine coolant. (See ENGINE COOLANT REPLACEMENT [MZR 2.0 DISI i-stop].)
8. Loosen the water outlet case installation bolts securing the high pressure line pipe.
9. Remove the following part:
-
• High pressure fuel pump
• Tension collar
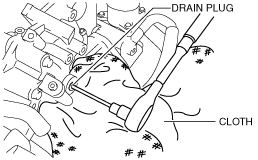
10. Perform the following procedure when removing the high pressure fuel pump cover.
- (1) Remove the drain plug and drain the engine oil accumulated in the high-pressure fuel pump cover.
-
-
Note
-
• 20—30 ml {20—30 cc, 1.3—1.8 cu in} of engine oil will drain out when the plug is removed so put a cloth under the drain plug beforehand.
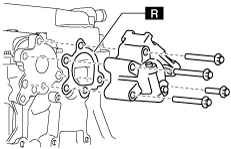
- (2) Remove the high pressure fuel pump cover.
-
- (3) Install the high pressure fuel pump cover.
-
- 1) Apply the silicone sealant to the contact surfaces of the camshaft cap and cylinder head.
-
- 2) Tighten the high pressure fuel pump cover bolts.
-
-
Tightening torque
-
17—23 N·m {1.8—2.3 kgf·m, 13—16 ft·lbf}
- 3) Apply the silicone sealant to the drain plug.
- 4) Tighten the drain plug.
-
-
Tightening torque
-
12—17 N·m {123—173 kgf·cm, 107—150 in·lbf}
-
Caution
-
• If the high pressure fuel pump installation bolts are tightened with the high pressure fuel pump tilted, the high pressure fuel pump may not operate correctly. Tighten the high pressure fuel pump installation bolts in a few passes with equal torque.
11. Tighten the bolts on the high pressure fuel pump.
-
Tightening torque
-
9—11 N·m {92—112 kgf·cm, 80—97 in·lbf}
-
Warning
-
• If the high pressure fuel pump joint nut is loosened, fuel leakage may occur resulting in death or serious injury, or damage to the equipment or the vehicle. Fuel can also irritate the skin and eyes. When installing the high pressure line pipe, always tighten the high pressure line pipe installation nut while fixing the high pressure fuel pump joint nut with a wrench. If the high pressure fuel pump joint nut has rotated, replace the high pressure fuel pump with a new one.
12. Assemble the high pressure line pipe.
- (1) Fix the joint nut with a wrench on the high pressure fuel pump side as shown in the figure.
- (2) Tighten the high pressure line pipe installation nut.
-
-
Tightening torque
-
24—35 N·m {2.5—3.5 kgf·m, 18—25 ft·lbf}
13. Tighten the water outlet case installation bolts.
-
Tightening torque
-
8—11 N·m {82—112 kgf·cm, 71—97 in·lbf}
14. Install the quick release connector. (See QUICK RELEASE CONNECTOR REMOVAL/INSTALLATION [MZR 2.0 DISI i-stop].)
15. Complete the “AFTER SERVICE PRECAUTION”. (See AFTER SERVICE PRECAUTION [MZR 2.0 DISI i-stop].)
16. Complete the “Fuel leakage inspection after high pressure fuel pump installation”. (See Fuel Leakage Inspection After High Pressure Fuel Pump Installation.)
Fuel Leakage Inspection After High Pressure Fuel Pump Installation
1. Verify that the high pressure fuel pump is assembled securely.
2. Drive the vehicle starting from a standstill and brake suddenly five to six times at a low speed.
3. Stop the vehicle and verify from outside the vehicle that there is no fuel leakage around the high pressure fuel pump.